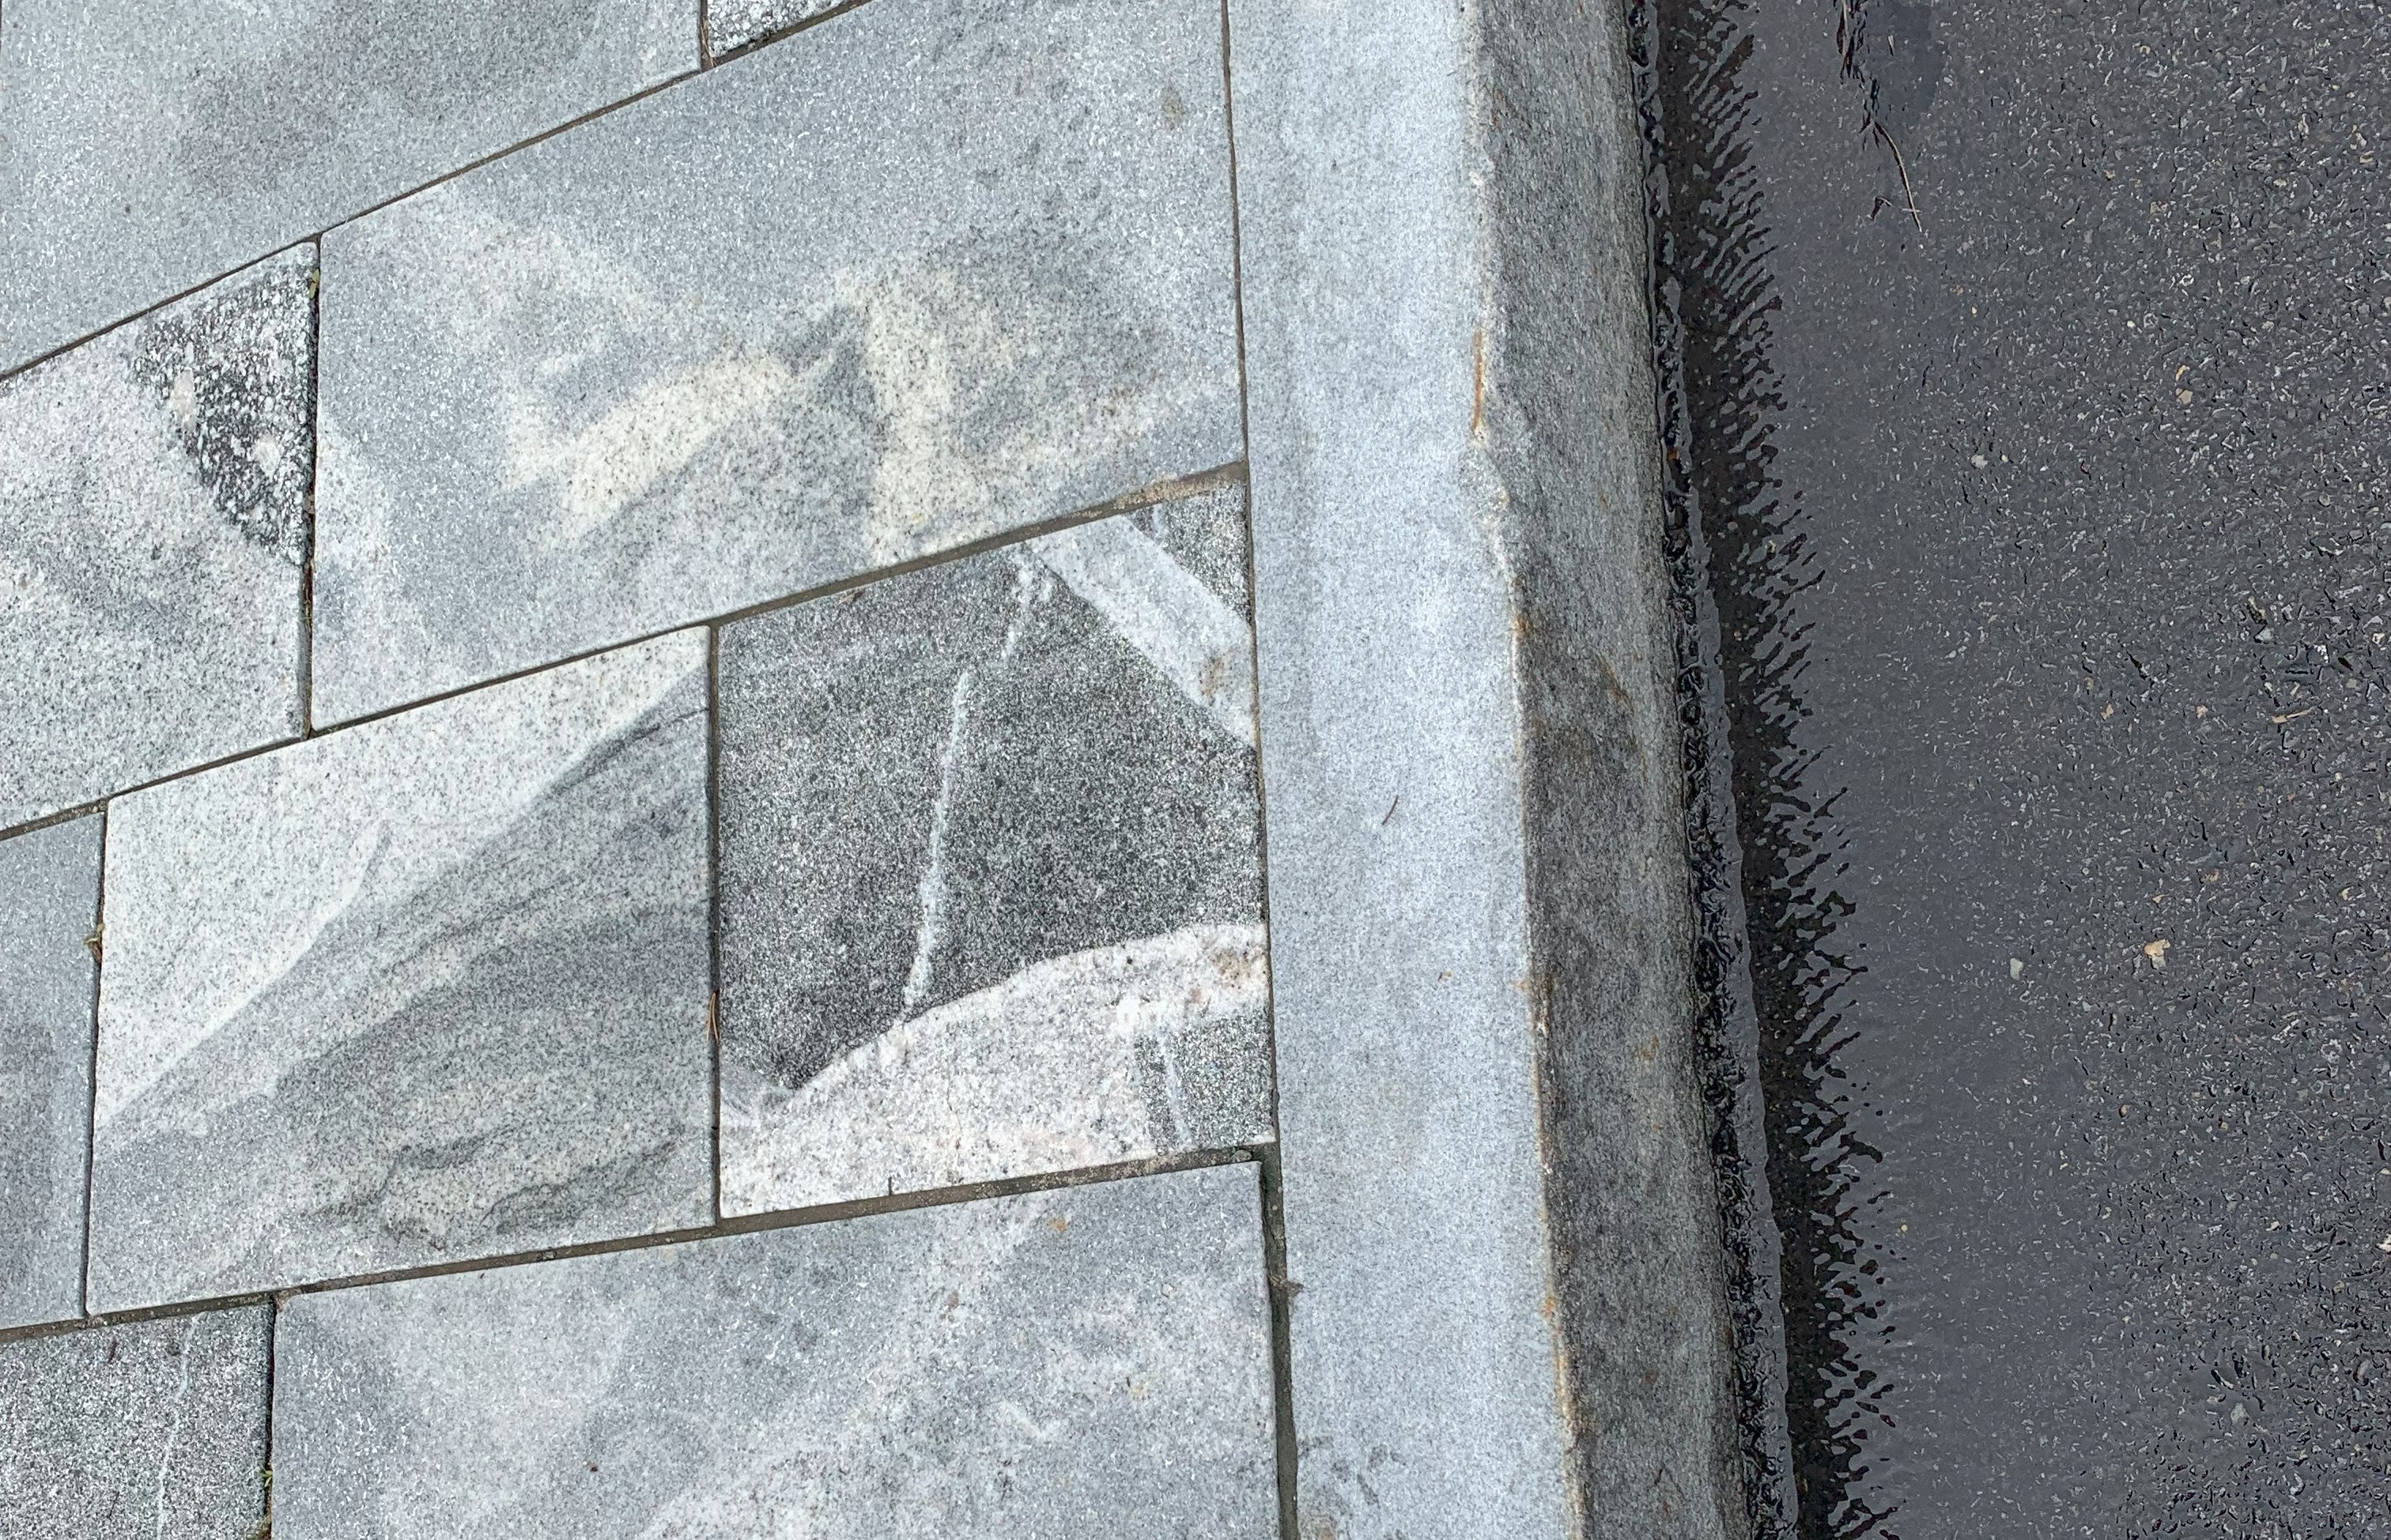
One thing I’ve noticed about upstate New York is that they have some really nice curbs.
Stone sidewalk and curb, Lake Placid, New York
I first noticed the curbs on a college campus in Geneva, New York. They’re great components of the college landscape – granite, durable, long-lasting, probably hold up really well to the snowplows that I imagine are regularly operating in that gray, snowy place. Actually, I’m pretty sure the orange streaks on the stone are rust stains from the snowplows that scrape these curbs each winter.
Stone curb with rust stains, Geneva, New York
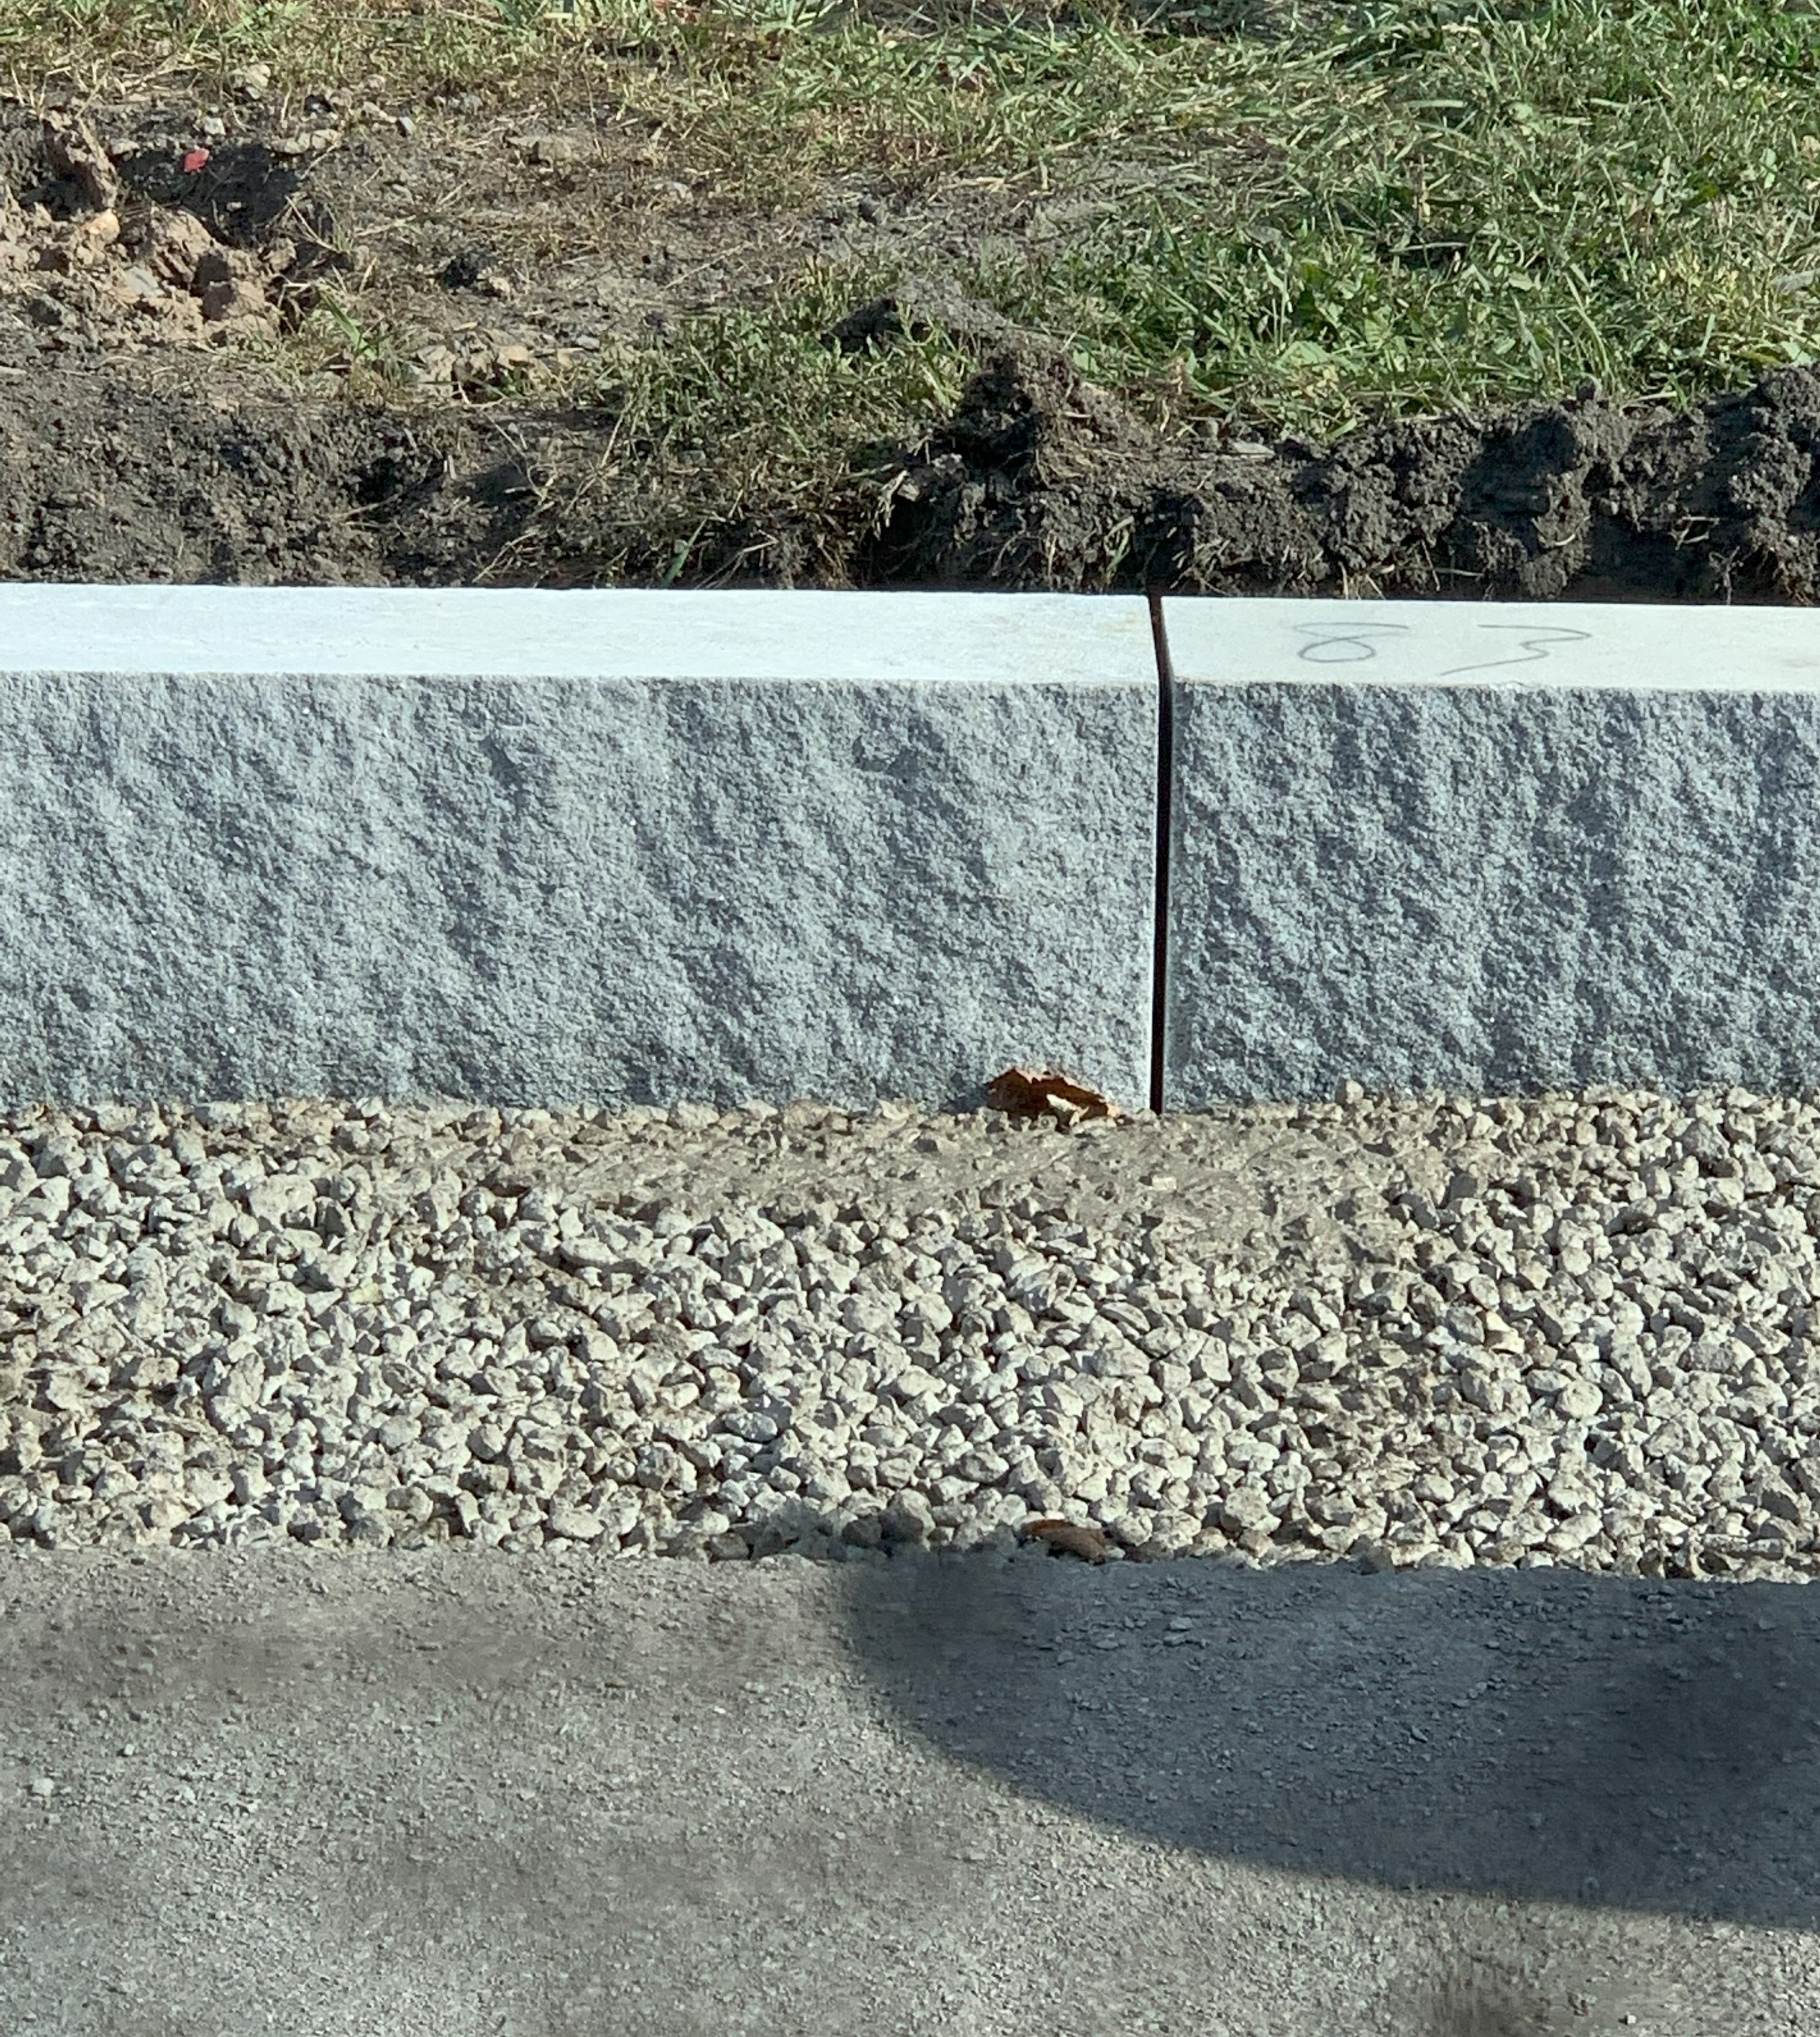
I figured that the granite curb was a campus standard, so I was a bit surprised when I noticed the same curb in nearby downtown Geneva, and then I really couldn’t believe it when I saw the curb design again on the side of some little state highway near a new strip mall and big box retail development in the middle of nowhere in the Finger Lakes region in New York. Apparently, the New York State Department of Transportation has the nicest design standards for curbs that I’ve ever seen for highway use, and it looks like the college campus decided to go with that standard.
New stone curb being installed, near Seneca Falls, New York
I’ve encountered some terrible curbs in Denver, where I live, including at one decaying median with disintegrated curb with a corroded rebar sticking out on a busy US highway that runs through south Denver. More typically, I see unreinforced concrete curbs cut up by snowplows and work trucks. No orange streaks of rust staining on these – the concrete seems to just get scraped off.
Damaged concrete curb, Denver, Colorado
Over time, the concrete disintegrates.
Detail of damaged concrete curb, Denver, Colorado
A big piece of granite will last a lot longer than a chunk of cast-in-place concrete. This natural stone material will cost more than concrete, but stone curbs may not cost more in labor than concrete curbs do, and labor costs these days are really something to consider. The granite will look better, year after year, even under harsh conditions that seriously damage other materials.
The old quality-time-cost dynamic is at play in the stone curb vs. concrete curb design question. We rarely get good quality, with fast construction time, with low cost. Something can be built well – good quality – but it’ll cost more and may take more time than producing something of lesser quality. Something can be built quickly, but compared to something built on a more typical schedule, it will either cost more or be of lesser quality, or both. Something can be built cheaply, but the quality is likely to be poor.
For me, quality always includes durability – effectiveness and appearance over the long term. A higher-initial-cost, more durable building component can cost less in the long run, because of lower maintenance costs over its service life. Durable building components almost certainly look better over the long term, too. With cheap materials, there is often a period of time after their beauty has been exhausted but before they have been replaced, during which they are unbearable to look at. Durable things age gracefully. The beauty of an object, whether it’s part of a building, a piece of furniture, a good quality leather bag, or even a curb on the side of the road, is an incentive to keep and properly maintain the thing so that it continues to serve its purpose. Those nice curbs last long, look good for decades, maybe centuries, even when scraped by snowplows, and therefore probably cost less in the long run. Win-win-win.
I recently stayed at a historic hotel a few states away. It’s a very historic hotel – over 130 years old, and a designated historic landmark. The framing of the grand old building is all wood. I don’t know exactly what is under the finished floors in the guest rooms, but I do know that wood framing and wood subfloor are among the components in there.
Our bathroom had large-format natural stone tile – about 12 inches by 24 inches – probably not “period” – and also not very old. Based on a few facts that I know from staying there several times over the last half century, and a long-held interest in the building, my best guess is that the large-format stone tile on our bathroom floor had been installed just over 15 years ago.
The stuff is thick – 3/8-inch to 1/2-inch thick, if the base and wall tile are the same as the floor tile – and it appears to be natural marble.
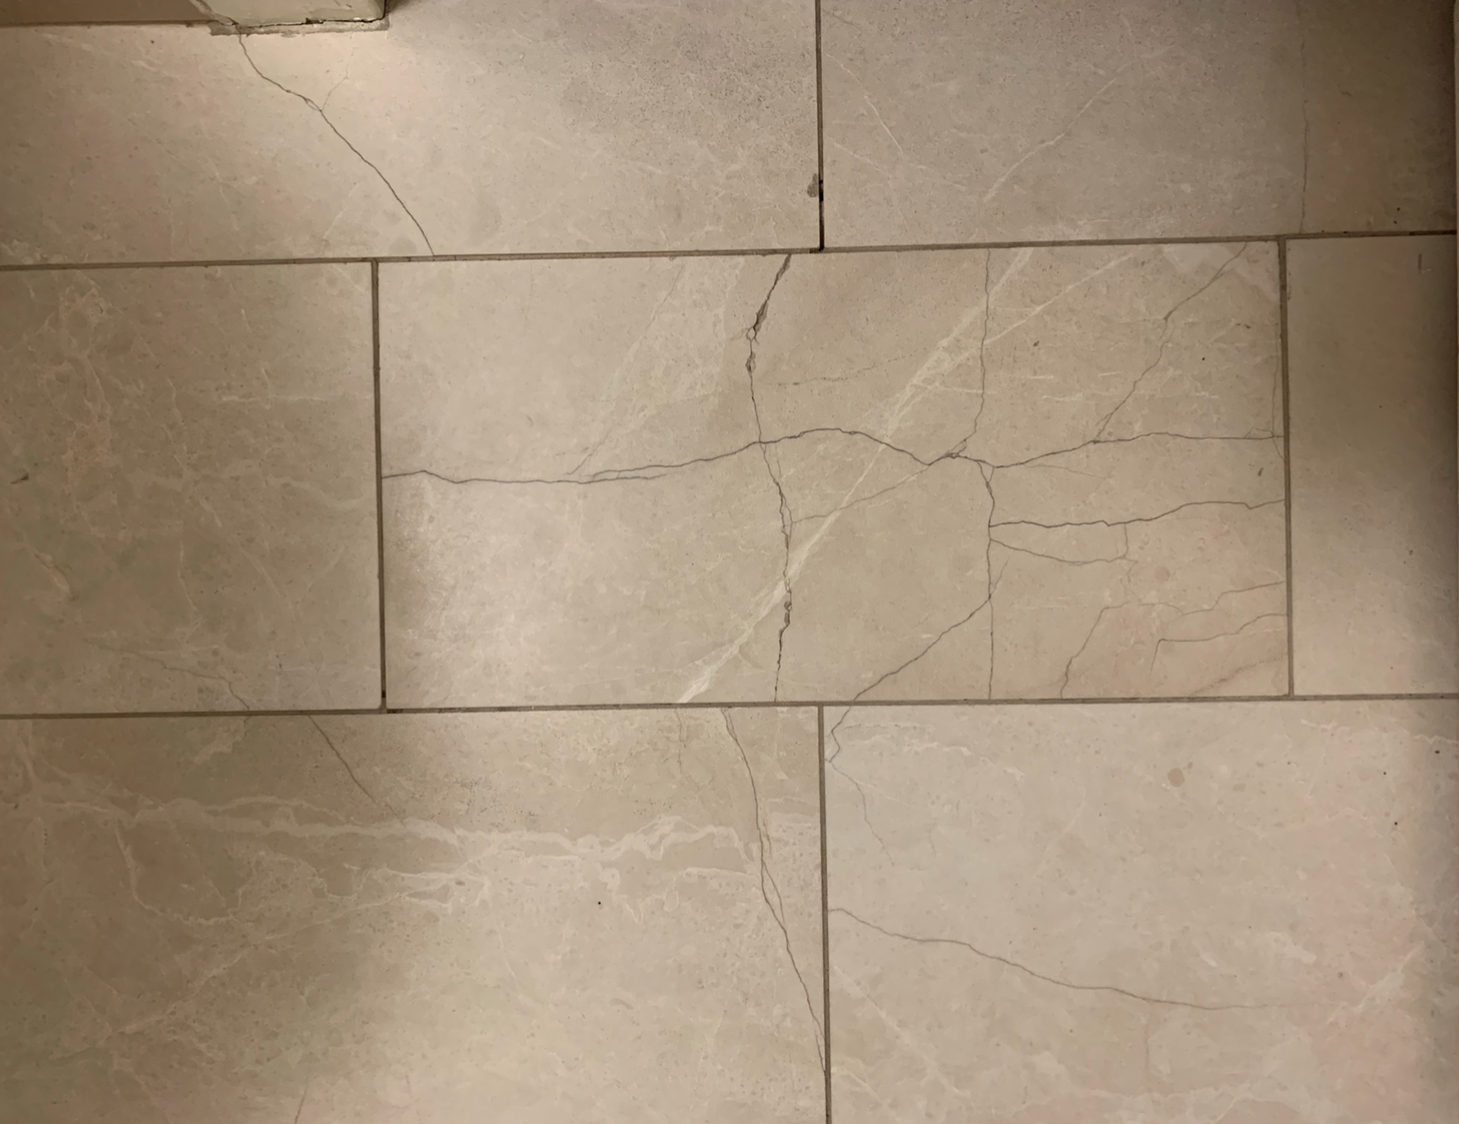
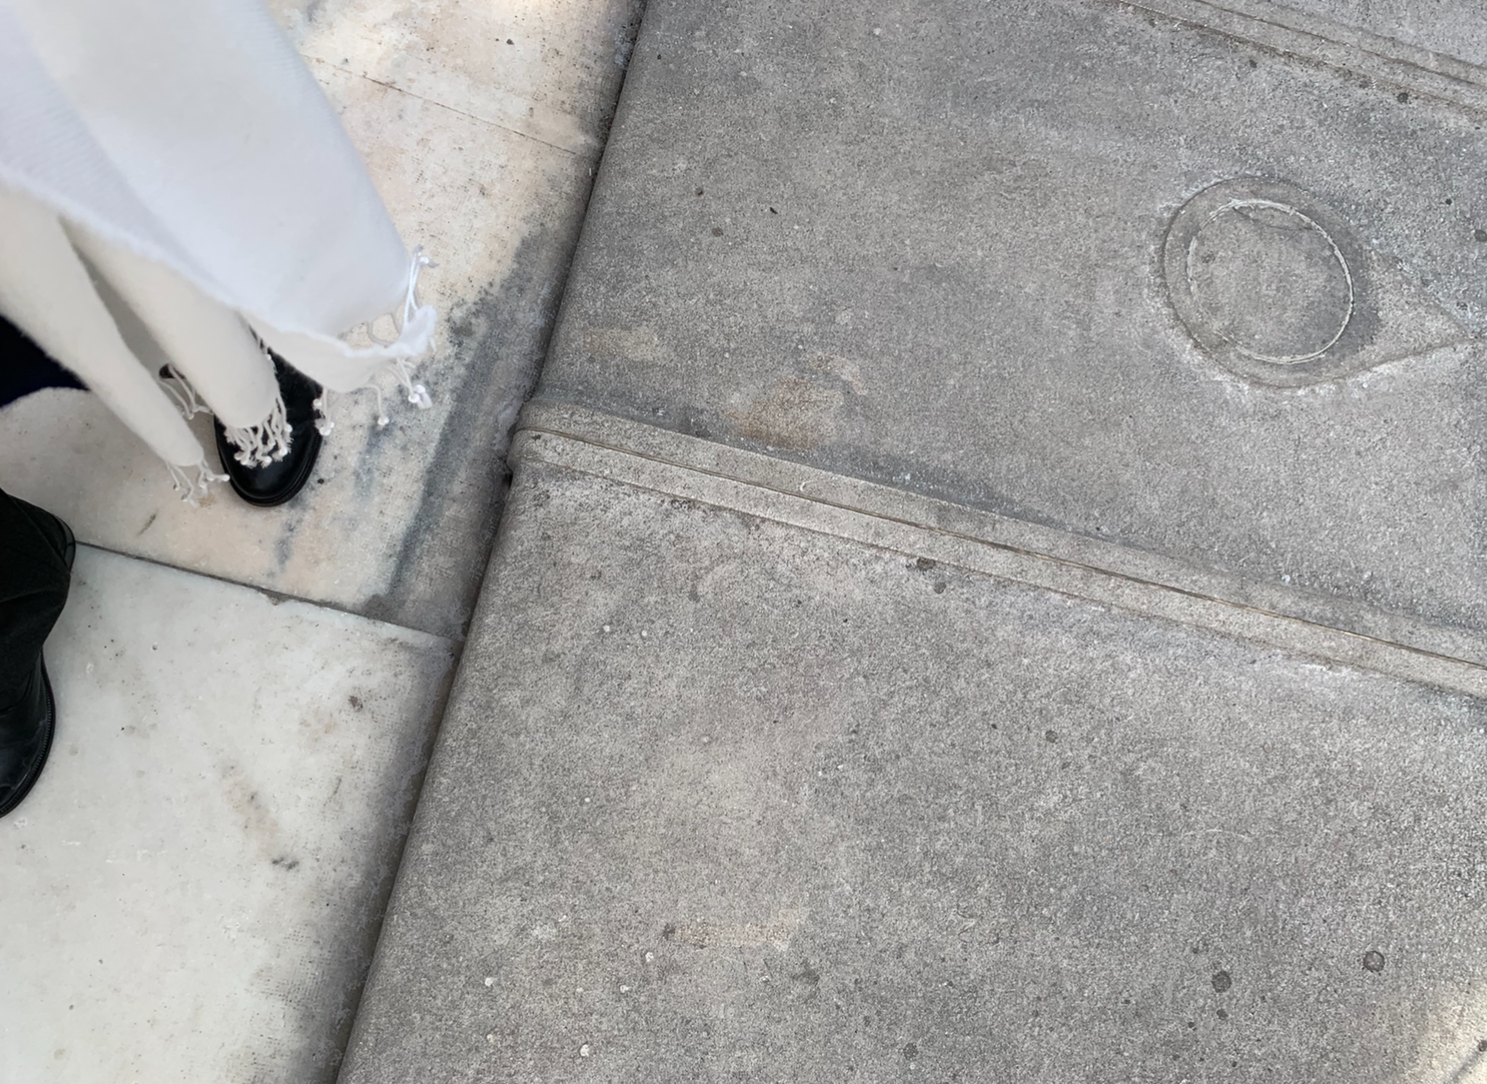
And it’s cracked, in multiple places. And multiple bathrooms on the same floor also have cracked floor tile.
Cracked large-format marble floor tile, hotel bathroom. Photo by Liz O’Sullivan
The stuff under this tile is probably the reason for the cracking. I’m not exactly sure what’s under there besides the wood framing and the wood subfloor, but one thing I do know for sure is that there is barely a single level or flat hallway floor or guest room floor in the hotel. More importantly, some of the floors feel a bit… flexible.
Levelness isn’t a big issue – tile can be installed on ramps, after all. (Our bathroom floor was a bit like a ramp, by the way, noticeably sloping from the door to the back wall. Ah, the charm of an old hotel.)
But my perception of flatness… that is an issue for the substrate under large-format tile. And the flexing in the floor that I felt when I walked down the hall or across my guest room? That is definitely not good under tile. This flexing is probably at the root of the cracking issue. Deflection is an important thing to address for floors which are to receive tile.
Now, I bet that some measures had been taken with the preparation of the substrates for tile so that they weren’t as flexible or unlevel as they are elsewhere in the building. The tile floors certainly didn’t feel flexible or unflat. But… those tiles cracked, after installation. So my guess is that the measures weren’t quite enough.
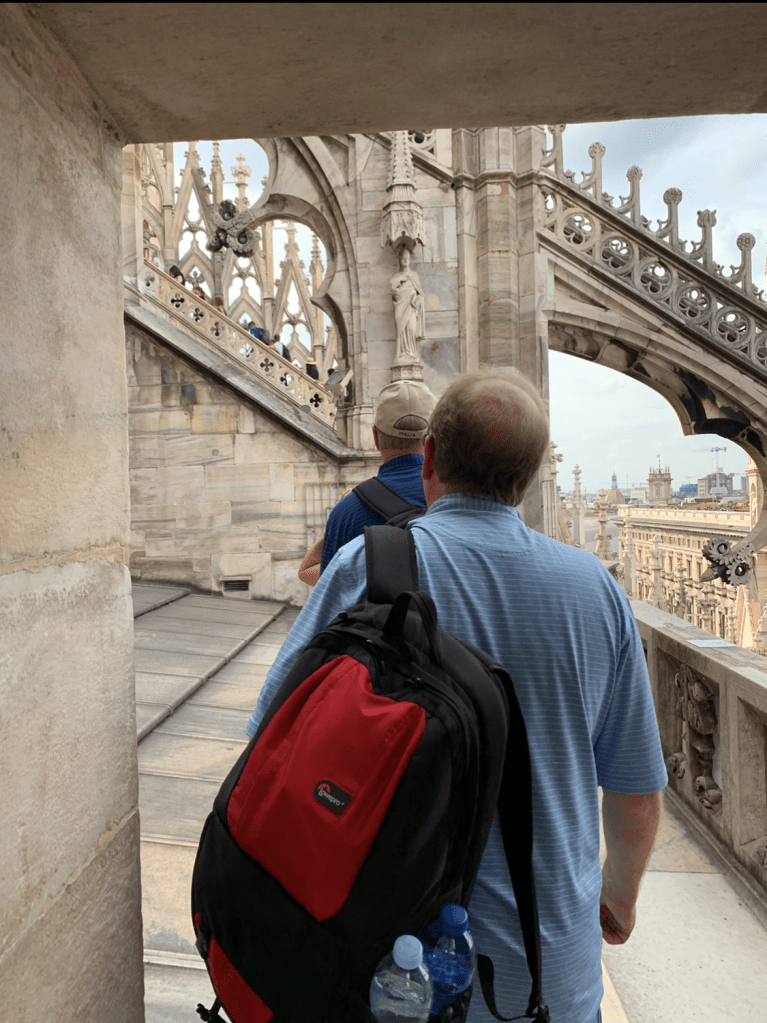
Obviously humans have been walking on marble for ages – even on thin marble such as tile. The astonishing roof terraces of the Duomo in Milan, Italy, are paved in marble, and any ambulatory person who can get up there (via elevator or stairs) can walk around the roof terraces, on the marble pavers, and even on the sloped marble roof tiles.
Duomo Roof Terraces, Milan, Italy, September 2019. Photos by Liz O’Sullivan
I don’t know what’s under the Duomo rooftop pavers and tiles. (Wouldn’t that be a fabulous tour – the attic of the Duomo?) But I do know that a different substrate installation than what is existing might have helped prevent the cracking of the hotel bathroom floor tile. And my opinion is that if the existing conditions were such that not enough could have been done to create an appropriate substrate for large-format natural stone tile, perhaps a different finish should have been selected for those hotel bathroom floors.
The construction industry has installation guidelines for so many parts of buildings. Manufacturers of specific products and assemblies have their own published installation instructions, and proper installation is often tied to warranty validity. For example, in many cases, an EPDM roofing installation must be done under certain weather conditions, must use specific products approved but not necessarily made by the EPDM manufacturer, and must be inspected by the EPDM manufacturer’s technical representative in order to get the specified warranty.
Building codes incorporate some standards into their requirements – in order to meet code, certain building products and assemblies must be installed according to certain published standards. For example, some building codes require that suspended acoustical panel (“acoustical tile”) ceilings are installed in accordance with the provisions of ASTM C636, Standard Practice for Installation of Metal Ceiling Suspension Systems for Acoustical Tile and Lay-In Panels.
Other building materials, such as lumber, plywood, brick, glass, and natural stone tile, don’t necessarily come with manufacturers’ installation instructions, and since there are many different ways that these materials are used in construction, building codes don’t necessarily govern their installation, either. But industry organizations have developed guidelines for the installation of these materials and so many more. There are at least two separate industry organizations who have developed some guidelines for the installation of natural stone floor tile. The Natural Stone Institute (formerly the Marble Institute of America) has some important guidelines in its Dimension Stone Design Manual.1 A publication by the Tile Council of North America, the TCNA Handbook for Ceramic, Glass, and Stone Tile Installation2 is referenced by the Dimension Stone Design Manual, and is also a very important stand-alone document. The TCNA Handbook has tile installations called out by alphanumeric designations that many people are familiar with – many tile setting and grout manufacturers refer to specific TCNA installations in their product info, and many specifiers use the TCNA designations in Tile Installation Schedules in the Tiling spec sections. Some architects and interior designers carefully refer to the TCNA Handbook when they’re figuring out the designs of tile installations.
But sometimes design professionals just don’t realize that there are industry-standard ways to install things. And then there’s the special condition of an existing, historic building – historic buildings certainly can be tricky. And sometimes the approach that makes the most sense is to work with what you have, and not do any invasive explorations to verify suitability of substrates for new installations. One problem with a project that involves nothing but updating interior finishes is that sometimes the design team is made up completely of people who are considering nothing but the surfaces, and the person selecting the floor tile may not realize that one floor tile is not necessarily interchangeable with another floor tile. Natural stone isn’t as strong as most ceramic tile. So a proper installation of natural stone floor tile requires a stiffer substrate (a substrate with less deflection) than an installation of ceramic floor tile requires.
Both the TCNA and the Natural Stone Institute address stiffness of subfloor for natural stone tile in their publications. For stone tile on wood subfloor without room for a thick mortar bed, TCNA calls for the joists to be no more than 16 inches on center, supporting the plywood subfloor, over which should be installed a plywood underlayment, then a backer board such as a cementitious backer board, then the stone tile. The Natural Stone Institute and the TCNA both call for stone tile subfloor areas in frame construction to have a deflection not exceeding L/720 of the span. There may be some wiggle room with some of the TCNA guidelines (joist spacing, backer board) when using certain uncoupling mats which have specific manufacturers’ installation instructions for the mat and the tile, but the 2 layers of plywood (subfloor plus underlayment) seem to be the best practice in all natural stone floor tile installations.
I’m not an authority on tile, or on the Milan Duomo – the point I’m trying to make with this blog post is that there are ways to design, detail, and specify, in our construction documents, the proper installation of most building materials, and this is not where a design professional’s creativity should take the lead. This is where the design professional’s technical side needs to be guiding the documentation. There are manufacturer requirements in some cases, building code requirements in some cases, and industry best practices in so many cases, including the case of natural stone tile. The designer should become familiar with these. Not all of this technical stuff can be taken care of with the project specifications – some of it needs to be shown in the drawings. Not all finishes can be applied or installed the same way as other finishes, even in a remodel, even when replacing (what-was-probably-small-ceramic) tile with (large-format-natural-stone) tile. When materials are designed and detailed properly in the drawings and specs to explicitly describe a correct installation, they’ll look as good decades later as they did immediately upon completion. (Maybe they’ll even still look good centuries later.)
Duomo Roof Terraces, Milan, Italy, September 2019. Photo by Liz O’Sullivan
Marble roof paver on the left, marble roof tile on the right, Duomo Roof Terraces, Milan, Italy, September 2019. Photo by Liz O’Sullivan
Notes:
The Natural Stone Institute’s Dimension Stone Design Manual is on their website for free. You access one chapter at a time.
The TCNA Handbook for Ceramic, Glass, and Stone Tile Installation is updated every few years. It’s available for $50 on the TCNA website.
When I was in architecture school, people often talked about “building for 500 years.” The architecture program at my alma mater, the University of Notre Dame, is a classical program, steeped in the traditions of ancient Greece and Rome, so this timeframe is not a surprise. For the past 5 decades, all architecture students at Notre Dame have spent an entire school year in Rome, in the middle of their degree program, studying the city and its buildings. Rome is a fascinating city, with many ancient buildings, or at least parts of many ancient buildings, still intact, and in most cases still in use. Usually the buildings being reused have been adapted to be something other than what they were originally built for. A great example of this is the Theatre of Marcellus, built as an open air theatre similar to the Colosseum in ancient times, but then partly used for parts (stone) for other structures, then turned into a fort, then turned into a palazzo (a private palace), and then later turned into apartments. It continues to be used as apartments, and still includes parts of the ancient building. You can see parts of the building from different eras in the photo below (some ancient, some restoration of the ancient, and some of the newer apartments at the top).
Theatre of Marcellus, Rome, photo by Liz O’Sullivan
It’s mostly just an accident that buildings like this have lasted this long. I’m sure the builders of the original theatre didn’t envision it lasting over two millennia. But they used the construction materials, building methods, and knowledge they had – they didn’t have many choices. If they wanted something to last for more than a year, they pretty much had to build it in such a way that it might last thousands of years.
Here in the New World, up in the mountains in Colorado, we often see old miners’ cabins in various stages of deconstruction, decay, stabilization, or restoration.
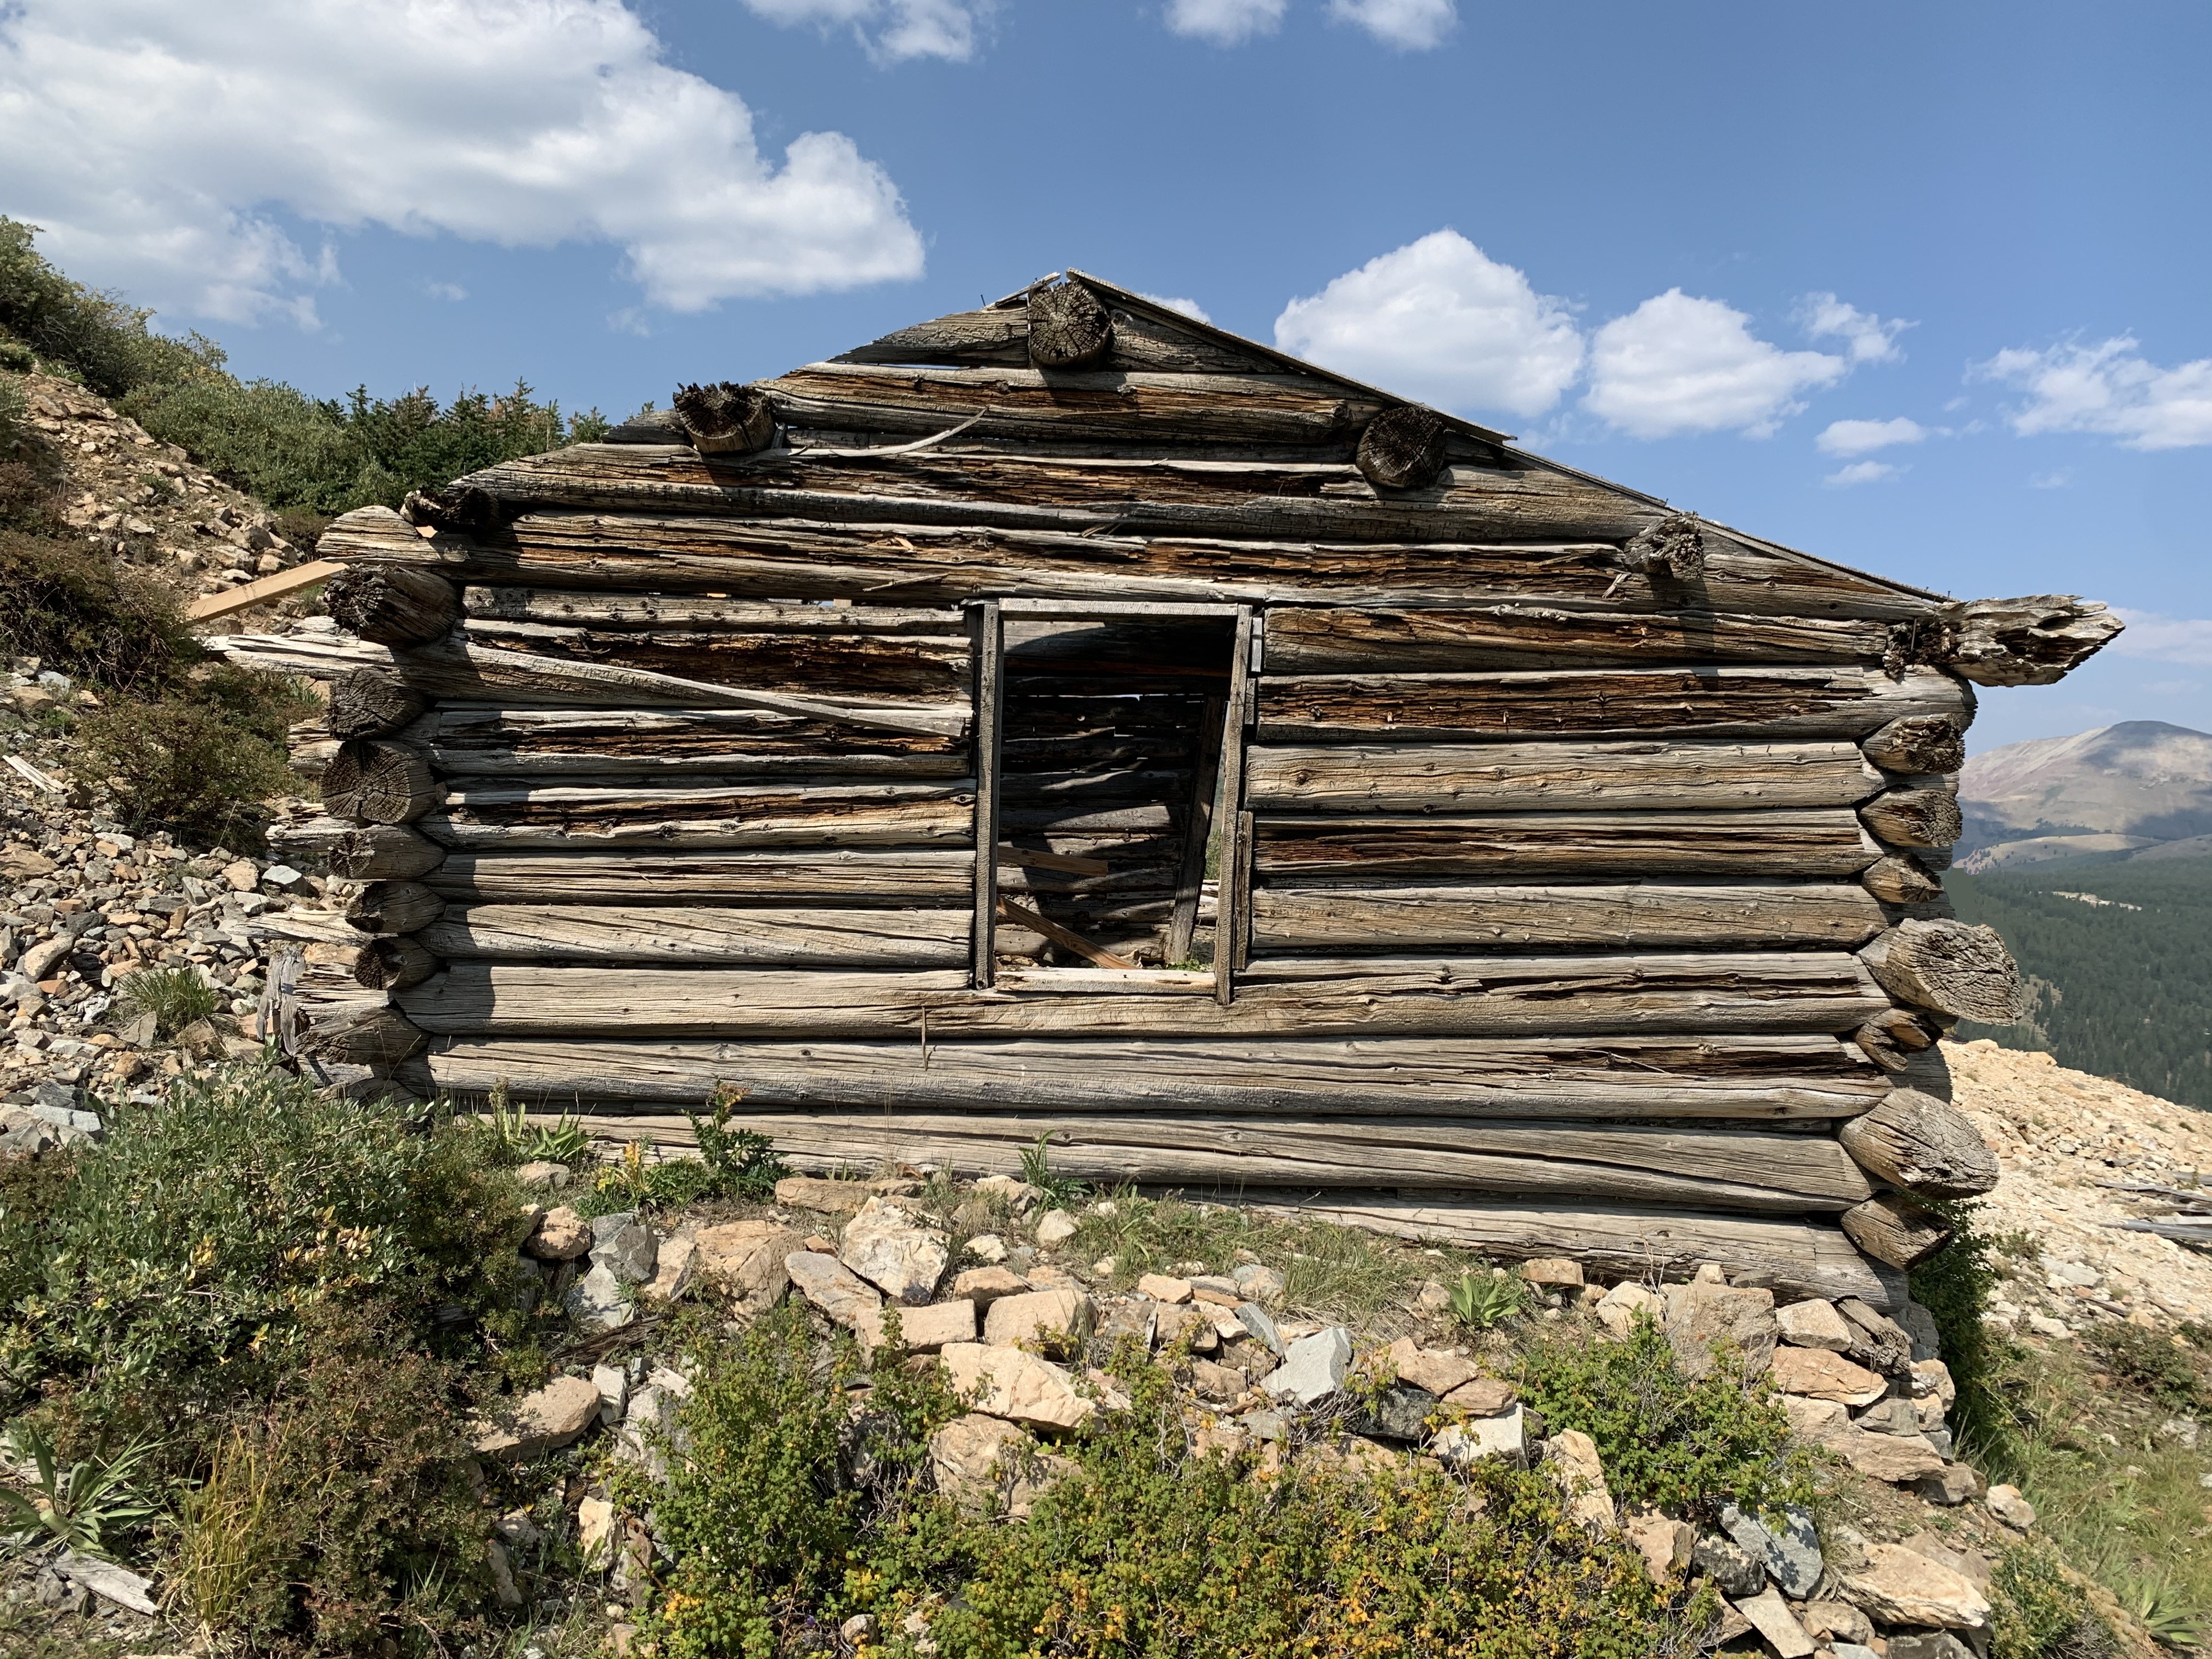
Miner’s Cabin, Colorado, photo by Liz O’Sullivan
A silver miner probably built the cabin in the photo above – silver mines operated near this cabin starting in the 1870’s – but the actual age of the cabin is unclear. It’s obviously no longer in use. It long ago outlived its usefulness in this terribly harsh spot over 12,000 feet above sea level, above treeline, directly below several 14,000 foot high mountain peaks, whose flanks still have old abandoned mines all over the place – yet the cabin remains. How long was this cabin supposed to last? We don’t know, but in order to build a habitable shelter that would withstand the fierce winds coming down from the mountain peaks, and the tremendous wintertime snow loads, for as long as the miner’s luck or determination held, the builder had to use materials accessible in this remote area (primarily evergreen trees cut from the forest nearby), and the available knowledge at the time. So it stands today, probably accidentally.
Today in most of the U.S. we have many choices of building materials and methods. Usually, the more durable and resilient materials are more expensive, so building owners who are building to hold for less than a decade are going to choose less-expensive materials so that they end up with buildings that serve them well, with little repair or expensive maintenance, for only as long as they intend to hold them. What happens next to the buildings doesn’t matter much to the first short-term owners. But owners who intend to hold buildings for the foreseeable future (maybe a university, a hospital, a public school, or a government) usually carefully consider and weigh the desired lifespan of the building, desired or budgeted maintenance and repair costs, and construction costs. Almost no one has an unlimited budget for construction costs, but some owners do have enough so that they can build in ways that most owners no longer build. Most people don’t pay for double-wythe clay masonry exterior walls as a general rule for institutional buildings, but at least one university that I know of has made this a standard for their campus in recent decades. Some owners only have enough construction budget to build their exterior walls with studs and OSB sheathing, even if their plan counts on the building’s lasting for more than 25 years. They just have to hope that no catastrophic water damage event occurs. In rising floodwaters, a building with an exterior wall assembly with less-durable or less-resilient materials that get soaked will fare much worse than a building with double-wythe clay masonry exterior walls, and may even have to be demolished well before the end of its originally-planned life.
Some old buildings accidentally ended up being long-lasting; some new buildings accidentally end up being temporary. Older methods of construction are more durable and resilient by default, and are more expensive. Some of our newer methods, which can pencil out to make more financial sense for an owner’s intentions for the building, cannot withstand some disasters, or even minor water damage over a long term, and buildings can end up being a total loss before their planned ends. What a waste, in the big picture.
But some buildings are actually meant to be truly temporary.
When Denver restaurants reopened after closing in the early days of Covid, they were allowed to apply for permits to expand seating into the right-of-way and parking lots. Denver has a sunny, dry climate, and if they can get it, restaurants have outdoor patio or sidewalk tables for diners – used almost all year round, even in winter, even when there is no pandemic, at sunny noontimes. We love to be outdoors. But it can get very, very cold in Denver in the fall, winter and spring. When Covid-19 combined with chilly weather, Denver saw a proliferation of small temporary buildings, set up on sidewalks, parking lots, and even streets near restaurants.
None of these temporary buildings is great. Many are small greenhouses with doors, repurposed to be tiny dining rooms with one table inside, scattered around parking lots or restaurant patios. Some are large event tents, set up on sidewalks or streets, with two ends open, and a mess of hoses, cables, and propane tanks to bring electricity and heat for a dozen tables of mostly-outdoor diners. Some are wood shed-type structures, with individual booths in partitioned areas under the roof, and curtains making up one wall. Denverites have been stepping over power cords on sidewalks and avoiding flapping plastic “walls” for months. The restauranteurs were lucky to get these structures – they quickly became hard to procure.
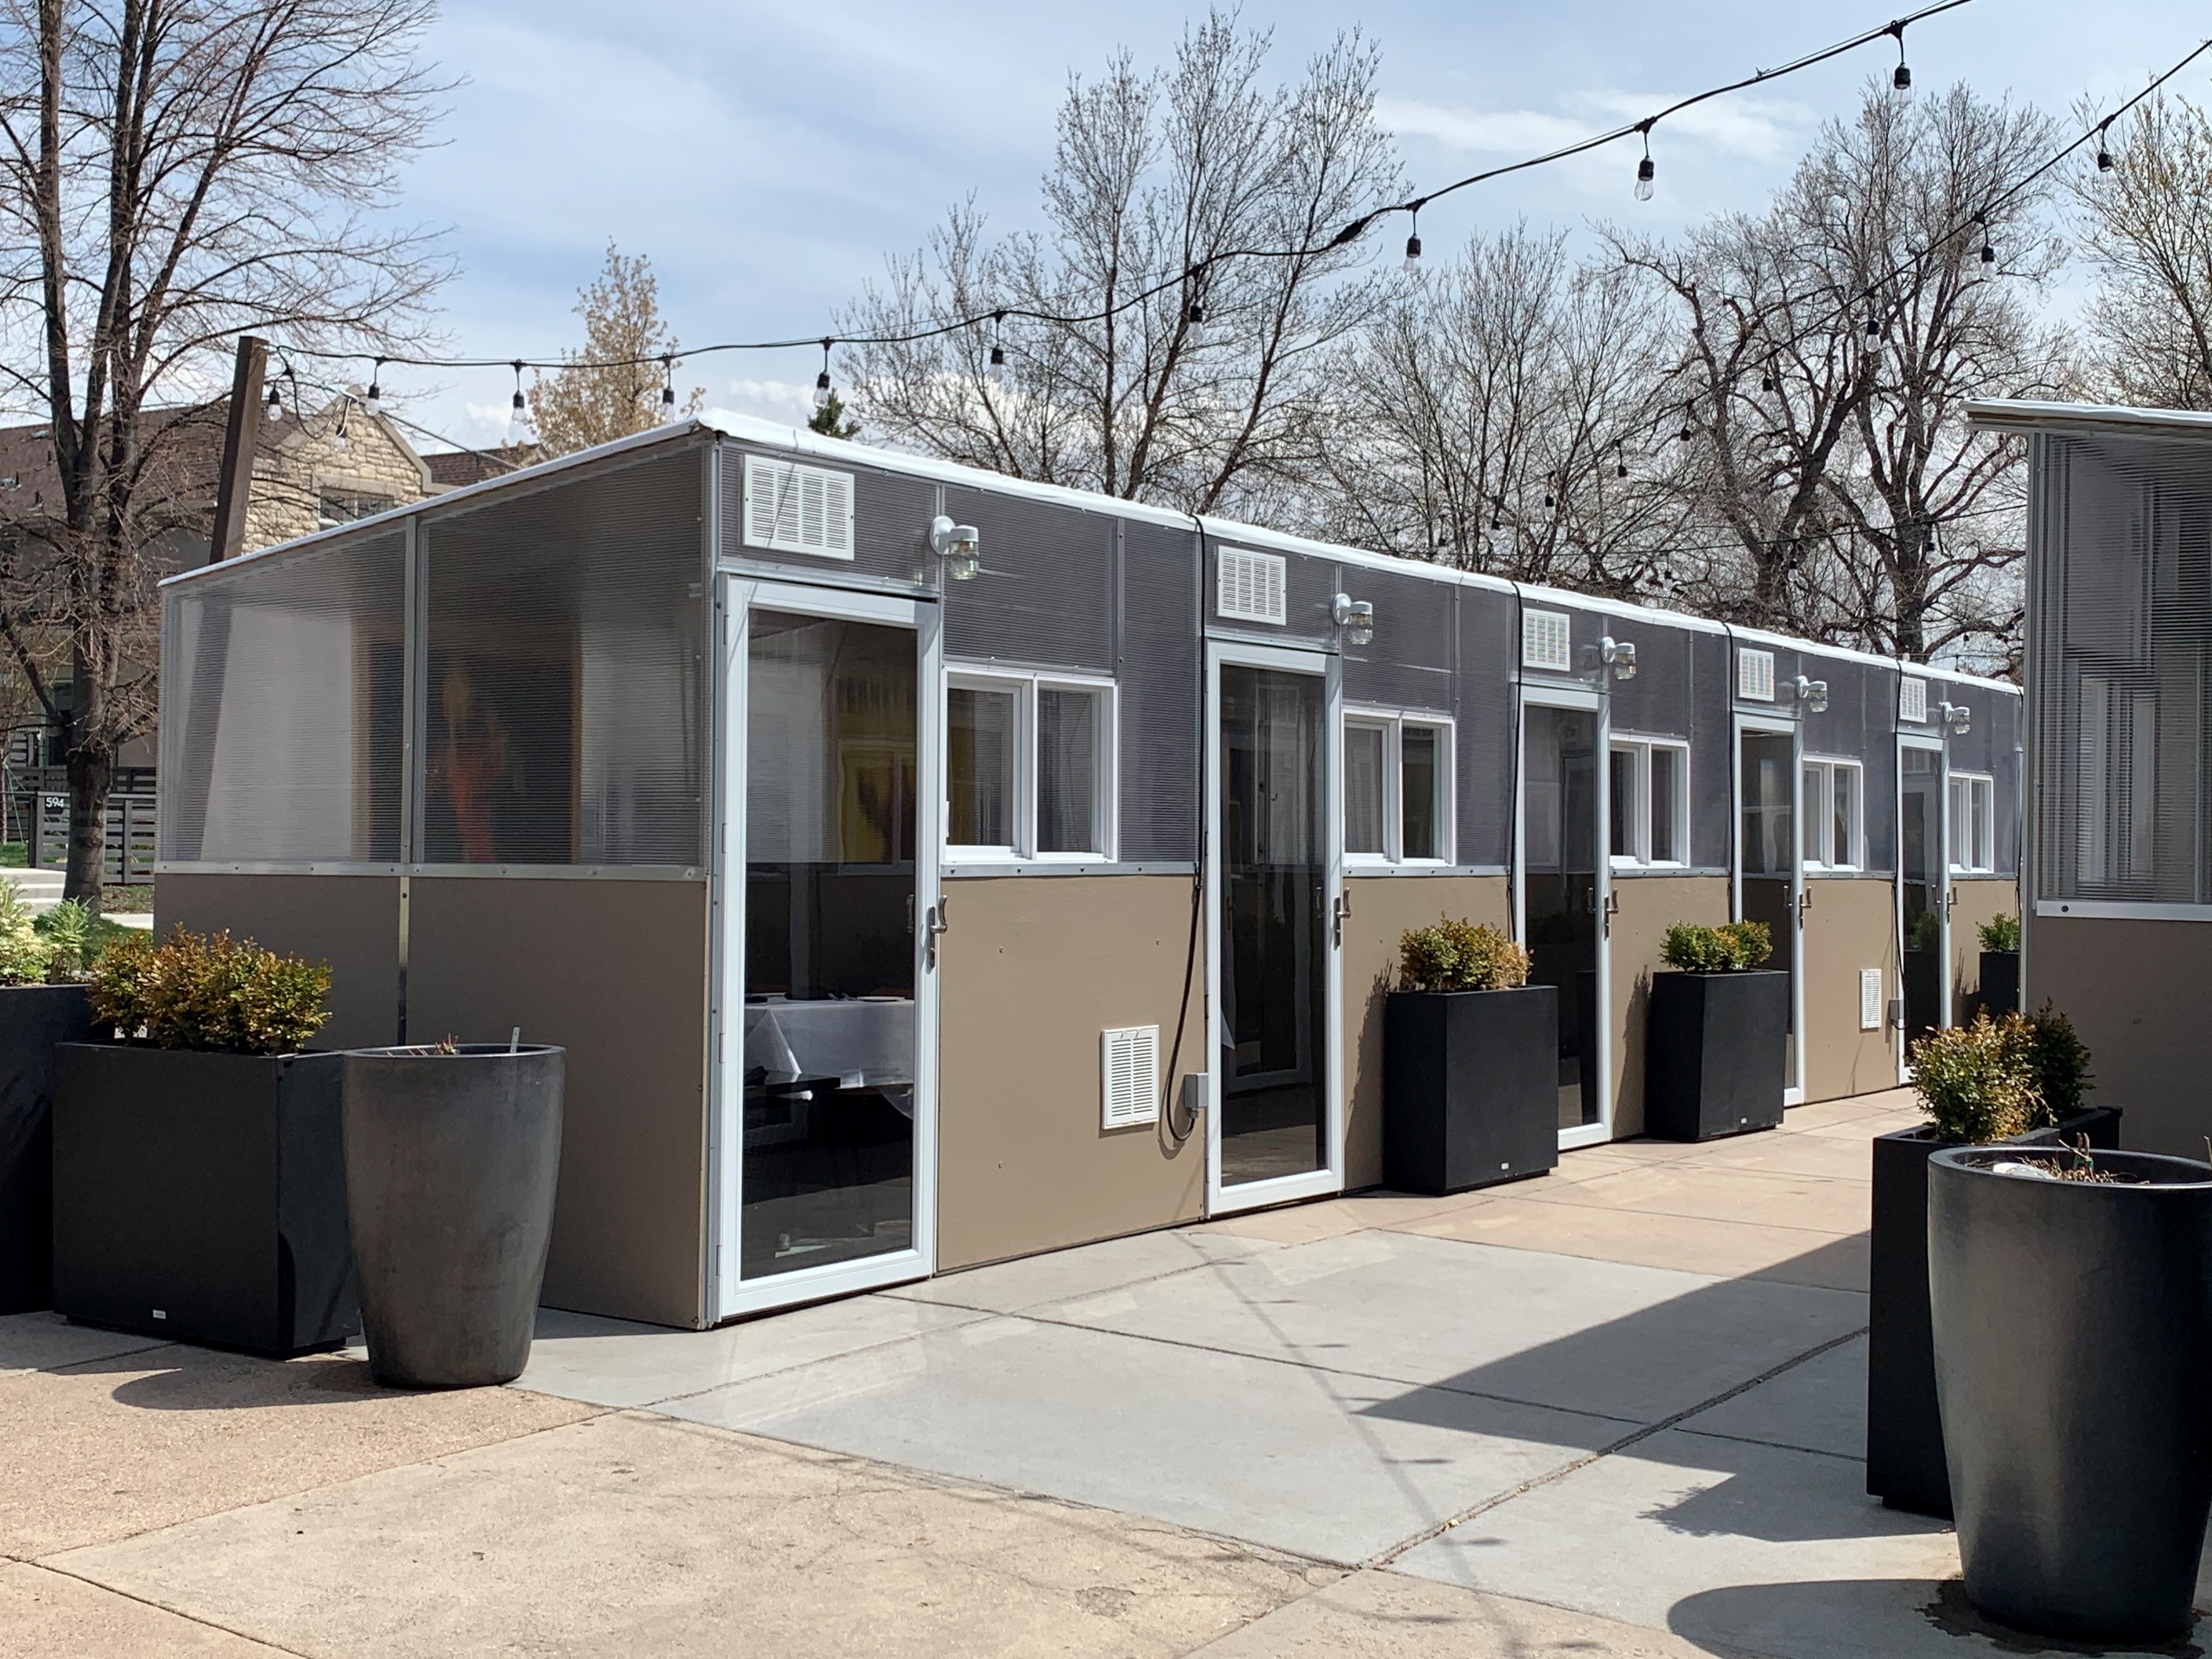
Last month, I ate inside at a restaurant for the first time in over 13 months, to celebrate my husband’s birthday. Well, we were inside, but technically we weren’t in the restaurant. We were in a very thoughtfully designed and constructed temporary “outdoor private bungalow” located on a before-times parking lot, 2 doors down from the restaurant. Instead of the quick-we-need-something-that-we-can-make-do-with approach that most restaurants seemed to take, this restaurant actually had their outdoor bungalows designed and constructed to fit their specific needs. The structures have no floors, but they have rugs. Ours was big enough for a table for 4, but didn’t feel too big for the 2 of us. Each structure has electric heating, nice lighting, a glass door on a closer, and a slider window next to the door. Interior wiring is concealed and thoughtfully routed, outdoor wiring and lighting were carefully installed. The bottoms of the walls are opaque, possibly fiber cement panels, the top parts of the walls are translucent polycarbonate. The roof, a white corrugated shed roof, drains thoughtfully. There are about 18 of these, most in rows of up to 6, with shared walls, in this parking lot.
Covid-Era Outdoor Dining Bungalows, Denver, photo by Liz O’Sullivan
How did one restaurant have such an ideal designed-to-order solution while others scrambled to make do with flimsy greenhouses or tents? Planning. If I recall correctly, this restaurant appeared to me to be late to the game of outdoor dining shelters – but now I know that was probably because they were planning and constructing, while others were popping ready-made things into place. In late September of 2020, the City of Denver announced that restaurants could apply to continue to operate in the public right-of-way or in parking lots through October 2021. So, that announcement set a lifespan of about a year for a temporary outdoor dining structure, one important known thing in a sea of unknowns. This restaurant has had a large following of loyal patrons for almost 3 decades. They kept up a curbside pickup program during the Covid-shutdown days. It’s located in a neighborhood where many people eat out many nights of the week and walk to their favorite restaurants. Employee turnover is low – servers work at the restaurant for years. So although no one could guarantee anything at any time during the early days of Covid, this restaurant is more stable than many, and was sure to have continued patronage at some minimum level.
The restaurant set some requirements for use of the “private bungalows” – reservations in advance, reservation deposits, fixed price 4-course menu only, and a strict 2-hour maximum use time limit, due to a neighborhood requirement that they close the outdoor dining at 10 pm on weekdays and 11 pm on weekends. This restaurant was able to determine some knowns on their own. But my guess is that the biggest piece of this puzzle had to be the permission to keep the outdoor dining bungalows erected through October 2021 – setting a lifespan. Presumably the restaurant could budget based on these things. (Knowing how much diners would spend, knowing the maximum amount of time they’d stay, knowing how long the private dining bungalows could stay in place.) The structures only have to be weathertight for a year. The windows and doors only have to operate smoothly and look good for a year. The thin solid walls only have to resist weathering and look okay for a year. In these very uncertain times, this restaurant was able to take the knowns set by the City, create some of their own knowns, and work with those to come up with a budget for their temporary structures.
Denver became full of temporary structures due to Covid. We have drive through tents and sheds for Covid testing set up in parking lots. There are hundreds of camping tents and tarps set up on unoccupied properties and the strip between sidewalk and street where increased numbers of people experiencing homelessness are living all over the city. Restaurants have the aforementioned strange little greenhouses for private outdoor dining. Our friends’ backyards began to include makeshift roofless enclosures around firepits for socially-distanced dead-of-winter small gatherings. As these things cropped up, I became interested in temporary structures in a way I never imagined I would. Mostly, I have wondered what will happen to the temporary structures when they are no longer needed, or when they start to fall apart. I’m always going to prefer that cities be filled with resilient long-lasting structures, but temporary buildings might continue to have their places in cities too – and these are better when they’re thoughtfully conceived and executed.
Water lapping at the first step of an entry, Doge’s Palace, Venice. This happens all the time, yet the centuries-old building, made of solid stone masonry, is still standing. Photo by Liz O’Sullivan
Some of the projects I work on experience many design changes between initial concept and completion of construction. On healthy projects, the most dramatic changes that I see occur after the schematic design phase, before the beginning of the construction documents phase. A few of these projects of mine have included “green roofs” (vegetated roofs) at the outset of the project. But those were gone before the construction documents phase started. I’m not sure who’s talking whom down from the roof, but it’s outta there, over and over again. Who brought the idea to the project? Was it just something that added a splash of color to the architect’s renderings? Had the owner always wanted to be able to walk in a garden while simultaneously enjoying a great view from a rooftop? Was everyone on board with a green roof until the contractor’s preliminary pricing came in?
Denver voters just passed the Green Roof Initiative last month, mandating vegetated roofs for certain buildings within the City limits. I wrote a commentary about this for the newsletter of our Denver Chapter of the Construction Specifications Institute. It includes a link to the text of the ordinance, and touches on the specifics of the initiative, some green roof risks for owners, and the loopholes in the ordinance. Here’s part of that:
“Denver voters faced Initiated Ordinance 300, the Denver Green Roof Initiative, in our recent election, and voted it in, by a small margin. What does this mean for building owners, developers, architects, engineers, contractors, roofing distributors and product representatives?” Continue reading…
Green roofs have benefits, mostly for the people who get to look out windows and see plants instead of roofing materials, but they can also mitigate urban heat island impacts, and help to improve the quality of stormwater before it hits municipal systems. Perhaps the most idealistic of the selling points made by the supporters of the Green Roof Initiative is the dream of rooftop urban farming. From the mission of the supporters: “Buildings are permitted to use the rooftop space for urban agriculture. This allows for the building to rent out their rooftop space to urban farmers who can then supply their goods around the city.” However, crops need a roof that meets more than just the minimum mandated by the ordinance. Here’s a basic overview of the 3 main types of green roofs. Some require beefier supporting structure, and more complex irrigation systems, than others.
Most owners who are merely looking to build a commercial building in the Denver area will do the minimum green roof, use a loophole to get out of building a green roof altogether, or build outside the City limits.
As I wrote in my commentary, “Building owners will have costs for their green roofs beyond the design and construction phases. They will have risks that owners without green roofs don’t have. Green roof plantings need to be maintained, cared for, and watered, forever. Insurance riders for green roofs will increase the costs of building insurance, but regular insurance policies usually exclude problems stemming from green roofs, so these will be necessary costs. Problems with the waterproofing components of green roof assemblies, discoverable only after moisture intrusion into buildings, are more difficult to diagnose and repair than problems with non-green-roof assemblies. Moisture intrusion is the most common cause of damage to buildings, and roofs are the parts of buildings that are most prone to moisture intrusion…”
Aesthetically, a green roofscape is a lovely goal for Denver, but building owners should not contribute to this blindly. They need to know what risks they are taking on. Sometimes people start projects without knowing a lot, then learn more as design goes on. (And then the green roofs on my projects aren’t there anymore.) In my work as a construction specifications consultant to architects, I expect to see a little bit more of the same pattern I’ve been seeing for my projects – green roofs that are there at schematic design, and gone before construction. Now you see ’em, now you don’t.
Last week I had an experience that makes another good case for the licensure of architects and the regulation of use of the word “architect” and its derivatives.
I was chatting with a parent outside our kids’ after-school activity. She asked what I do for work and I gave my standard brief initial answer, “I’m an architect.”
She immediately told me her story. Her family is building an addition on to the house they recently bought. But they’re months behind with getting going on construction because of the first architect they hired.
After 3 months of working with the first architect, the drawings that they received for bidding to contractors couldn’t be built from – one bidder after another said he couldn’t build from those and needed other drawings. The night before the architect was planning to submit for permit, she checked the code, and found that the addition she’d been designing extended 5 feet into the setback. They’d have to redesign. My acquaintance went back to her with what the contractors said, she replied defensively that she “could do this,” she could submit the drawings and get a permit, this is what she does.
They fired her, and began looking for another architect.
Do the services provided sound like the services of someone who has worked for at least 3 years under the direct supervision of a licensed architect?
Not to me. But imagine the confusion of someone who has never hired an architect before.
Many single-family residential architects and designers draw more-constructible details, and are more familiar with building codes than many commercial architects (who have much more to learn about, and often, much bigger buildings to work on). They learn from working with experienced residential architects or designers, and from time spent on the jobsite. Less documentation is required for residential builders – contractors who do houses are used to building from pretty sparse documents. If they couldn’t build from what my acquaintance had given them, then those documents were pretty bad “construction documents.”
The services provided to my acquaintance sound to me like those of an unlicensed designer who hasn’t done any building envelope work, only interiors, and had no idea that she wasn’t competent enough to design an addition. She probably hadn’t worked under a licensed architect for very long, if at all.
(Only if you’ve worked for at least 3 years under the direct supervision of a licensed architect, and have passed your licensing exams, can you legally call yourself an architect.)
Knowing that my new acquaintance had moved to Colorado recently, I figured she didn’t know that in Colorado, you don’t actually need an architect for single-family residential work. Many Colorado home designers are not architects. Unfortunately, some of them imply to the public and to their clients that they are architects. Many of them did go to architecture school, and have degrees in architecture. However, a degree in architecture means only that you learned a lot of design and theory, and not much of the stuff you need to know in order to get buildings actually built. That’s why you have to work for at least 3 years under the direct supervision of a licensed architect (and pass your exams) before you can go out and offer architectural services to the public on your own. It’s actually possible that the designer my acquaintance hired is an architect, but just a really incompetent one. In my opinion, it’s much more likely that she’s not licensed.
I feel bad about the money and time lost by my acquaintance. But even more than that, I’m embarrassed to be associated with this “architect” in the mind of my new acquaintance, and in the mind of all consumers who have similar experiences. I’m embarrassed for all architects. People who are not competent at architectural services, and who call themselves architects, bring down all architects in the eyes of the public. Incompetent practitioners in all professions create a bad name for those professionals, of course. But in Colorado, we have a lot of people who are not competent at architectural services simply because of the fact that they do not have enough experience working under someone competent to actually take their exams – but they go ahead and call themselves architects anyway.
Why does this matter, beyond my personal embarrassment? I believe that consumers should be protected, and so do the people of Colorado. That’s why the profession of architecture in Colorado is regulated by the Department of Regulatory Agencies. That’s why the Colorado Revised Statutes (our laws) require that a person be licensed to practice architecture in Colorado in order to be able to use the titles “architect,” “architects,” “architecture,” “architectural,” or “licensed architect.” In addition, our laws require that a person be licensed to practice architecture in Colorado in order to use the words “architect,” “architects,” “architecture,” “architectural,” or “licensed architect” in any offer to the public to perform architectural services (this includes marketing materials and websites). (A person who is working under the supervision of an architect and is in the process of completing required practice hours in preparation for the architect licensing examination is explicitly allowed to use the term “architectural intern.”)
Residential designers are perfectly within their legal rights to design houses and additions to houses. Many of them are very good at what they do. But unless they’re licensed architects they’re not allowed to imply to their clients that they are architects. Licensure does not guarantee competence, but it sure can weed out the least competent.
Jared Banks (you might think of him as Shoegnome, as I do) hit the proverbial nail on the head in his blog post yesterday. His post “You graduated from Architecture School and want to be called Architect” illustrated for me the main reason that I am so displeased by the formal use1 of the word “architect” to describe people who are not licensed architects.
Jared points out in his post that the question in the profession about who gets to use the term “architect” may be “just the symptom, not the illness,” and that “Perhaps the real problem isn’t who should be allowed to be called an architect. It’s actually that the value of architects has eroded.” Building owners are finding architects to be less valuable than they used to find them. I hate to be reminded of this.
When “architect” doesn’t mean much anymore, because architects provide less value than they used to, there are fewer objections to broadening the field of people who are eligible to call themselves architects.
The bill currently defines an eligible participant in the loan relief program as an “eligible architect” and defines “eligible architect” as an individual who “has completed an accredited masters program in architecture; or is an intern architect who has completed an accredited masters program in architecture and is enrolled in the Intern Development Program of the National Council of Architectural Registration Boards.” Here’s the text of that bill.
In other words, the bill defines “architect” as a person with a masters degree in architecture. Even the AIA, this country’s primary professional organization for architects, misuses the word “architect.”
The AIA is writing legislation that misleads our legislators and the public by ignoring the fact that under state laws, a person can’t be called “architect” without a state-issued license to practice architecture. (Oddly, the AIA also doesn’t seem to believe that a person with a 5-year professional degree, a BArch, should be eligible for loan forgiveness – the bill currently only addresses masters degrees.)
How is THIS advocating for architects?
This doesn’t help with the perception of the value of an architect. If everyone who finishes school gets called “architect” by the AIA and our federal lawmaking bodies, while under state law only those of us who have licenses can call ourselves architects, mixed messages are being sent. “You just have to get through school!” “You have to get through school, actually get some experience, pass some tests, and be willing to take on some professional responsibility!” Which is it? State law is clear. I believe federal law is silent on the matter, but will no longer be if this bill passes.
As I wrote to my senators and representative, the profession has problems, and one problem is that many grads have huge debt, but this bill is a bad idea that may further the problems of the profession by allowing schools to continue to charge more tuition every year, and deliver less of value to architecture students every year. Schools turn out architecture graduates who are nowhere near equipped to produce construction documents that buildings can be built from, but schools seem to be telling their grads that they’re ready to practice as full-blown architects upon graduation. That’s simply not true, and it’s not how our profession is set up.
Internship, the years between graduation and licensure, is an essential part of our training in this profession. Schools teach lots of design and theory, and a tiny bit of building technology and construction documentation. We are supposed to learn these practical things on the job. Producing construction documents is absolutely essential to the job, to the profession, as described in state licensing laws. But schools gloss over that, and some lead students to believe that they can just hire someone to do technical things like construction documents for them.
This National Design Services Act bill indicates that people straight out of architecture school can do a number of things, including “Assessment of the safety of structures that are in disrepair or have been damaged as the result of natural or manmade disasters.” I don’t want people right out of school doing this type of assessment in MY community. They are simply not qualified. (I may not be qualified. I’m an architect [licensed for over a decade], not an engineer.)
It’s not too late to find ways to return value to our profession. And I know where to start. Architects need to get more technical, and architecture firms need to keep technical expertise in-house or under their umbrella. By “get more technical,” I mean that architects need more building code expertise, an understanding of building technology, comprehension of building science, and expertise in effective construction contract administration. These things are no longer emphasized in many practices, and are rarely addressed in schools, but this knowledge and these skills are where the value lies for owners, for communities.
This knowledge, these skills, and the responsibility and liability that come with a license are what separate competent licensed architects from designers, architectural graduates, and kids with software programs. And we shouldn’t all be called by the same name.
1. By formal use, I mean use by newspapers, professional organizations, local government candidates, and architecture firms. I do not mean use during cocktail party conversation, or use by 19-year-olds explaining their college majors.
I’ve dealt with some inconvenient exterior wall assemblies lately.
Although two recent projects had to comply with the 2012 International Energy Conservation Code, the nature of their exterior wall assemblies made achieving continuous insulation difficult in both projects, and made achieving a continuous air barrier difficult in one project. Energy calculations indicated that we did need continuous insulation on both; there was no getting around it.
In these projects, the insulation and air barriers were afterthoughts.
So the construction documents for both projects show some unusual applications of rigid insulation, and for one project, show an unusual application of an air barrier coating. It can all work, it can all meet the code requirements, but these situations may not be ideal for construction.
How did we get here? I believe that the exterior wall assemblies were dictated by the owner in one case and by the design-build contractor in the other case.
Owners and contractors aren’t required to be familiar with building codes. The person responsible for interpreting the building code and making sure that the construction documents comply with the code is the architect.
Whether the architect or someone else initially selects wall assemblies, the architect needs to verify code compliance, early in the project. And don’t forget that IECC! The earlier in the project that you take all code requirements into account, the more convenient for everyone, from architect to cost estimator to insulation installer.
There’s something that architects need to be aware of as we use increasingly thicker continuous insulation behind masonry veneer cladding.
If the distance between the structural steel backup and the back of the masonry veneer cladding exceeds 4-1/2 inches, the masonry veneer anchor spacing must be designed by a structural engineer.1
Masonry veneer anchor spacing is not usually designed by a structural engineer; the code provides prescriptive requirements that we typically follow, and this spacing is most often indicated in the specifications by the architect or the structural engineer.2
Manufacturers of some types of masonry veneer anchors indicate that the legs of the anchors can accommodate up to 4 inches of insulation. But even these can’t be used without having calculations run by an engineer, unless you keep the distance between the structural steel backup and the back of the masonry to 4-1/2 inches. (This would leave very little air space. You need at least 1 inch of air space, per the code, and an air space of 2 inches is recommended by the Brick Industry Association.3)
By the way, these things aren’t spelled out in the text of the International Building Code. They’re in a separate document that is incorporated into the IBC by reference, the TMS 402/ACI 530/ASCE 5. This document is called “Building Code Requirements for Masonry Structures,” and is developed by the Masonry Standards Joint Committee (MSJC). Since it’s referenced in the IBC, it becomes part of the requirements of the IBC.4
So, architects, either stick with 4-1/2 inches or less between the structural steel backup and the back of the veneer masonry, or let your structural engineer know, as soon as possible, that you are exceeding 4-1/2 inches. If it’s too late for your project, sometimes the masonry veneer anchor manufacturer who gets the project will hire a structural engineer to check (or design) the anchor spacing. The cost of this service would get passed on to the general contractor and then to the owner (as an extra cost). Avoid a construction change order – deal with this on the design side, before construction starts.
Chapter 12, section 12.2.2.7.4 of the latest version of TMS 402/ACI 530/ASCE 5 indicates that “A 4-1/2 inch maximum distance between the inside face of the veneer and the steel framing shall be specified. A 1 inch minimum air space shall be specified.” There are alternative procedures allowed by the code that can be used instead of these prescriptive requirements, but the alternative procedures are what require a structural engineer to design the anchor spacing.
Chapter 12, section 12.2.2.5.6 of the latest version of TMS 402/ACI 530/ASCE 5 tells us the prescriptive requirements for anchor spacing: “For adjustable two-piece anchors, anchors of wire size W1.7, and 22 gage corrugated sheet-metal anchors, provide at least one anchor for each 2.67 ft2 of wall area.
“Space anchors at a maximum of 32 inches horizontally and 25 inches vertically…”