I know your plans… for this last week before the deadline… don’t include me.
“How do you write the specs?” I was asked recently at an untimely point – late – in a project – by the project manager at the architecture firm.
I took a deep breath.
I have been working with many of my architect-clients for many years, and sometimes I forget that people who are new to me may be new to specifications altogether. Mea culpa.
So. When I write the specs for your project, the first thing I do is sit down with my notepad, and my pen, and your drawings.
Yes. First, I need your drawings.
I know it’s late.
I look at the drawings and I make notes about them on my notepad. Some info from my review starts to live in my memory. Some needs to be written down. Either way, I need to get going on the written work very soon after my drawing review, before another project’s buildings lodge themselves in my head.
When I review your drawings, I look at the graphics, but I really study the notes.
I worked as an architect before I became a specifications consultant – I have been in your position before, visually communicating the design through drawings. But something important that I didn’t fully realize until I became a specifications consultant is that much less information is communicated in the graphics than some people think. A lot of the design that you’re drawing is in your head – in your personal understanding and memory reservoir. It can’t all get out through a drawing, or even a model. You are filling in some gaps with your mind.
I know you’re weary.
Part of the process of doing a good job writing specs is helping to fill in the gaps in the actual construction documents – I do need to know what’s in the gaps to be able to write a complete project spec. And the contractor will need to know what’s in the gaps to be able to build the building according to the design intent and the owner’s wishes. So, I am probably going to ask you a lot of questions.
A specifier is interested in both the minute details and the overall big picture in a way that an architect involved in the daily or weekly preparation and communication of the design and drawings often cannot be. If your spec writer is also an architect, you may be getting a “second set of eyes” on your drawings, a person who notices a few little issues here and there that an in-house reviewer might not notice because of the historical knowledge of the project that is stored in their head, even if they just overhear things about the project occasionally.
Regarding the very specific details – most architects understand why the specifier is interested and involved in those. (We put in the specs the info that shouldn’t go on the drawings because it’s too much, or too detailed, or related to process more than products.)
Regarding the big picture – I think a specifier’s grasp of this has to do with the way most specifiers approach our work. We work through a database or checklist or a sort of subtractive process. (Don’t need that, don’t need that, wait – might need that – need to ask, yes need that, nope don’t need that anymore. Oh, we’re gonna need that, because I see the old one going away on the demo plan and prep for a new thing is called out even though the new is actually not on the construction plan yet. I think we need this even though it’s not on the drawings because I see this other thing on the structural drawings…)
I know your plans don’t include me.
Architects, I have been in your shoes. I know what it feels like to coax, push, drive, drag yourself forward through fatigue and “overwhelm” to get to the deadline… encouraging yourself by telling yourself that it will all be over after the deadline and that you only have “this much” left… and then someone like me comes along and tells you there’s more to do. I feel compassion for you in your position. I have been there before and I truly know how it feels.
Let’s find a way.
Let’s find a way… to work together better to help get beautiful buildings built. I will keep in mind how you work. I will keep in mind that not all architects are familiar with specifications. Please ask me anything, anytime, about how I work. We’ll find a way.
(Apologies for doing weird things with a great song.)
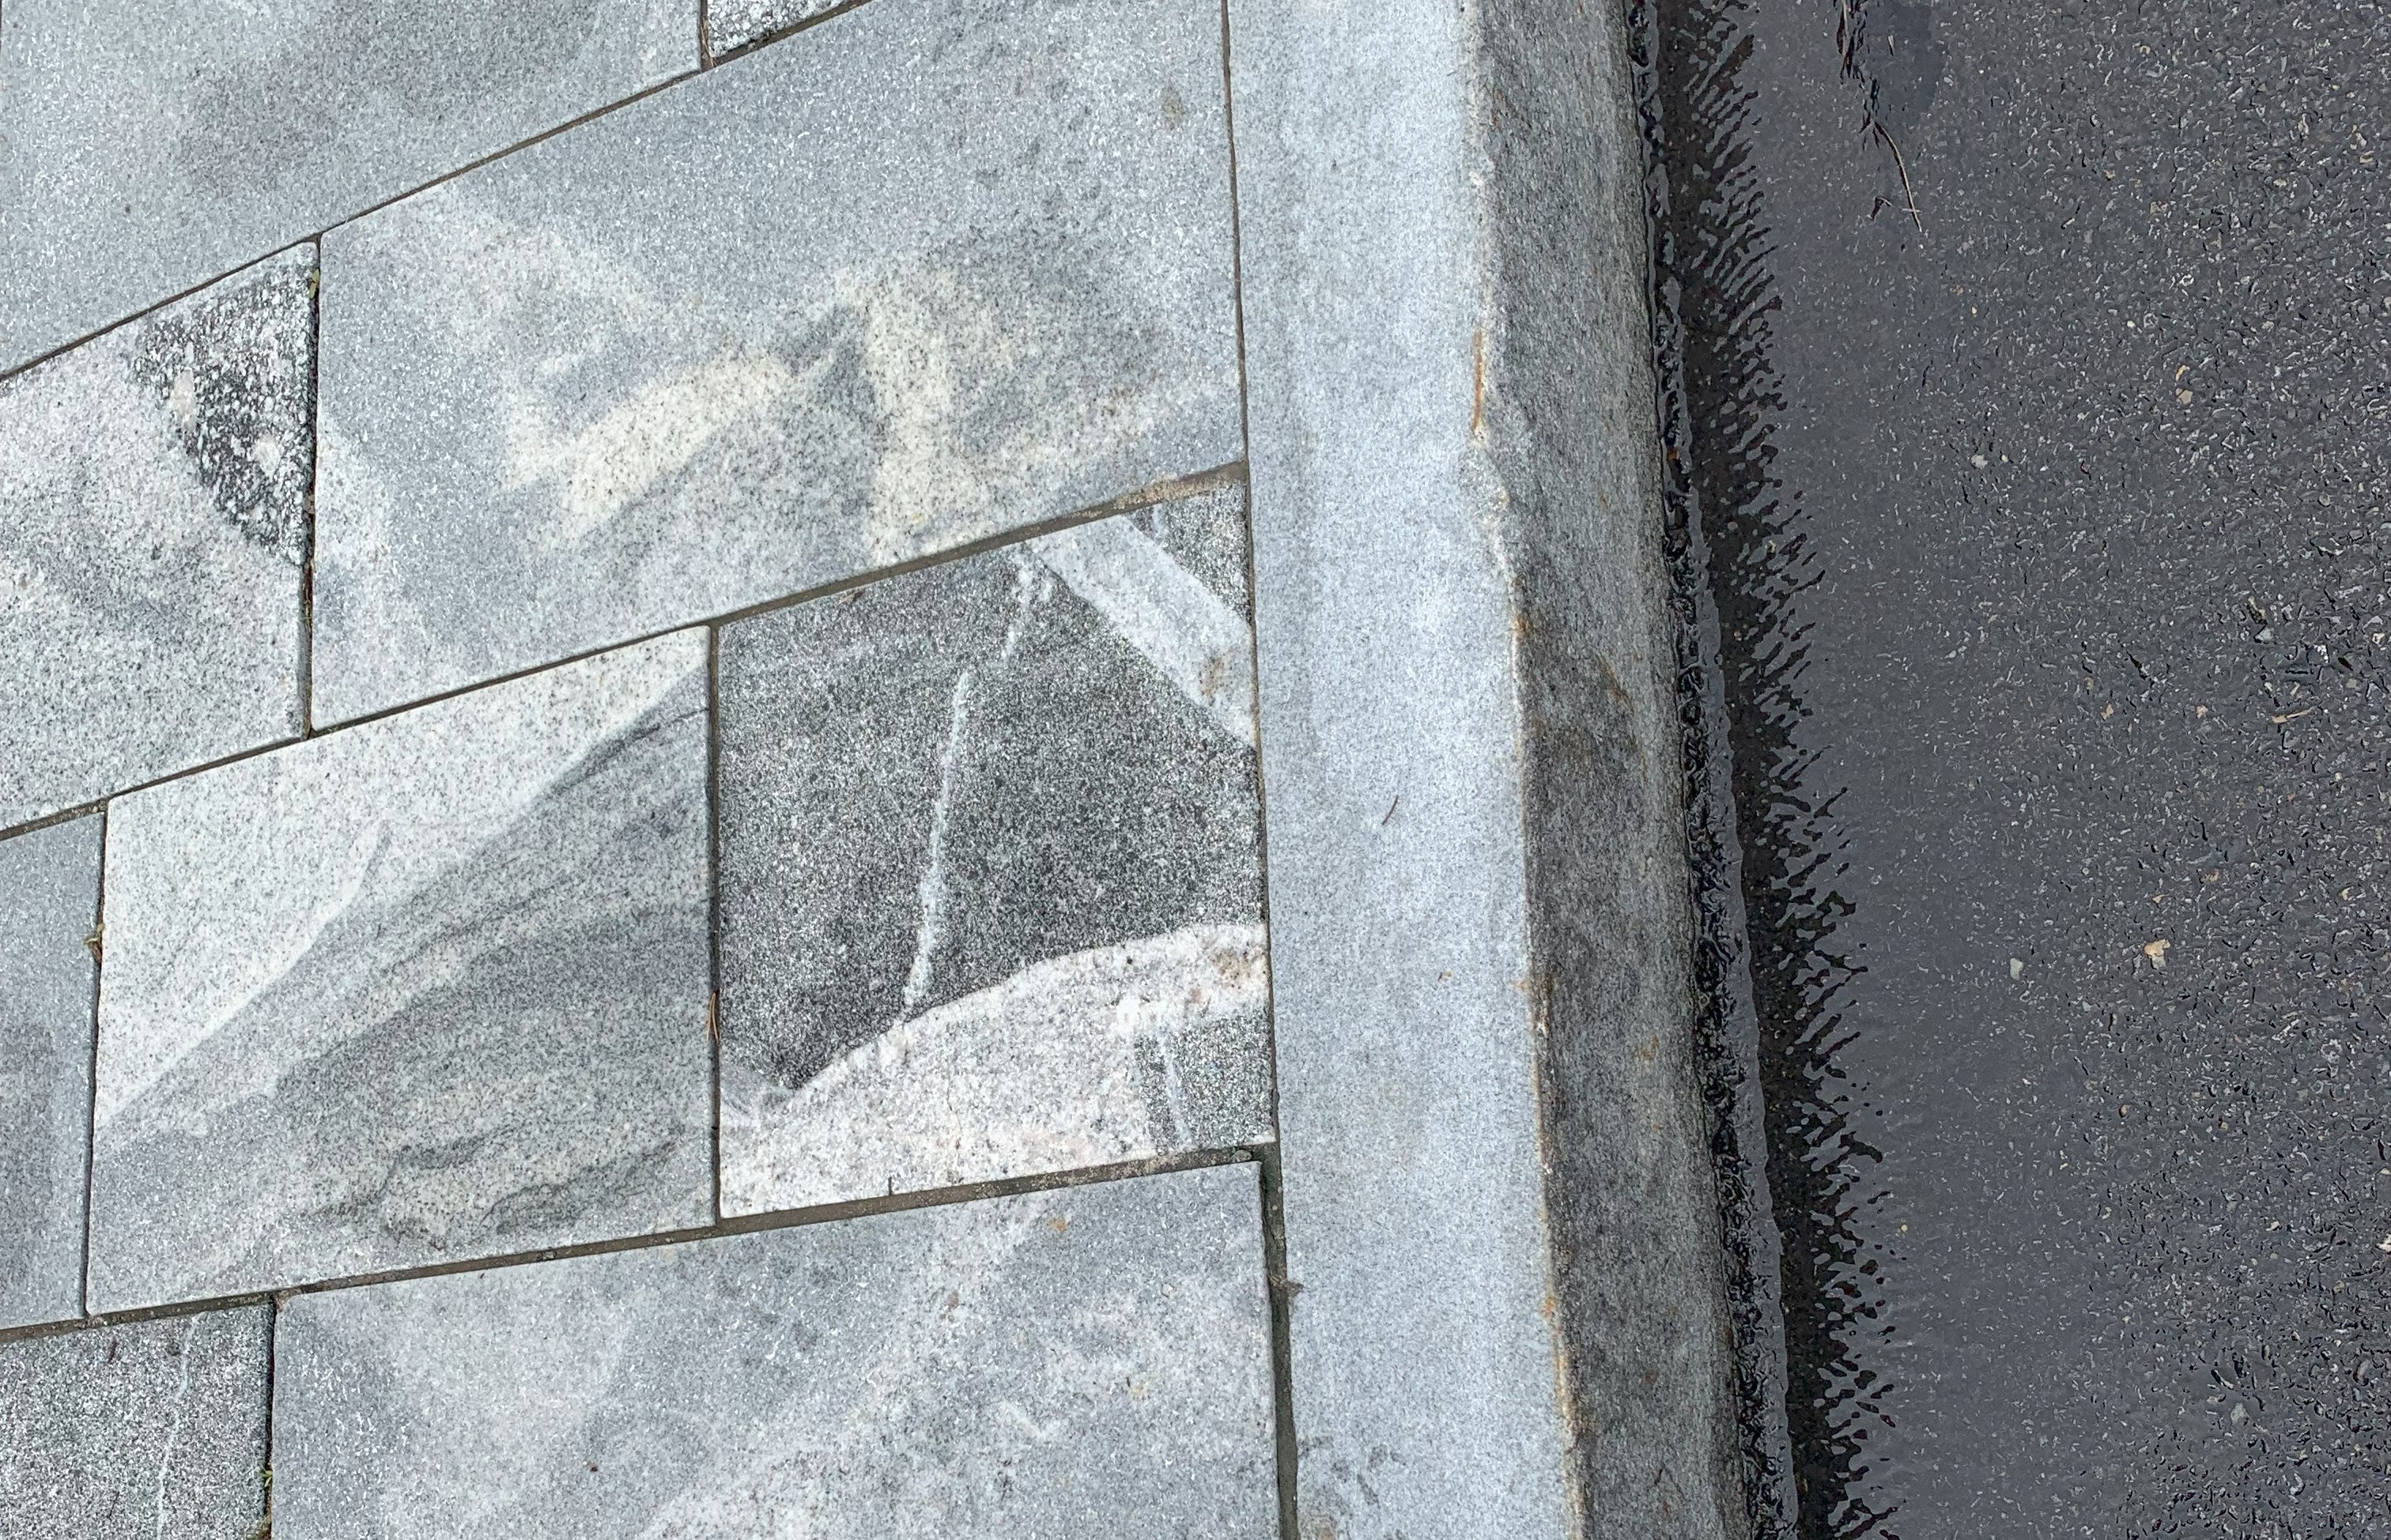
One thing I’ve noticed about upstate New York is that they have some really nice curbs.
Stone sidewalk and curb, Lake Placid, New York
I first noticed the curbs on a college campus in Geneva, New York. They’re great components of the college landscape – granite, durable, long-lasting, probably hold up really well to the snowplows that I imagine are regularly operating in that gray, snowy place. Actually, I’m pretty sure the orange streaks on the stone are rust stains from the snowplows that scrape these curbs each winter.
Stone curb with rust stains, Geneva, New York
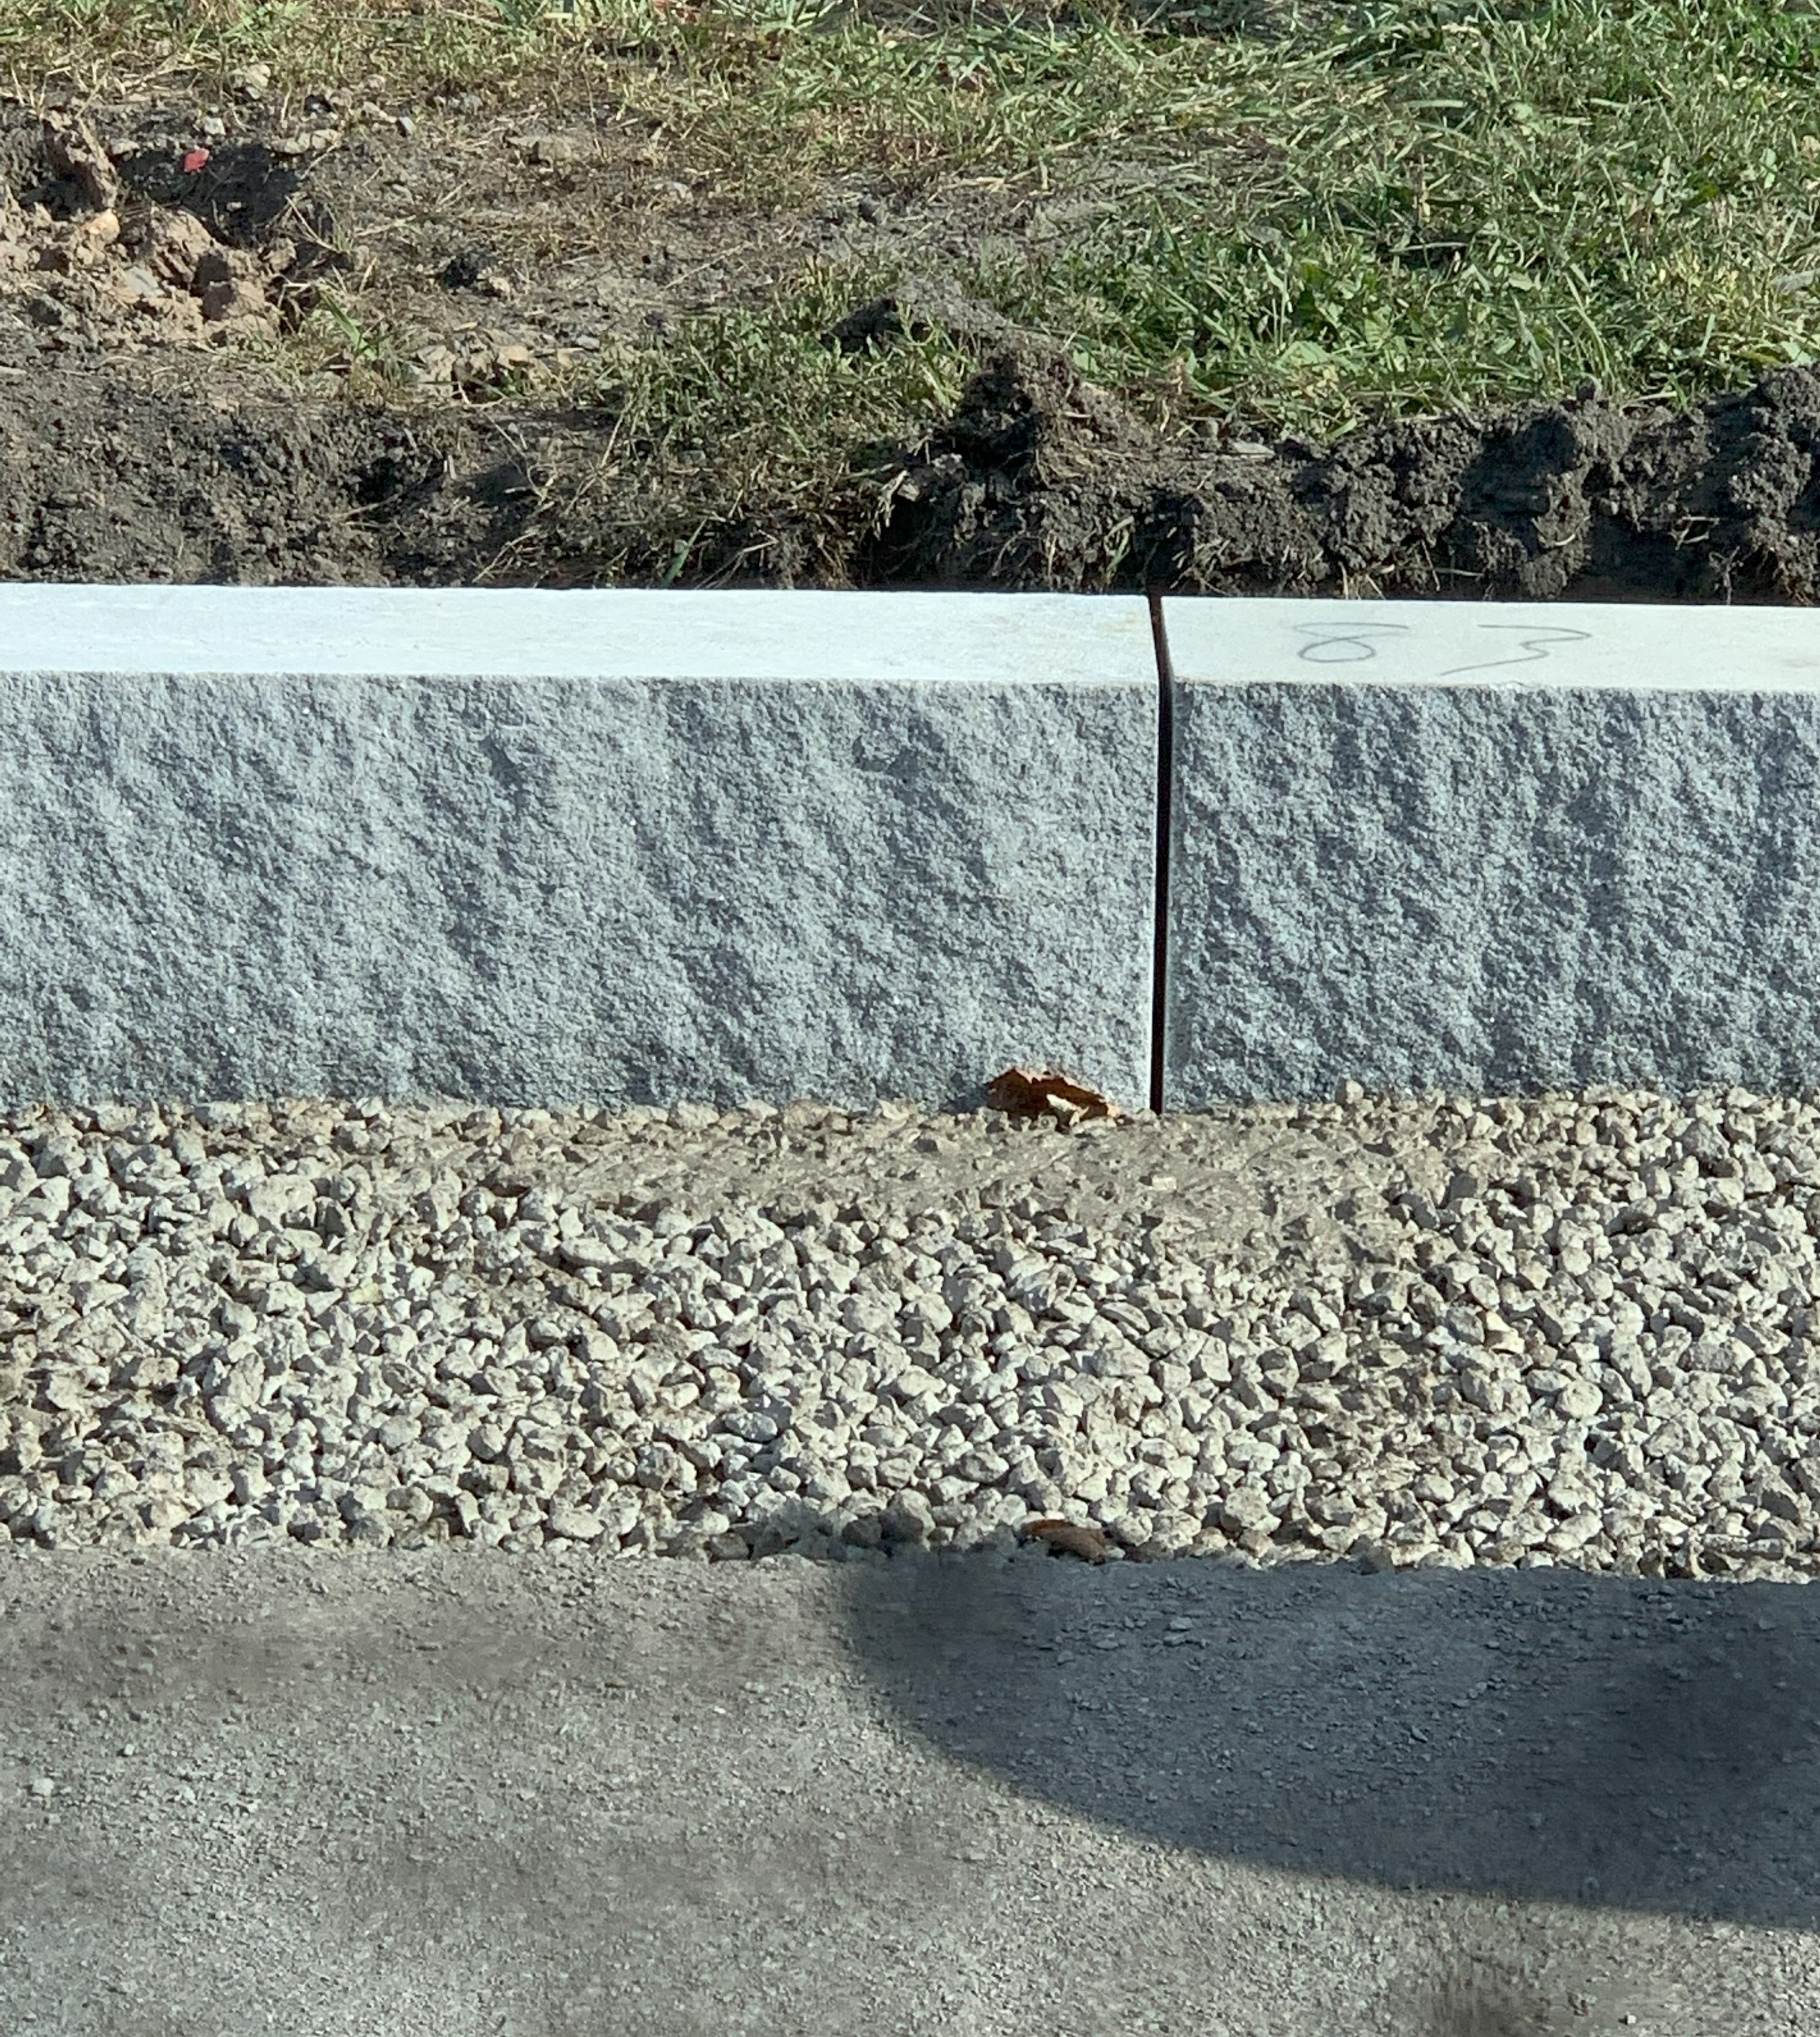
I figured that the granite curb was a campus standard, so I was a bit surprised when I noticed the same curb in nearby downtown Geneva, and then I really couldn’t believe it when I saw the curb design again on the side of some little state highway near a new strip mall and big box retail development in the middle of nowhere in the Finger Lakes region in New York. Apparently, the New York State Department of Transportation has the nicest design standards for curbs that I’ve ever seen for highway use, and it looks like the college campus decided to go with that standard.
New stone curb being installed, near Seneca Falls, New York
I’ve encountered some terrible curbs in Denver, where I live, including at one decaying median with disintegrated curb with a corroded rebar sticking out on a busy US highway that runs through south Denver. More typically, I see unreinforced concrete curbs cut up by snowplows and work trucks. No orange streaks of rust staining on these – the concrete seems to just get scraped off.
Damaged concrete curb, Denver, Colorado
Over time, the concrete disintegrates.
Detail of damaged concrete curb, Denver, Colorado
A big piece of granite will last a lot longer than a chunk of cast-in-place concrete. This natural stone material will cost more than concrete, but stone curbs may not cost more in labor than concrete curbs do, and labor costs these days are really something to consider. The granite will look better, year after year, even under harsh conditions that seriously damage other materials.
The old quality-time-cost dynamic is at play in the stone curb vs. concrete curb design question. We rarely get good quality, with fast construction time, with low cost. Something can be built well – good quality – but it’ll cost more and may take more time than producing something of lesser quality. Something can be built quickly, but compared to something built on a more typical schedule, it will either cost more or be of lesser quality, or both. Something can be built cheaply, but the quality is likely to be poor.
For me, quality always includes durability – effectiveness and appearance over the long term. A higher-initial-cost, more durable building component can cost less in the long run, because of lower maintenance costs over its service life. Durable building components almost certainly look better over the long term, too. With cheap materials, there is often a period of time after their beauty has been exhausted but before they have been replaced, during which they are unbearable to look at. Durable things age gracefully. The beauty of an object, whether it’s part of a building, a piece of furniture, a good quality leather bag, or even a curb on the side of the road, is an incentive to keep and properly maintain the thing so that it continues to serve its purpose. Those nice curbs last long, look good for decades, maybe centuries, even when scraped by snowplows, and therefore probably cost less in the long run. Win-win-win.
When we see parts of buildings coming apart, we get curious, and that can prompt us to learn how things get put together. Sometimes, it’s obvious how building elements began to deteriorate or started to come undone. Other times, it’s a real head-scratcher.
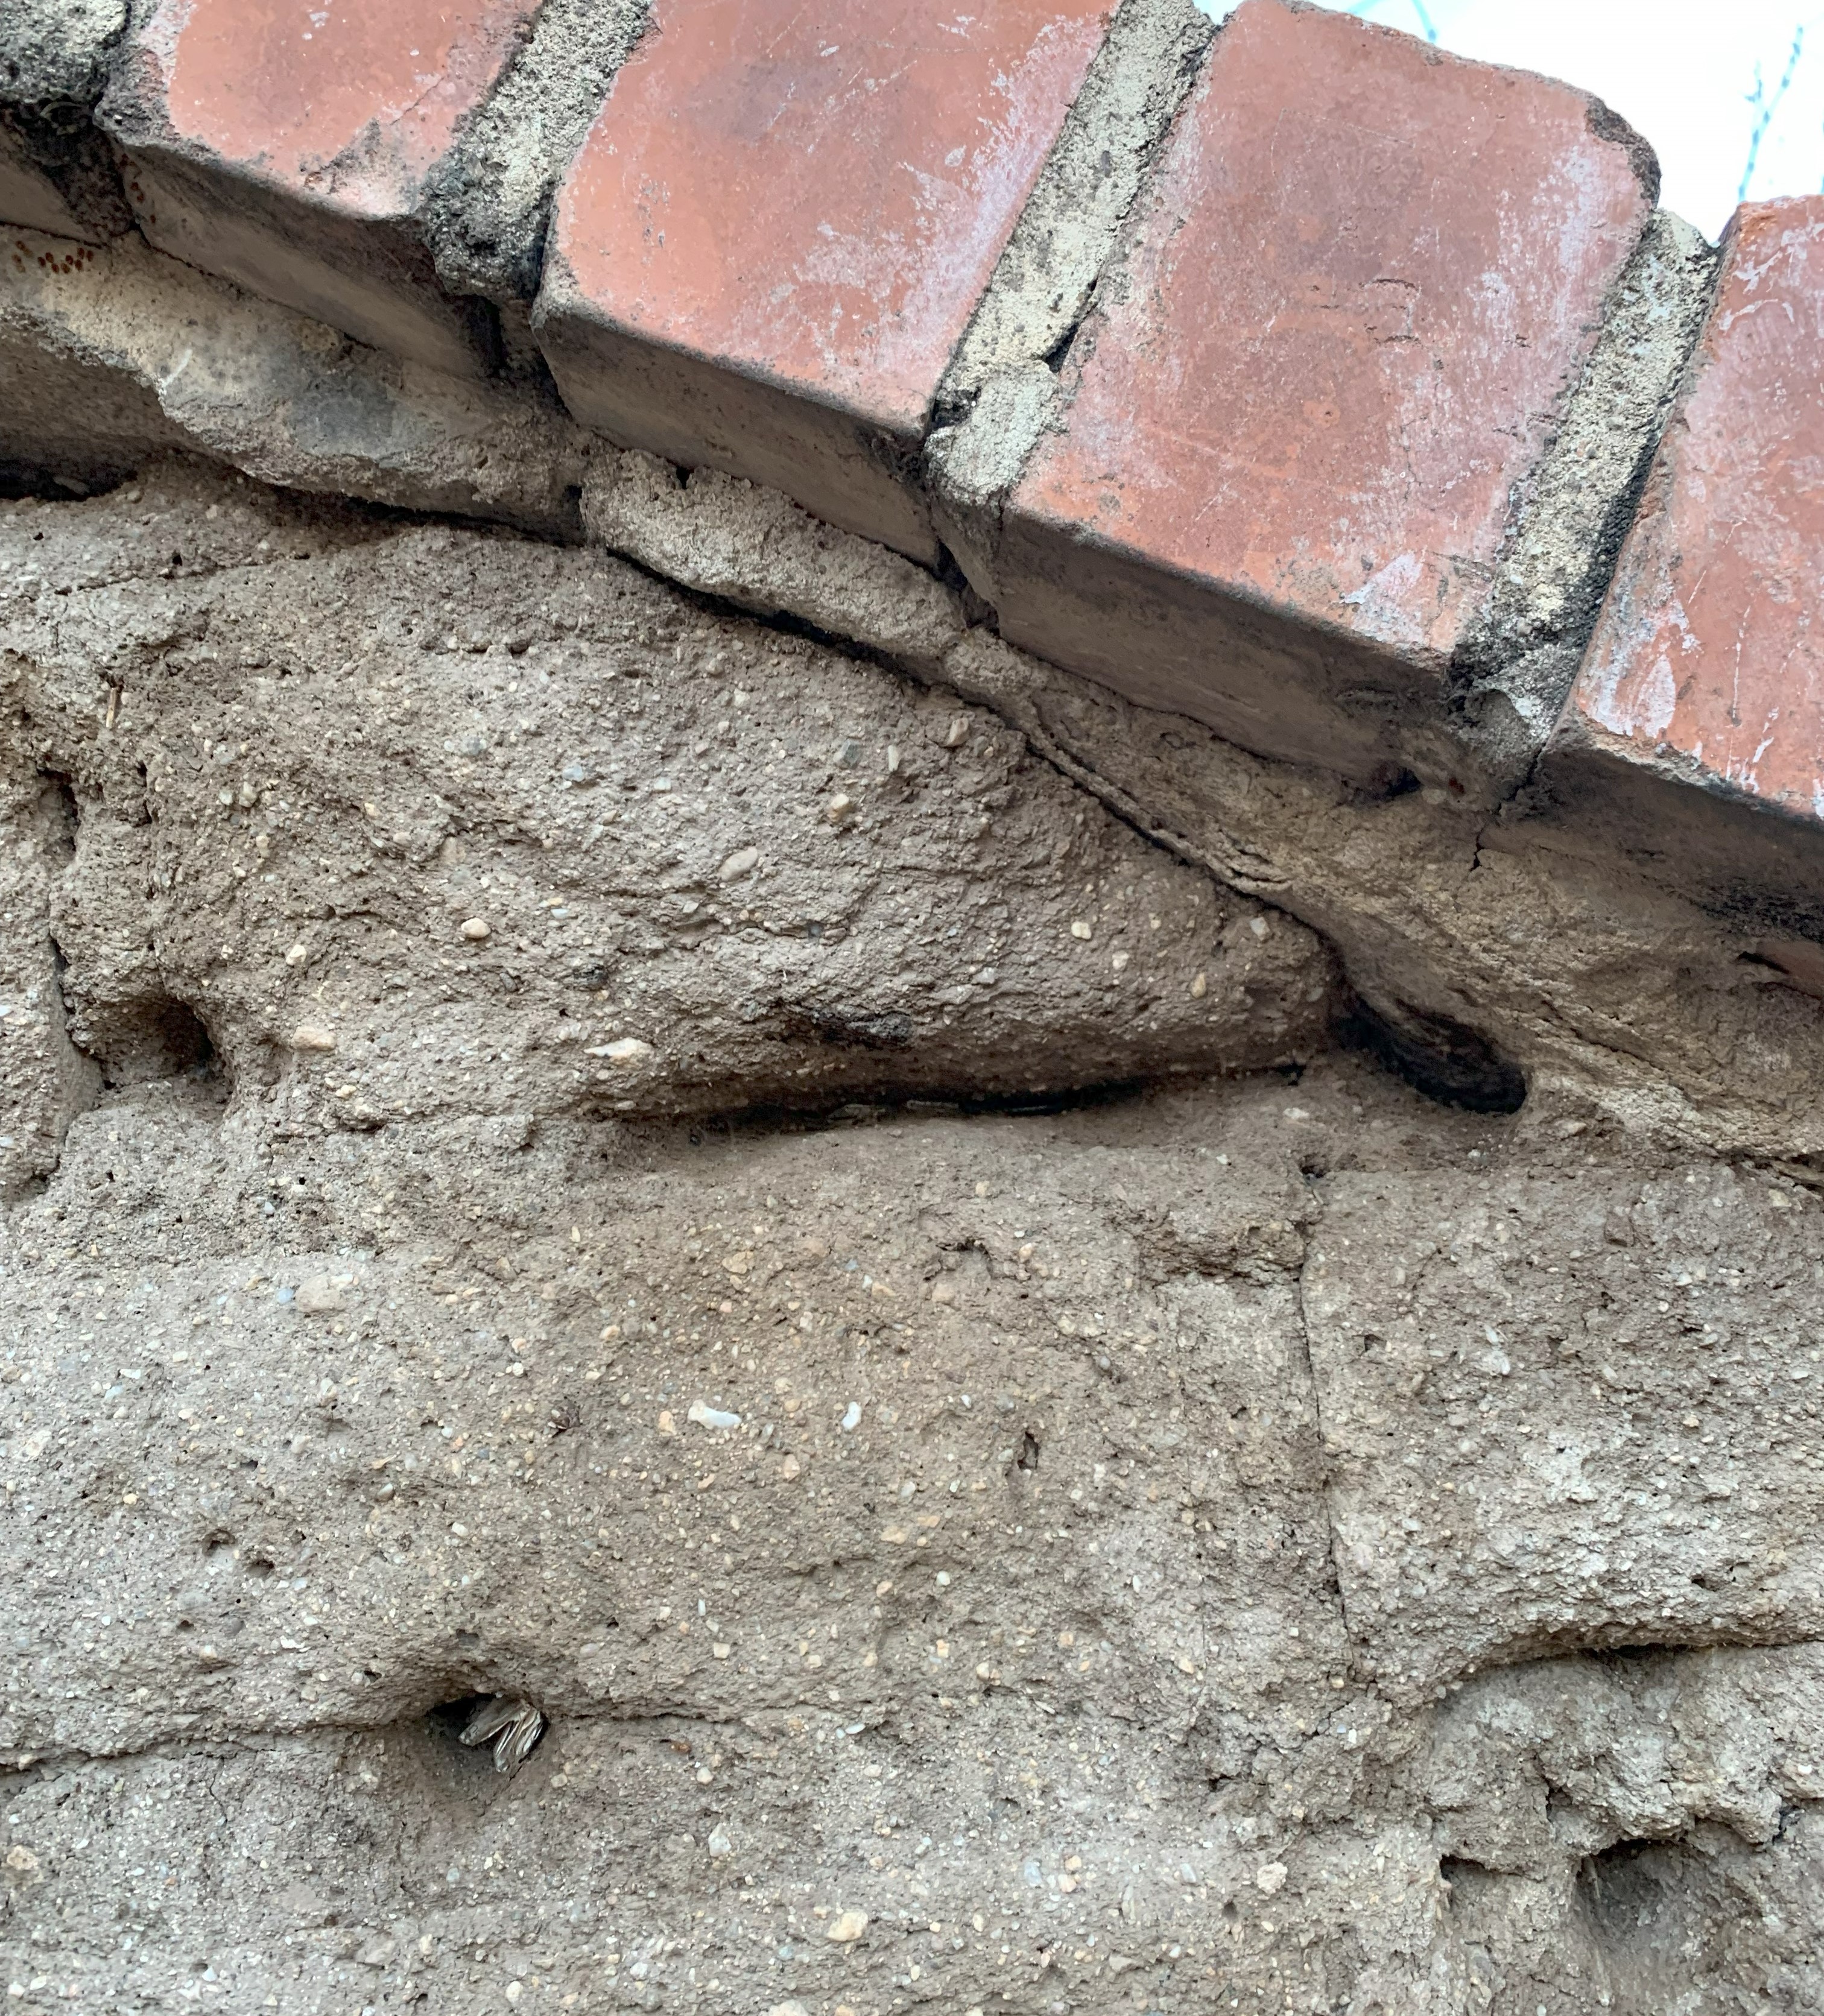
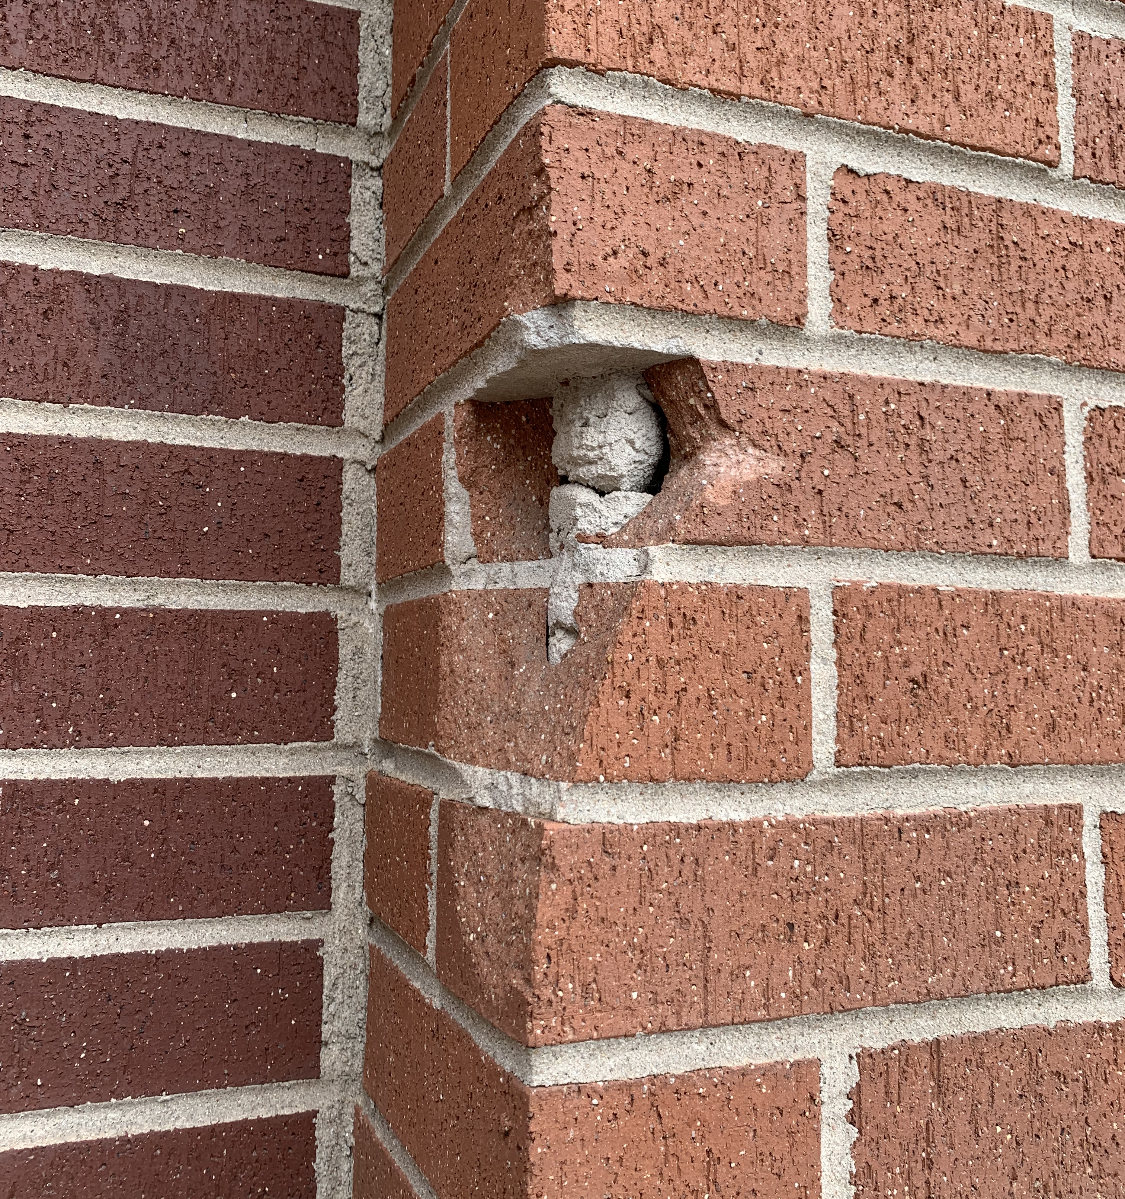
Damaged brick wall.
This masonry wall is separated from the street by about 5 feet of sidewalk, and another 4 feet of planting strip with some trees. The closest lane on the street is dedicated to parallel parking. This damage is about 6 feet above the sidewalk. I just can’t imagine how this happened. But what it exposes is the stuff we don’t usually see (a cylinder of mortar!) so here is an opportunity for exploration.
Many people never see the entirety of a single brick. We walk by brick walls, but are never prompted to ask what a lone brick looks like without its fellow bricks.
Old brick wall of house.
Or we walk over beautiful brick pavers, which some people have no way of knowing aren’t the same type of brick that is typically used for building walls.
Brick pavers in concrete sidewalk.
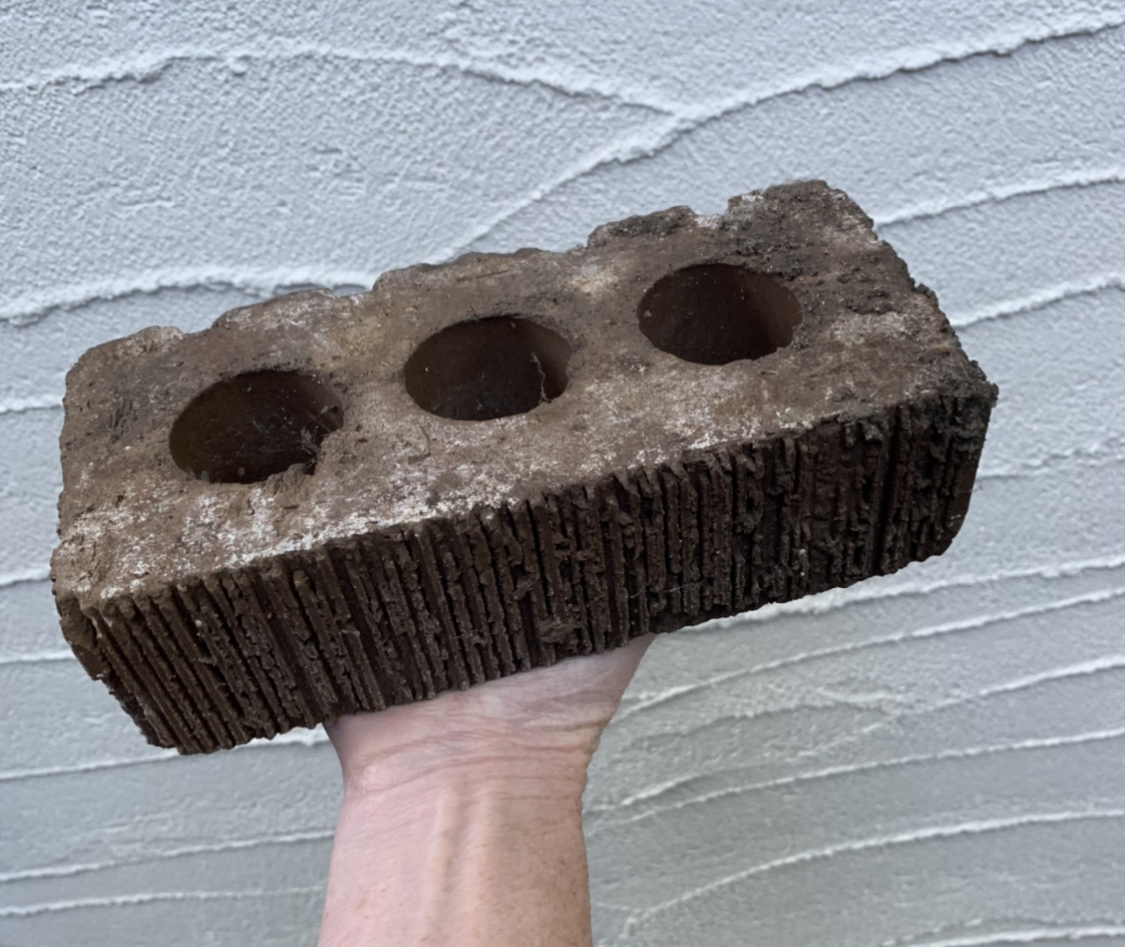
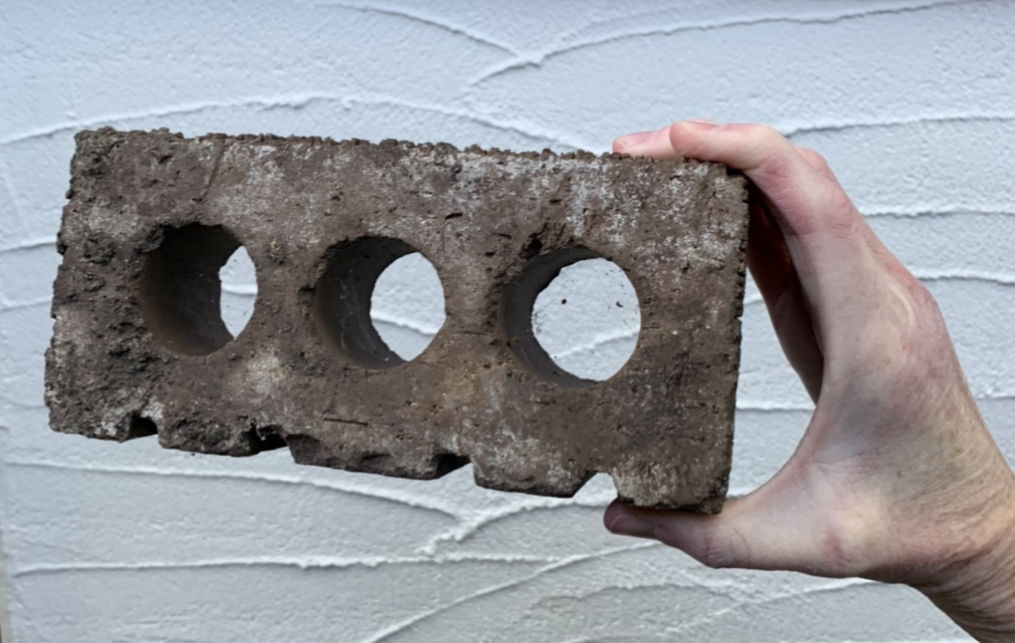
Or we spent the first decade of our life playing with the pallet of brick pavers our parents eventually, finally, paved the family home’s outdoor courtyard with. So some people probably imagine that all bricks are solid all the way through. However, today’s facing brick, the brick that is visible on a building, isn’t typically solid all the way through. A “solid” brick by today’s standards can have up to 25 percent of its cross-sectional area cored out or depressed.
Above and below: A facing brick with cores.
There are a few good reasons for voids such as cores, frogs (depressions), or cells. Compared to bricks that are completely solid, bricks with voids use less clay, can be fired in the kiln more evenly and quickly (using less energy), and are lighter-weight (easier to transport and to install). Voids also allow for mortar on more surface area of the brick, which helps all the bricks in the wall mechanically bond together better. In the case of cores and cells, mortar can continue through each brick from the mortar bed below to the mortar bed above, further strengthening the bonds between the individual components of the wall. (That’s what that cylinder of mortar is in the top photo – mortar continuing through cores in bricks from bed to core to bed to core. It is the stuff we are not meant to see – part of the magic of masonry walls.)
I guess one downside of a well-bonded wall such as the one in the top photo is that it’s harder to get a damaged brick (or 4 damaged bricks) out of the wall for replacement. I wonder exactly when this damage happened – before or after final completion – and why it wasn’t repaired.
When specifiers specify bricks, we indicate that bricks to be used in exposed conditions, such as at ends of window sills and ends of wall caps, are to be bricks without voids such as cores, frogs, and cells. Otherwise, voids in bricks are allowed, but the voids will not be visible in completed construction.
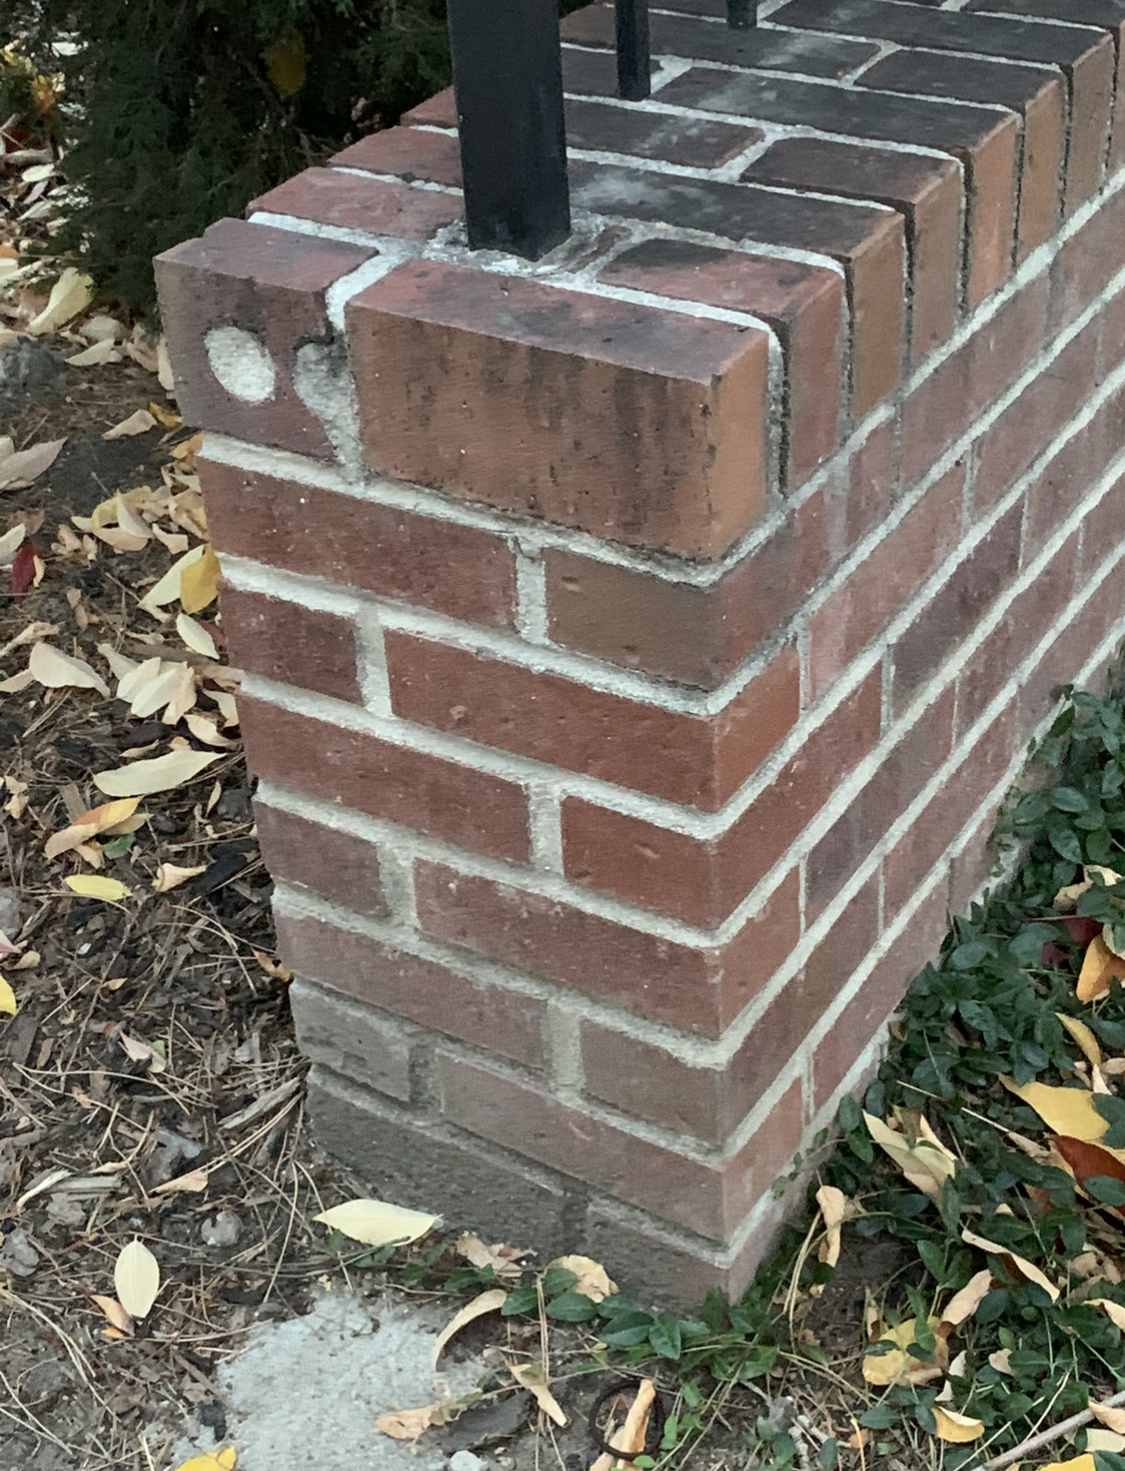
Sometimes damage happens, but at other times… well, someone didn’t think this through before ordering materials (photo of site wall cap, below). It’s not only when things fall apart that their insides are exposed. Some things just aren’t planned, detailed, or specified carefully. This isn’t magic revealed, it’s just a mistake that got built. Let’s try to do better.
Old brick site wall.
I’m just a brick lover, not a brick expert. The Brick Industry Association (BIA) has lots of useful information. Here’s the technical article that addresses some of these issues mentioned above.
I recently stayed at a historic hotel a few states away. It’s a very historic hotel – over 130 years old, and a designated historic landmark. The framing of the grand old building is all wood. I don’t know exactly what is under the finished floors in the guest rooms, but I do know that wood framing and wood subfloor are among the components in there.
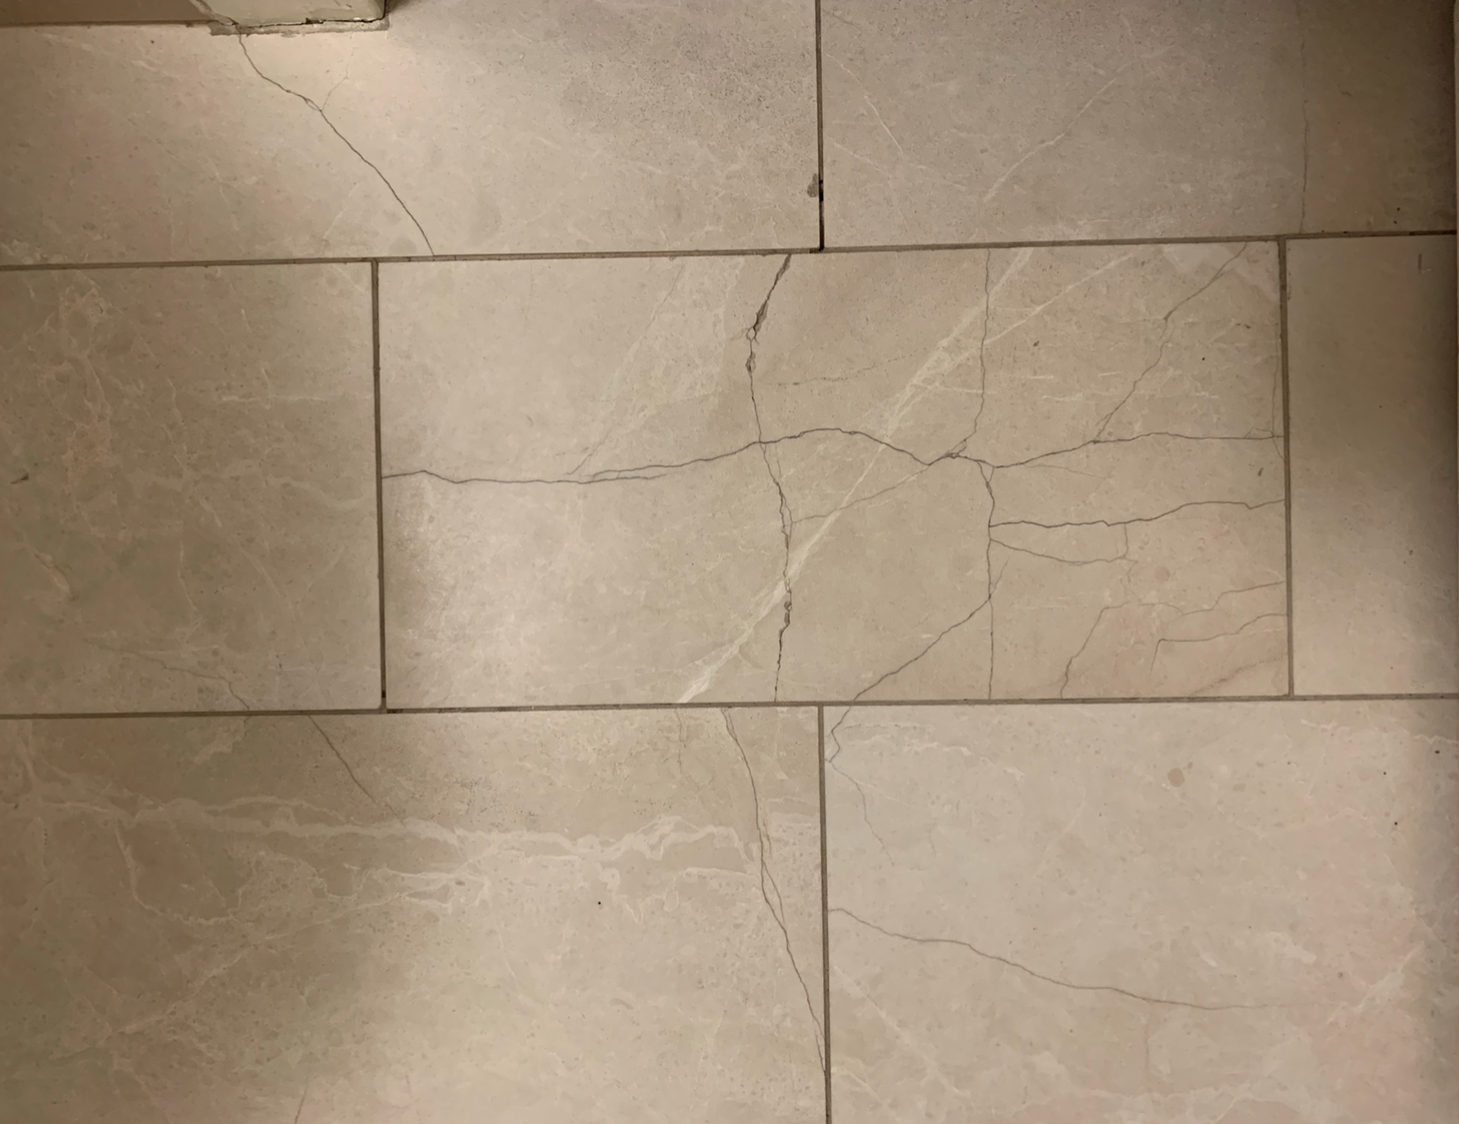
Our bathroom had large-format natural stone tile – about 12 inches by 24 inches – probably not “period” – and also not very old. Based on a few facts that I know from staying there several times over the last half century, and a long-held interest in the building, my best guess is that the large-format stone tile on our bathroom floor had been installed just over 15 years ago.
The stuff is thick – 3/8-inch to 1/2-inch thick, if the base and wall tile are the same as the floor tile – and it appears to be natural marble.
And it’s cracked, in multiple places. And multiple bathrooms on the same floor also have cracked floor tile.
Cracked large-format marble floor tile, hotel bathroom. Photo by Liz O’Sullivan
The stuff under this tile is probably the reason for the cracking. I’m not exactly sure what’s under there besides the wood framing and the wood subfloor, but one thing I do know for sure is that there is barely a single level or flat hallway floor or guest room floor in the hotel. More importantly, some of the floors feel a bit… flexible.
Levelness isn’t a big issue – tile can be installed on ramps, after all. (Our bathroom floor was a bit like a ramp, by the way, noticeably sloping from the door to the back wall. Ah, the charm of an old hotel.)
But my perception of flatness… that is an issue for the substrate under large-format tile. And the flexing in the floor that I felt when I walked down the hall or across my guest room? That is definitely not good under tile. This flexing is probably at the root of the cracking issue. Deflection is an important thing to address for floors which are to receive tile.
Now, I bet that some measures had been taken with the preparation of the substrates for tile so that they weren’t as flexible or unlevel as they are elsewhere in the building. The tile floors certainly didn’t feel flexible or unflat. But… those tiles cracked, after installation. So my guess is that the measures weren’t quite enough.
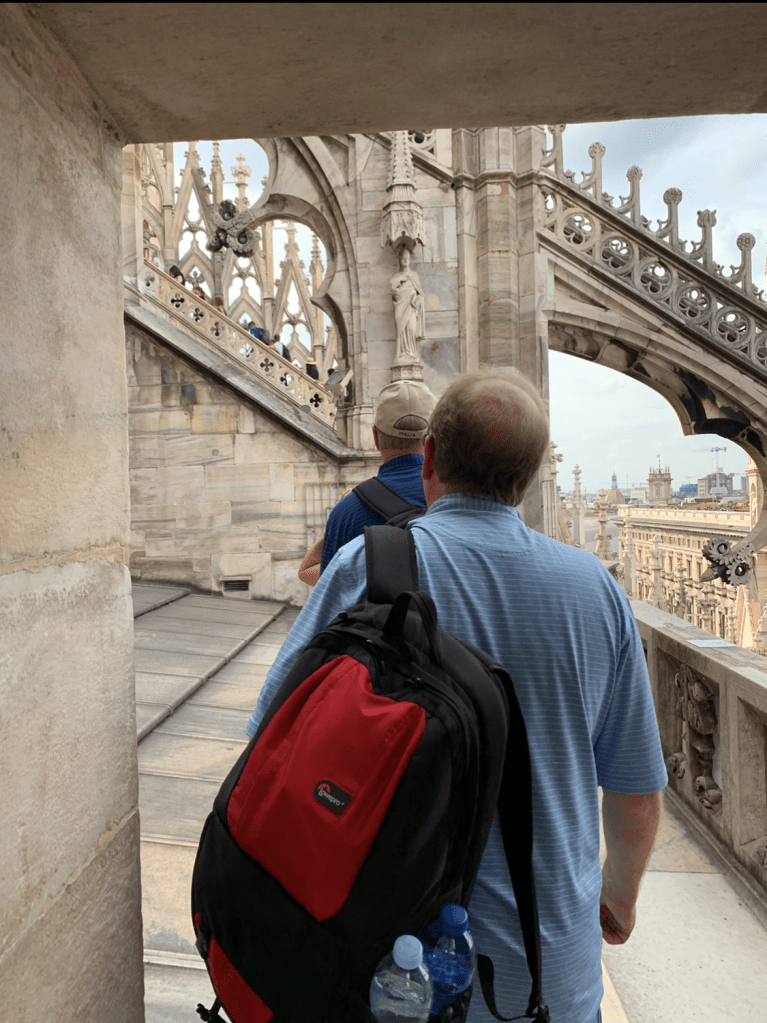
Obviously humans have been walking on marble for ages – even on thin marble such as tile. The astonishing roof terraces of the Duomo in Milan, Italy, are paved in marble, and any ambulatory person who can get up there (via elevator or stairs) can walk around the roof terraces, on the marble pavers, and even on the sloped marble roof tiles.
Duomo Roof Terraces, Milan, Italy, September 2019. Photos by Liz O’Sullivan
I don’t know what’s under the Duomo rooftop pavers and tiles. (Wouldn’t that be a fabulous tour – the attic of the Duomo?) But I do know that a different substrate installation than what is existing might have helped prevent the cracking of the hotel bathroom floor tile. And my opinion is that if the existing conditions were such that not enough could have been done to create an appropriate substrate for large-format natural stone tile, perhaps a different finish should have been selected for those hotel bathroom floors.
The construction industry has installation guidelines for so many parts of buildings. Manufacturers of specific products and assemblies have their own published installation instructions, and proper installation is often tied to warranty validity. For example, in many cases, an EPDM roofing installation must be done under certain weather conditions, must use specific products approved but not necessarily made by the EPDM manufacturer, and must be inspected by the EPDM manufacturer’s technical representative in order to get the specified warranty.
Building codes incorporate some standards into their requirements – in order to meet code, certain building products and assemblies must be installed according to certain published standards. For example, some building codes require that suspended acoustical panel (“acoustical tile”) ceilings are installed in accordance with the provisions of ASTM C636, Standard Practice for Installation of Metal Ceiling Suspension Systems for Acoustical Tile and Lay-In Panels.
Other building materials, such as lumber, plywood, brick, glass, and natural stone tile, don’t necessarily come with manufacturers’ installation instructions, and since there are many different ways that these materials are used in construction, building codes don’t necessarily govern their installation, either. But industry organizations have developed guidelines for the installation of these materials and so many more. There are at least two separate industry organizations who have developed some guidelines for the installation of natural stone floor tile. The Natural Stone Institute (formerly the Marble Institute of America) has some important guidelines in its Dimension Stone Design Manual.1 A publication by the Tile Council of North America, the TCNA Handbook for Ceramic, Glass, and Stone Tile Installation2 is referenced by the Dimension Stone Design Manual, and is also a very important stand-alone document. The TCNA Handbook has tile installations called out by alphanumeric designations that many people are familiar with – many tile setting and grout manufacturers refer to specific TCNA installations in their product info, and many specifiers use the TCNA designations in Tile Installation Schedules in the Tiling spec sections. Some architects and interior designers carefully refer to the TCNA Handbook when they’re figuring out the designs of tile installations.
But sometimes design professionals just don’t realize that there are industry-standard ways to install things. And then there’s the special condition of an existing, historic building – historic buildings certainly can be tricky. And sometimes the approach that makes the most sense is to work with what you have, and not do any invasive explorations to verify suitability of substrates for new installations. One problem with a project that involves nothing but updating interior finishes is that sometimes the design team is made up completely of people who are considering nothing but the surfaces, and the person selecting the floor tile may not realize that one floor tile is not necessarily interchangeable with another floor tile. Natural stone isn’t as strong as most ceramic tile. So a proper installation of natural stone floor tile requires a stiffer substrate (a substrate with less deflection) than an installation of ceramic floor tile requires.
Both the TCNA and the Natural Stone Institute address stiffness of subfloor for natural stone tile in their publications. For stone tile on wood subfloor without room for a thick mortar bed, TCNA calls for the joists to be no more than 16 inches on center, supporting the plywood subfloor, over which should be installed a plywood underlayment, then a backer board such as a cementitious backer board, then the stone tile. The Natural Stone Institute and the TCNA both call for stone tile subfloor areas in frame construction to have a deflection not exceeding L/720 of the span. There may be some wiggle room with some of the TCNA guidelines (joist spacing, backer board) when using certain uncoupling mats which have specific manufacturers’ installation instructions for the mat and the tile, but the 2 layers of plywood (subfloor plus underlayment) seem to be the best practice in all natural stone floor tile installations.
I’m not an authority on tile, or on the Milan Duomo – the point I’m trying to make with this blog post is that there are ways to design, detail, and specify, in our construction documents, the proper installation of most building materials, and this is not where a design professional’s creativity should take the lead. This is where the design professional’s technical side needs to be guiding the documentation. There are manufacturer requirements in some cases, building code requirements in some cases, and industry best practices in so many cases, including the case of natural stone tile. The designer should become familiar with these. Not all of this technical stuff can be taken care of with the project specifications – some of it needs to be shown in the drawings. Not all finishes can be applied or installed the same way as other finishes, even in a remodel, even when replacing (what-was-probably-small-ceramic) tile with (large-format-natural-stone) tile. When materials are designed and detailed properly in the drawings and specs to explicitly describe a correct installation, they’ll look as good decades later as they did immediately upon completion. (Maybe they’ll even still look good centuries later.)
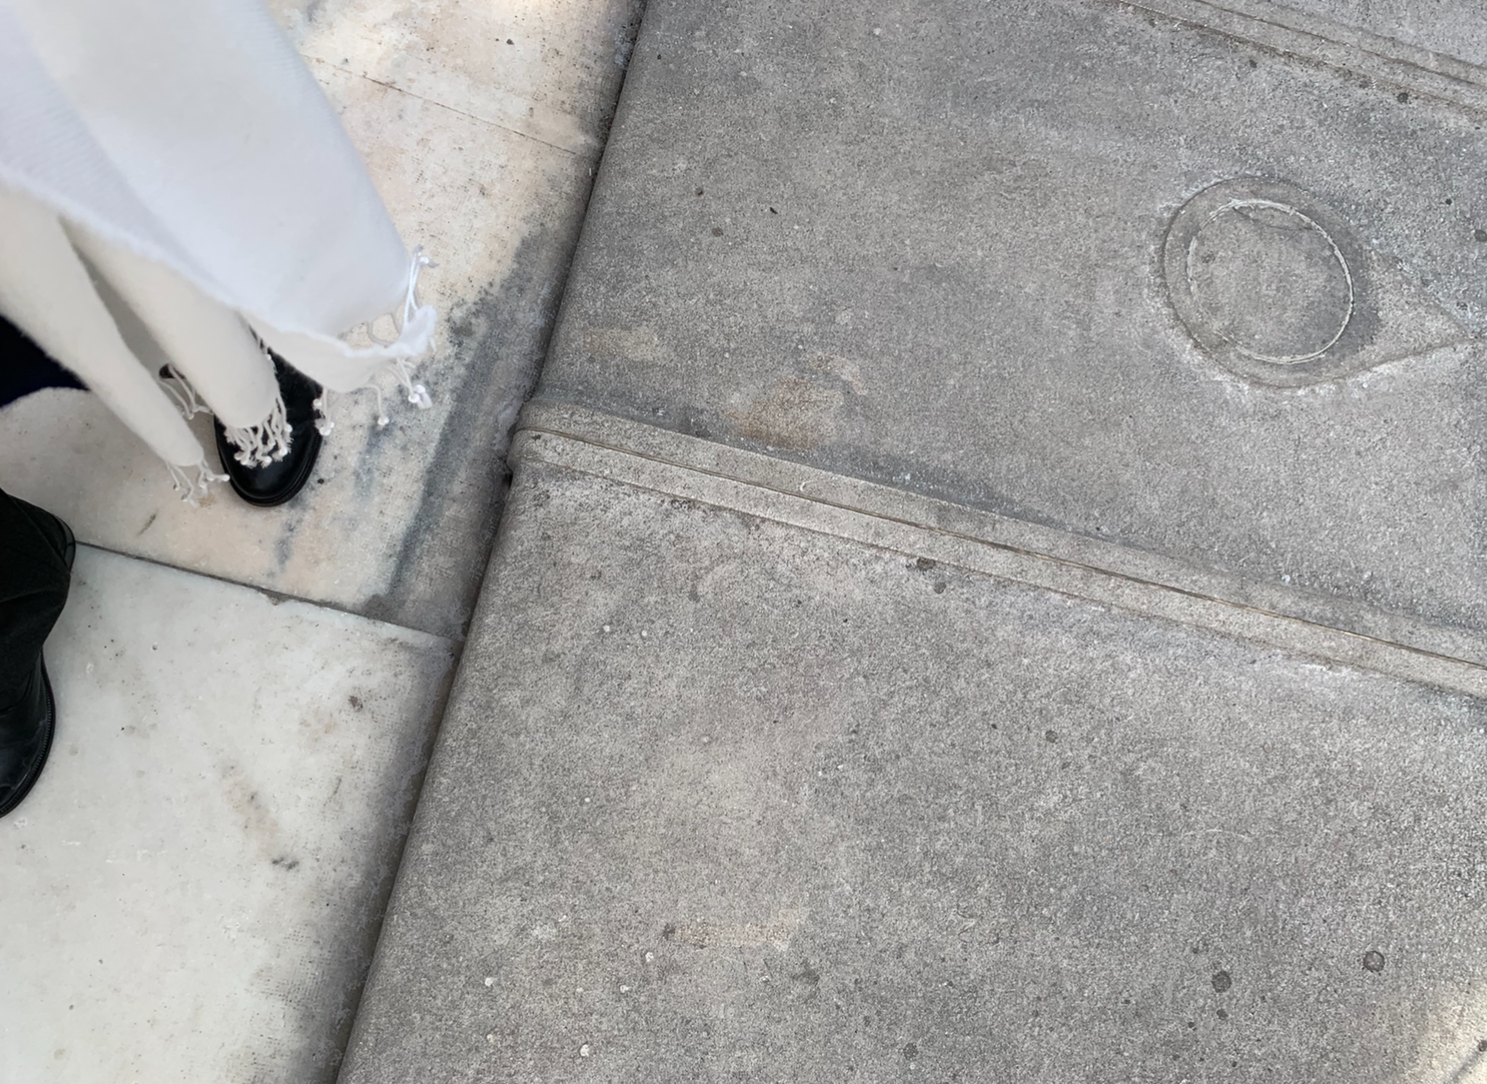
Duomo Roof Terraces, Milan, Italy, September 2019. Photo by Liz O’Sullivan
Marble roof paver on the left, marble roof tile on the right, Duomo Roof Terraces, Milan, Italy, September 2019. Photo by Liz O’Sullivan
Notes:
The Natural Stone Institute’s Dimension Stone Design Manual is on their website for free. You access one chapter at a time.
The TCNA Handbook for Ceramic, Glass, and Stone Tile Installation is updated every few years. It’s available for $50 on the TCNA website.
When I was in architecture school, people often talked about “building for 500 years.” The architecture program at my alma mater, the University of Notre Dame, is a classical program, steeped in the traditions of ancient Greece and Rome, so this timeframe is not a surprise. For the past 5 decades, all architecture students at Notre Dame have spent an entire school year in Rome, in the middle of their degree program, studying the city and its buildings. Rome is a fascinating city, with many ancient buildings, or at least parts of many ancient buildings, still intact, and in most cases still in use. Usually the buildings being reused have been adapted to be something other than what they were originally built for. A great example of this is the Theatre of Marcellus, built as an open air theatre similar to the Colosseum in ancient times, but then partly used for parts (stone) for other structures, then turned into a fort, then turned into a palazzo (a private palace), and then later turned into apartments. It continues to be used as apartments, and still includes parts of the ancient building. You can see parts of the building from different eras in the photo below (some ancient, some restoration of the ancient, and some of the newer apartments at the top).
Theatre of Marcellus, Rome, photo by Liz O’Sullivan
It’s mostly just an accident that buildings like this have lasted this long. I’m sure the builders of the original theatre didn’t envision it lasting over two millennia. But they used the construction materials, building methods, and knowledge they had – they didn’t have many choices. If they wanted something to last for more than a year, they pretty much had to build it in such a way that it might last thousands of years.
Here in the New World, up in the mountains in Colorado, we often see old miners’ cabins in various stages of deconstruction, decay, stabilization, or restoration.
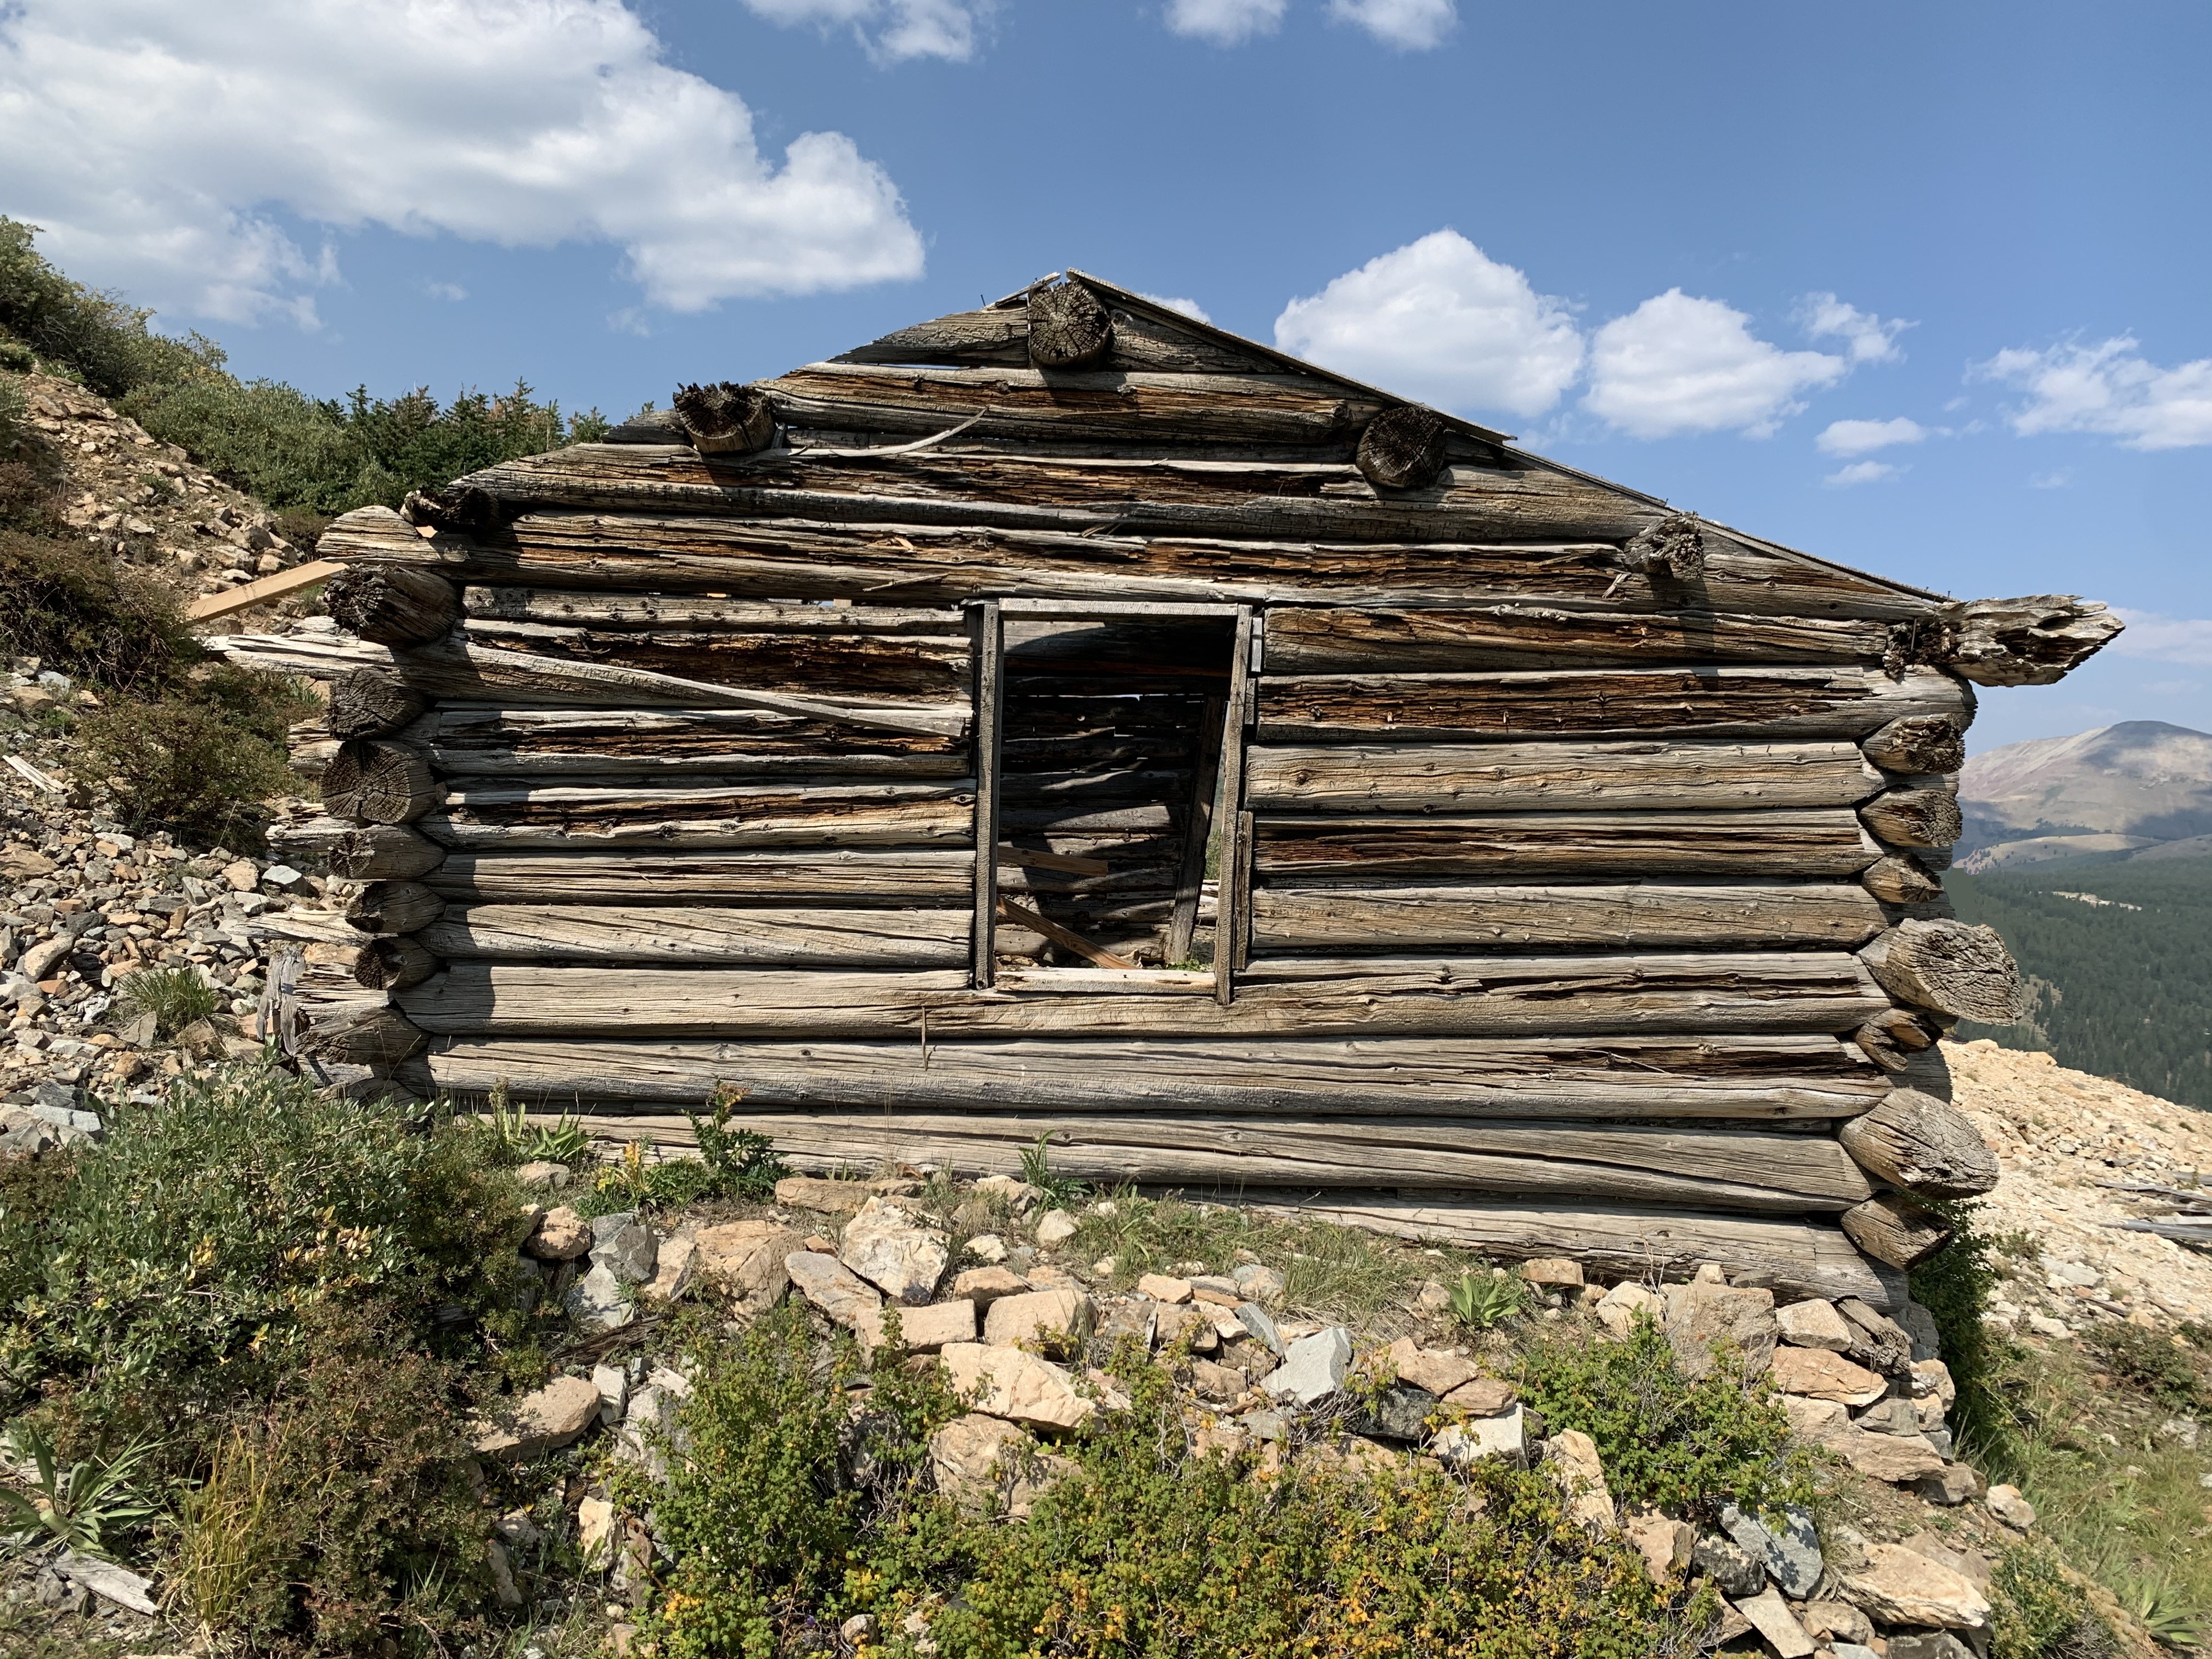
Miner’s Cabin, Colorado, photo by Liz O’Sullivan
A silver miner probably built the cabin in the photo above – silver mines operated near this cabin starting in the 1870’s – but the actual age of the cabin is unclear. It’s obviously no longer in use. It long ago outlived its usefulness in this terribly harsh spot over 12,000 feet above sea level, above treeline, directly below several 14,000 foot high mountain peaks, whose flanks still have old abandoned mines all over the place – yet the cabin remains. How long was this cabin supposed to last? We don’t know, but in order to build a habitable shelter that would withstand the fierce winds coming down from the mountain peaks, and the tremendous wintertime snow loads, for as long as the miner’s luck or determination held, the builder had to use materials accessible in this remote area (primarily evergreen trees cut from the forest nearby), and the available knowledge at the time. So it stands today, probably accidentally.
Today in most of the U.S. we have many choices of building materials and methods. Usually, the more durable and resilient materials are more expensive, so building owners who are building to hold for less than a decade are going to choose less-expensive materials so that they end up with buildings that serve them well, with little repair or expensive maintenance, for only as long as they intend to hold them. What happens next to the buildings doesn’t matter much to the first short-term owners. But owners who intend to hold buildings for the foreseeable future (maybe a university, a hospital, a public school, or a government) usually carefully consider and weigh the desired lifespan of the building, desired or budgeted maintenance and repair costs, and construction costs. Almost no one has an unlimited budget for construction costs, but some owners do have enough so that they can build in ways that most owners no longer build. Most people don’t pay for double-wythe clay masonry exterior walls as a general rule for institutional buildings, but at least one university that I know of has made this a standard for their campus in recent decades. Some owners only have enough construction budget to build their exterior walls with studs and OSB sheathing, even if their plan counts on the building’s lasting for more than 25 years. They just have to hope that no catastrophic water damage event occurs. In rising floodwaters, a building with an exterior wall assembly with less-durable or less-resilient materials that get soaked will fare much worse than a building with double-wythe clay masonry exterior walls, and may even have to be demolished well before the end of its originally-planned life.
Some old buildings accidentally ended up being long-lasting; some new buildings accidentally end up being temporary. Older methods of construction are more durable and resilient by default, and are more expensive. Some of our newer methods, which can pencil out to make more financial sense for an owner’s intentions for the building, cannot withstand some disasters, or even minor water damage over a long term, and buildings can end up being a total loss before their planned ends. What a waste, in the big picture.
But some buildings are actually meant to be truly temporary.
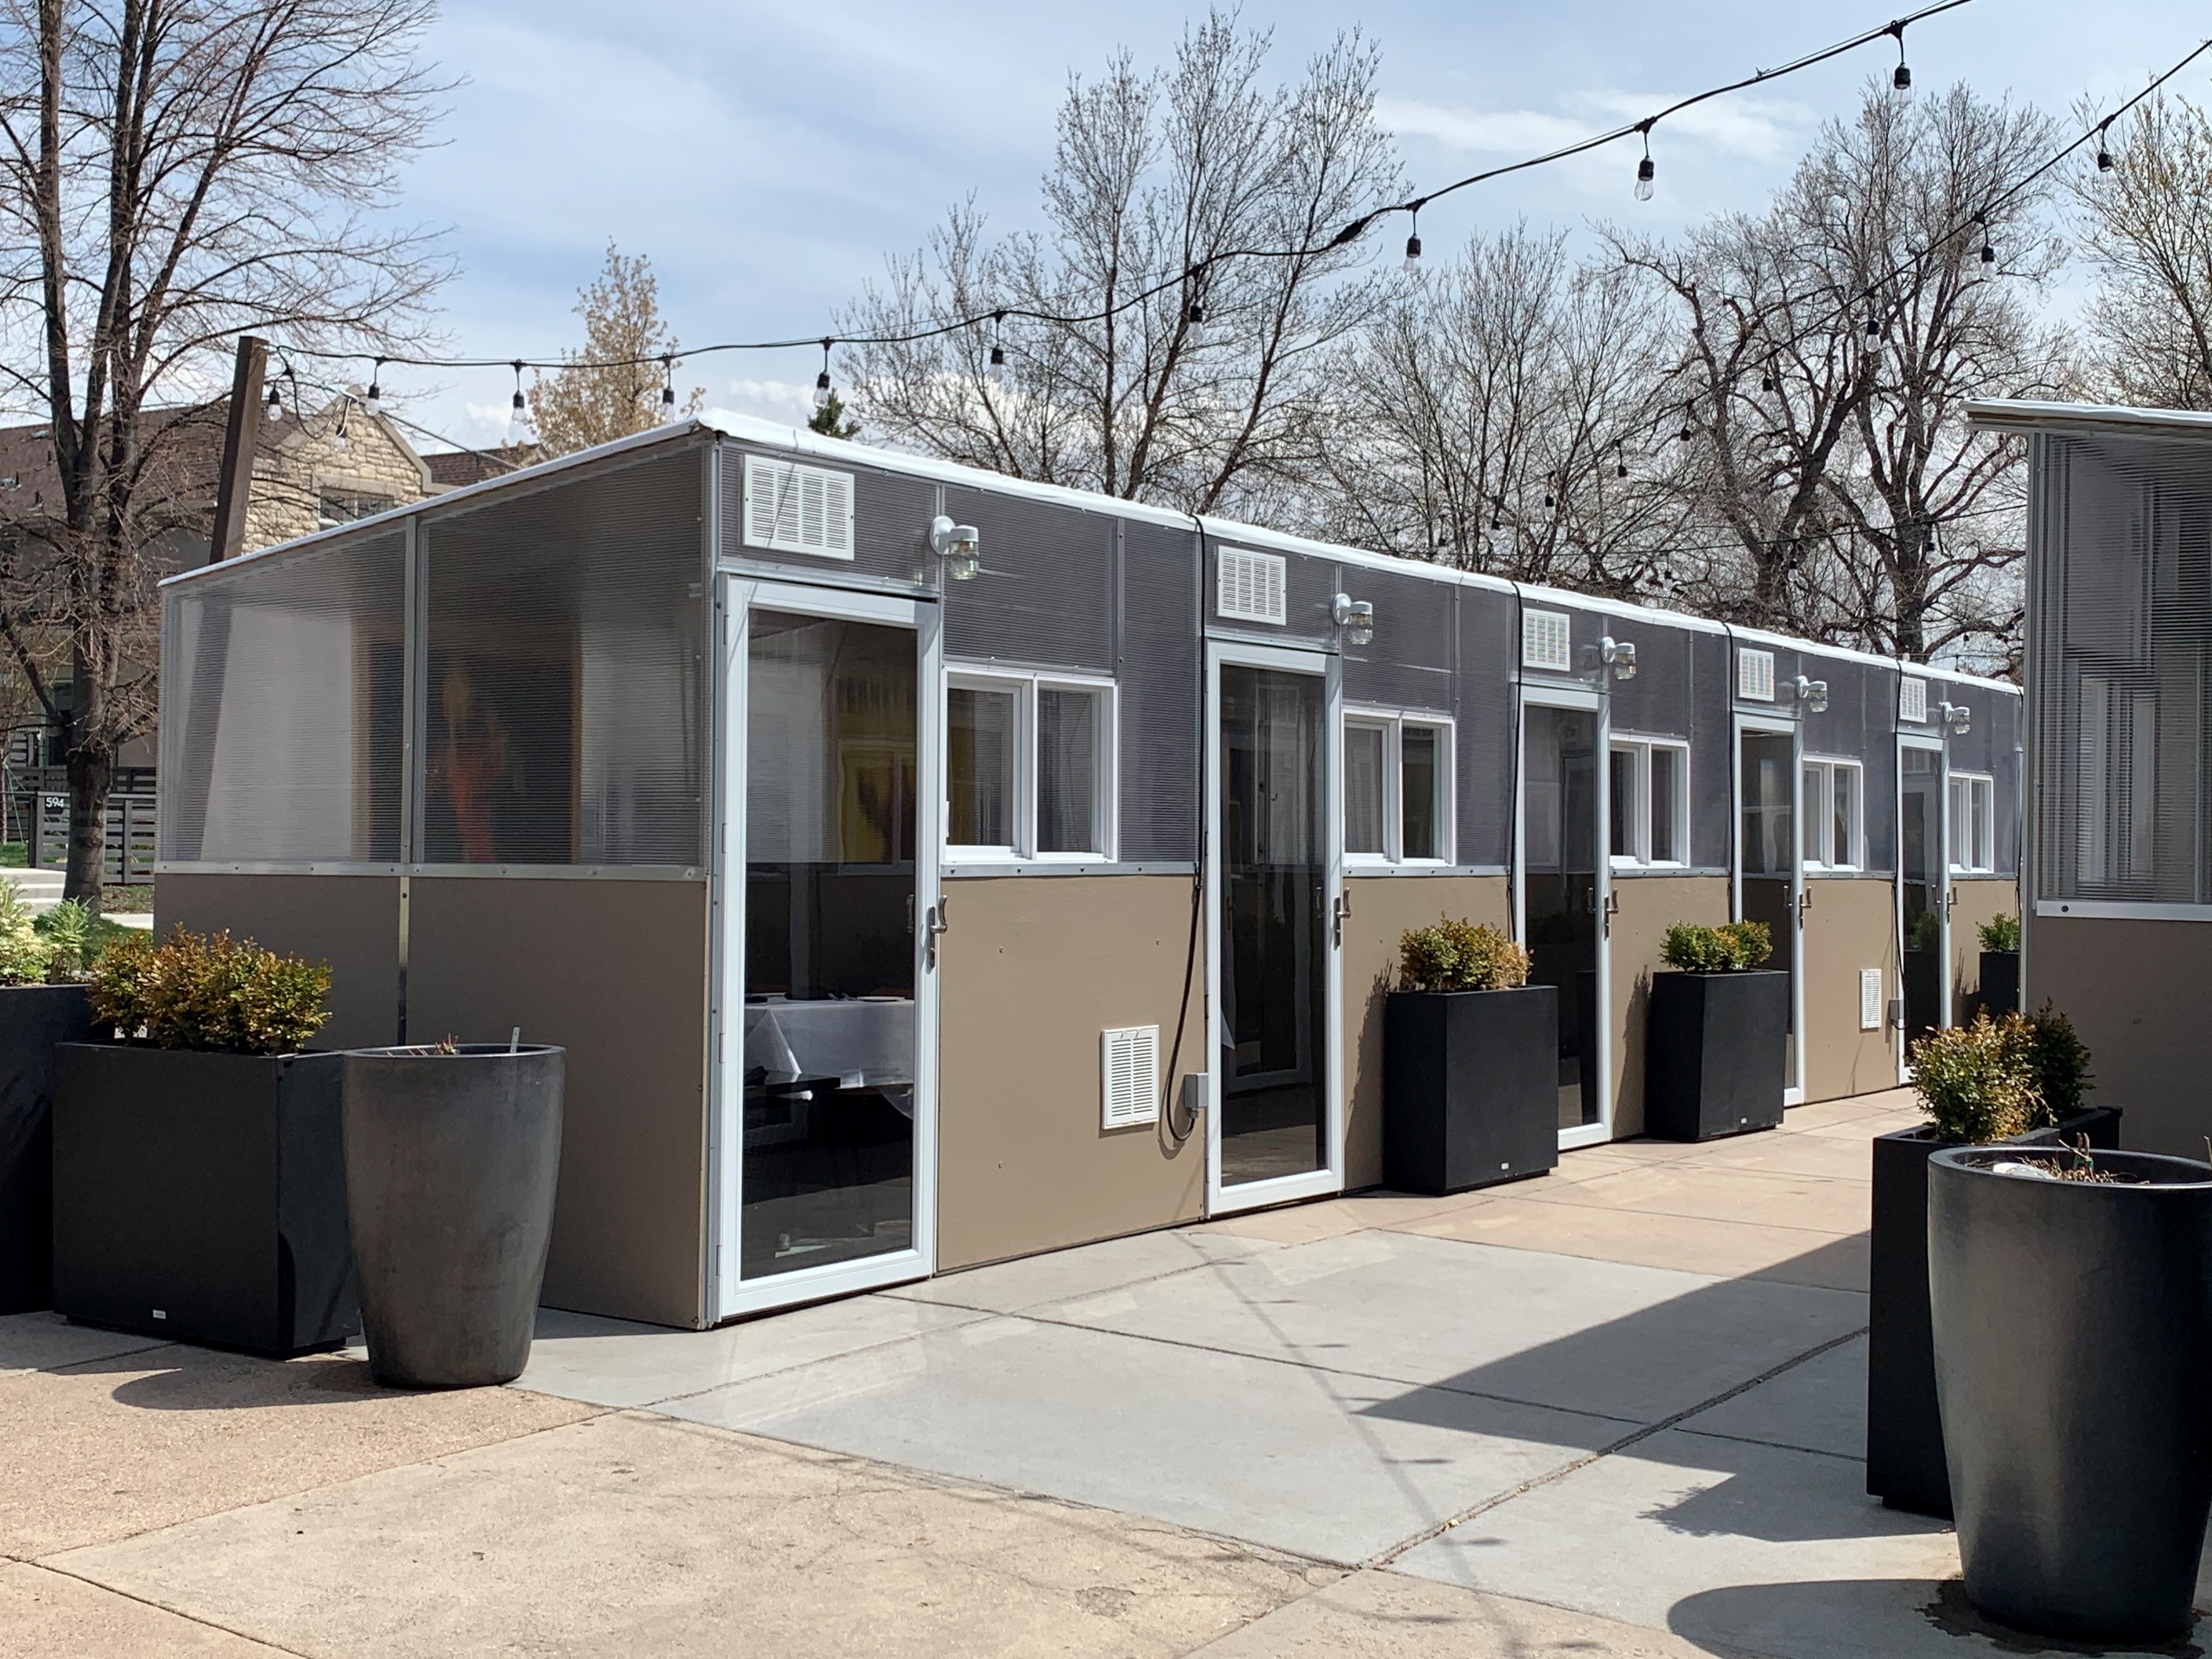
When Denver restaurants reopened after closing in the early days of Covid, they were allowed to apply for permits to expand seating into the right-of-way and parking lots. Denver has a sunny, dry climate, and if they can get it, restaurants have outdoor patio or sidewalk tables for diners – used almost all year round, even in winter, even when there is no pandemic, at sunny noontimes. We love to be outdoors. But it can get very, very cold in Denver in the fall, winter and spring. When Covid-19 combined with chilly weather, Denver saw a proliferation of small temporary buildings, set up on sidewalks, parking lots, and even streets near restaurants.
None of these temporary buildings is great. Many are small greenhouses with doors, repurposed to be tiny dining rooms with one table inside, scattered around parking lots or restaurant patios. Some are large event tents, set up on sidewalks or streets, with two ends open, and a mess of hoses, cables, and propane tanks to bring electricity and heat for a dozen tables of mostly-outdoor diners. Some are wood shed-type structures, with individual booths in partitioned areas under the roof, and curtains making up one wall. Denverites have been stepping over power cords on sidewalks and avoiding flapping plastic “walls” for months. The restauranteurs were lucky to get these structures – they quickly became hard to procure.
Last month, I ate inside at a restaurant for the first time in over 13 months, to celebrate my husband’s birthday. Well, we were inside, but technically we weren’t in the restaurant. We were in a very thoughtfully designed and constructed temporary “outdoor private bungalow” located on a before-times parking lot, 2 doors down from the restaurant. Instead of the quick-we-need-something-that-we-can-make-do-with approach that most restaurants seemed to take, this restaurant actually had their outdoor bungalows designed and constructed to fit their specific needs. The structures have no floors, but they have rugs. Ours was big enough for a table for 4, but didn’t feel too big for the 2 of us. Each structure has electric heating, nice lighting, a glass door on a closer, and a slider window next to the door. Interior wiring is concealed and thoughtfully routed, outdoor wiring and lighting were carefully installed. The bottoms of the walls are opaque, possibly fiber cement panels, the top parts of the walls are translucent polycarbonate. The roof, a white corrugated shed roof, drains thoughtfully. There are about 18 of these, most in rows of up to 6, with shared walls, in this parking lot.
Covid-Era Outdoor Dining Bungalows, Denver, photo by Liz O’Sullivan
How did one restaurant have such an ideal designed-to-order solution while others scrambled to make do with flimsy greenhouses or tents? Planning. If I recall correctly, this restaurant appeared to me to be late to the game of outdoor dining shelters – but now I know that was probably because they were planning and constructing, while others were popping ready-made things into place. In late September of 2020, the City of Denver announced that restaurants could apply to continue to operate in the public right-of-way or in parking lots through October 2021. So, that announcement set a lifespan of about a year for a temporary outdoor dining structure, one important known thing in a sea of unknowns. This restaurant has had a large following of loyal patrons for almost 3 decades. They kept up a curbside pickup program during the Covid-shutdown days. It’s located in a neighborhood where many people eat out many nights of the week and walk to their favorite restaurants. Employee turnover is low – servers work at the restaurant for years. So although no one could guarantee anything at any time during the early days of Covid, this restaurant is more stable than many, and was sure to have continued patronage at some minimum level.
The restaurant set some requirements for use of the “private bungalows” – reservations in advance, reservation deposits, fixed price 4-course menu only, and a strict 2-hour maximum use time limit, due to a neighborhood requirement that they close the outdoor dining at 10 pm on weekdays and 11 pm on weekends. This restaurant was able to determine some knowns on their own. But my guess is that the biggest piece of this puzzle had to be the permission to keep the outdoor dining bungalows erected through October 2021 – setting a lifespan. Presumably the restaurant could budget based on these things. (Knowing how much diners would spend, knowing the maximum amount of time they’d stay, knowing how long the private dining bungalows could stay in place.) The structures only have to be weathertight for a year. The windows and doors only have to operate smoothly and look good for a year. The thin solid walls only have to resist weathering and look okay for a year. In these very uncertain times, this restaurant was able to take the knowns set by the City, create some of their own knowns, and work with those to come up with a budget for their temporary structures.
Denver became full of temporary structures due to Covid. We have drive through tents and sheds for Covid testing set up in parking lots. There are hundreds of camping tents and tarps set up on unoccupied properties and the strip between sidewalk and street where increased numbers of people experiencing homelessness are living all over the city. Restaurants have the aforementioned strange little greenhouses for private outdoor dining. Our friends’ backyards began to include makeshift roofless enclosures around firepits for socially-distanced dead-of-winter small gatherings. As these things cropped up, I became interested in temporary structures in a way I never imagined I would. Mostly, I have wondered what will happen to the temporary structures when they are no longer needed, or when they start to fall apart. I’m always going to prefer that cities be filled with resilient long-lasting structures, but temporary buildings might continue to have their places in cities too – and these are better when they’re thoughtfully conceived and executed.
Water lapping at the first step of an entry, Doge’s Palace, Venice. This happens all the time, yet the centuries-old building, made of solid stone masonry, is still standing. Photo by Liz O’Sullivan
Some people are used to showing up in the wrong place, at the wrong time, with the wrong stuff.
Others of us double-check our calendars, recheck that voicemail, look up an address once again, and plan for extra time for bad traffic conditions, because we never want to show up at the wrong place, at the wrong time, or unprepared. Some of the double-checkers and planners hate to be late, can’t stand being wrong, don’t want to let anyone down, or fear looking unreliable. Others have busy lives like houses-of-cards, with multiple kids to get to multiple places, many work obligations, and unpredictable metro area traffic conditions. If one card slips, the whole house falls down.
Over the last 13 months, the double-checkers, along with just about every other human being on our planet, have been shown that no matter how carefully we plan, sometimes unpredictability is unavoidable. Since Covid-19 appeared, we have all learned what it’s like to be surprised by plans going awry.
Covid-19 has spawned many new obstacles, even for those of us who haven’t been affected health-wise. Traffic may not be much of a concern, but maybe we have to plan for extra time to wait in a line outside a grocery store until numbers of shoppers are low enough to be admitted. We’ve gotten used to waiting in a parking lot until enough patients have been brought in to exam rooms or dentist chairs before we can enter a building. We’ve had to reschedule doctor appointments because of stay-at-home orders, Covid-like symptoms, or because an office located in a hospital seemed unnecessarily risky to go to at certain times.
And the planners among us have learned that not all obstacles can be avoided. There’s not always a way around or forward or through. Most startling of all the revelations brought to light by Covid-19 is that there’s not always an immediately obvious treatment or cure for an illness, anywhere in the world, for any amount of money, even though every one of us is at risk.
But many obstacles in modern life can be anticipated.
In my work as an architectural specifications consultant, I don’t know when I started doing useful, organized planning things such as putting into my work calendar the day and time by which to expect deliverables from my architect-clients’ other consultants. I work on multiple projects at one time, and can’t keep all this in my head. I know for certain that this practice has headed off some potentially missed deadlines and has uncovered some schedule changes that I had not been informed about – preventing problems for my architect-clients, their other consultants, and myself, because I knew to follow up with people when when I had heard nothing by the time I was supposed to receive something.
I wasn’t born organized or proactive.
As a parent of two teenage boys, I’ve watched them learn, grow, and develop all their lives. This observation has cast a lot of light onto the development of my own planning and organizational abilities. I figured out some of my practices on my own, and some were suggested to me. Not much was taught – or it’s possible that I just refused to absorb the tips that may literally have been taught in high school when I was 13. Most people need a bit of experience and context in order to absorb the skills they are taught. For many people, those planning and organizing tips won’t really stick in the mind long enough to be put into practice if there’s no actual experience to associate them with – often some shortfall experience is required. I will never forget hearing my 16-year-old neighbor give a good idea to my son, who was 14 at the time and had forgotten his shin guards, about putting everything he needed to go in his soccer bag on top of the bag the night before, but waiting to actually pack until morning, so he knew exactly what was in there in the morning, and didn’t have to unpack to double-check. This approach works for me, too, but it took me decades to figure out on my own! But this boy’s mom is organized enough to teach her son how to organize himself – and to give the tip to others!
As a careful planner myself (now), I take every opportunity to point out organizational tips to my kids in the appropriate context. Being teenage boys, they don’t always take my suggestions to heart. This was most obvious during my proofreading of my older son’s multiple college applications. I lost track of how many times I told him to redo and reupload his resume because he kept missing one of several capitalization or punctuation errors I’d pointed out, and I kept finding them in the “final” versions of his applications. I’ve always been a proofreader, which not everyone can be, and I’m happy to fill that role for people in my family – but the people I do this for need to plan ahead and take into account the time this will take and the time to go back and fix things if errors are found – especially before those college application deadlines!
It may have taken me a while, but I know now that I need to ask for other consultants’ specs in time enough not just for me to compile everything into the project manual, but also in time enough for me to report back to them so they can redo and resend things if I notice problems that they didn’t catch before sending – like when “track changes” “all markup” was turned on when PDFs were made and they inadvertently sent me documents not suitable for issuing, or when filenames are somehow not matching the files and we end up short one spec section yet have a duplicate of another.
Age and experience have taught me that systems don’t always work properly, even in first-world countries, even at well-established institutions. But if we add routine double-checking and some schedule cushion to our practices, we can avoid some problems.
Well before those college application deadlines, but after my son had sent in college entrance exam results, transcripts, letters of recommendation, and applications, I encouraged (ok, nagged) him to check all his college application portals to make sure that everything that he’d sent was actually received. Almost everything was… but almost isn’t enough. My son was able to head off a problem by figuring out well ahead of time that his ACT scores never made it to one of the universities he sent them to, and he was able to resend the scores before the application deadline. He would have never known in advance that his good test scores never got there and that his application was incomplete if he hadn’t double-checked that application portal. I think he will remember this experience, and I hope that he develops into a planner and a double-checker.
Through experience, I have learned to always send a followup email, with no attachments, after I’ve sent an email with a large attachment. Project manuals can be massive PDF files, and sometimes emails with such attachments don’t make it to my architect-clients when I send them. I have learned that the absence of a notification that my email didn’t make it is not an assurance that my email made it. So I always send a followup email.
Some system breakdowns simply cannot be planned for or worked around. This has been made very clear to me in the Covid era. A call from school about a sick kid always makes parents jump up and drop what they are doing at work, but getting a call from school about a kid with Covid-19 symptoms who needs to be picked up and tested due to a past exposure at school even after a quarantine is a whole new level of unplanned obstacle. This is the stuff we just have to take a deep breath about. It’s not nearly as tragic or unexpected as an emergency such as a Covid infection, a car accident, or a death in the family, but for many people, unexpected things like this have happened so many times in the 13 months, and they simply can’t be planned for. This has been a year of taking many deep breaths.
If our way is blocked, due to an avalanche, a car pile-up, or unexpected road construction, are we simply stuck? Sometimes we are. We’ll have to wait and be late, or we’ll have to turn around and we won’t make it at all. But sometimes, maybe, if we had factored enough extra time into the schedule, we can sort out a way around when we encounter an obstacle. When it’s truly impossible, we just have to take a deep breath.
Sorting out the truly impossible from the obstacle that we just need to grit our teeth and muscle around is something that many of us have been figuring out over the last 13 months. Some of the people who are habitually late and unprepared truly have more obstacles in their paths than the rest of us, through no fault of their own. But some, like the kids and teens among them, and those of us who know that we can always be improving, could benefit greatly from some thought and tips on planning and organization. None of us is born with these abilities, and most of us don’t figure it all out quickly on our own. I’m still working on it… and working on taking deep breaths, when that’s truly the only thing that can be done.
Some of the lessons we learn most thoroughly come from mistakes we’ve made, or from finding out the consequences of actions we never considered before acting. For a specifier, these lessons hit hardest any time after bid opening, through the first few years of occupancy. (Anytime after pricing is set, or worse, after the building is built.) Sure, we research the things we specify, during the construction documents phase, but unless we’ve been given specific direction, we do our best, trying to keep in mind a general sense of the owner’s need for durability balanced with budget, and go with industry standards that align with those goals.
Discomfort sets in when we realize we need to research something further during construction, or after occupancy, because of a question from the architect. It means our work wasn’t quite right, or wasn’t written clearly enough. We need to follow through, follow up on the work we did, and make sure it was right, so the architect can defend it, or figure out what needs to change in order to make it right. Knowing exactly where and how something is being installed or used (once we’re in the construction phase) sure can illuminate the picture brightly, and let us know in which areas to focus our research. We often end up digging more deeply, because of the specific, now-more-clearly-defined, and now-critical, situation, and we end up learning stuff we’ll never forget.
In the last week I’ve had some good questions from some architect-clients: two questions about submittals. Nothing was wrong with the specified products, nothing was wrong with the specs, but there were some complicating factors that could have led to incorrect products being installed. These issues didn’t show up until the submittals came in during construction.
The most recent question came from the architect because the substrate indicated on the submittal for a type of coating was incorrectly listed. This raised some flags, so I looked into it deeply and realized that the manufacturer’s submittal sheet includes 2 different types of coatings, with very similar names, for various different types of substrates, on the same data sheet. The info I got from the architect indicated that the submittal didn’t use the full name of the product – just the words that were common to both of the different products on the datasheet! The incorrect product would have ended up on the building, if the contractor supplied the product most appropriate for the incorrectly-listed substrate. Lesson learned – I plan to always specify using the full name of a product to reduce the chances of a mistake such as could have happened on this project. The name of this product came from the owner and I didn’t change the way it was written. It was clear, but it could have been spelled out, to make it even more clear.
Another recent submittal question came about the specified thickness of sheet metal for a parapet coping. When I wrote the spec, I selected the default in the specification software I use. It turns out that the color of sheet metal we need isn’t available as standard in the thickness specified for the coping, although it is available as standard in all the other thicknesses of sheet metal specified for other uses. The architect asked why this sheet metal for coping was thicker. I wasn’t exactly sure… dug deep… and am now pretty sure that if this wide coping on this very visible sloped parapet were to be made of a thinner metal than specified, we’d see waviness, oil canning, sagging ugliness. Phew – a good lesson to learn, and just in time. Again, there was nothing wrong with the spec, but if I hadn’t been able to give the architect a good reason to ensure that the spec was complied with, it would have been much easier for the architect to allow thinner metal for the coping, and then we would have had a problem.
The chill that goes through me when I realize that I can’t answer a question about my work product immediately upon being asked is humbling. But no one, no one, could ever know enough about specs to know it all perfectly and thoroughly before ever starting out on the path of writing specs. And yes, the follow-through takes time. Following up on something that is brought to our attention well after we issued our documents requires shifting gears, jumping back to something we thought we were finished with, but we belatedly realize we weren’t. Specifiers must be lifelong learners, no matter how uncomfortable that is.
Some of the projects I work on experience many design changes between initial concept and completion of construction. On healthy projects, the most dramatic changes that I see occur after the schematic design phase, before the beginning of the construction documents phase. A few of these projects of mine have included “green roofs” (vegetated roofs) at the outset of the project. But those were gone before the construction documents phase started. I’m not sure who’s talking whom down from the roof, but it’s outta there, over and over again. Who brought the idea to the project? Was it just something that added a splash of color to the architect’s renderings? Had the owner always wanted to be able to walk in a garden while simultaneously enjoying a great view from a rooftop? Was everyone on board with a green roof until the contractor’s preliminary pricing came in?
Denver voters just passed the Green Roof Initiative last month, mandating vegetated roofs for certain buildings within the City limits. I wrote a commentary about this for the newsletter of our Denver Chapter of the Construction Specifications Institute. It includes a link to the text of the ordinance, and touches on the specifics of the initiative, some green roof risks for owners, and the loopholes in the ordinance. Here’s part of that:
“Denver voters faced Initiated Ordinance 300, the Denver Green Roof Initiative, in our recent election, and voted it in, by a small margin. What does this mean for building owners, developers, architects, engineers, contractors, roofing distributors and product representatives?” Continue reading…
Green roofs have benefits, mostly for the people who get to look out windows and see plants instead of roofing materials, but they can also mitigate urban heat island impacts, and help to improve the quality of stormwater before it hits municipal systems. Perhaps the most idealistic of the selling points made by the supporters of the Green Roof Initiative is the dream of rooftop urban farming. From the mission of the supporters: “Buildings are permitted to use the rooftop space for urban agriculture. This allows for the building to rent out their rooftop space to urban farmers who can then supply their goods around the city.” However, crops need a roof that meets more than just the minimum mandated by the ordinance. Here’s a basic overview of the 3 main types of green roofs. Some require beefier supporting structure, and more complex irrigation systems, than others.
Most owners who are merely looking to build a commercial building in the Denver area will do the minimum green roof, use a loophole to get out of building a green roof altogether, or build outside the City limits.
As I wrote in my commentary, “Building owners will have costs for their green roofs beyond the design and construction phases. They will have risks that owners without green roofs don’t have. Green roof plantings need to be maintained, cared for, and watered, forever. Insurance riders for green roofs will increase the costs of building insurance, but regular insurance policies usually exclude problems stemming from green roofs, so these will be necessary costs. Problems with the waterproofing components of green roof assemblies, discoverable only after moisture intrusion into buildings, are more difficult to diagnose and repair than problems with non-green-roof assemblies. Moisture intrusion is the most common cause of damage to buildings, and roofs are the parts of buildings that are most prone to moisture intrusion…”
Aesthetically, a green roofscape is a lovely goal for Denver, but building owners should not contribute to this blindly. They need to know what risks they are taking on. Sometimes people start projects without knowing a lot, then learn more as design goes on. (And then the green roofs on my projects aren’t there anymore.) In my work as a construction specifications consultant to architects, I expect to see a little bit more of the same pattern I’ve been seeing for my projects – green roofs that are there at schematic design, and gone before construction. Now you see ’em, now you don’t.
Are you designing for the function and performance of the building, or just doing some exterior decorating?
Funny things can happen early in design on a project, when an architect or interior designer makes color boards for the owner to make selections from, or to present to a municipality, or some other entity with authority, for approval.
It’s natural for interior construction products to be selected on the basis of color and appearance – color may be the driver that leads a designer to select the product, manufacturer, finish, and size. Performance is often not a big factor in the choice of interior finishes. For example, a specific color is desired for a conference room wet bar backsplash, to coordinate with a company’s logo colors. The material could be natural stone or metal or ceramic tile or epoxy paint… and then the perfect color is found in a ceramic tile. So that tile gets specified.
However, the performance and function of exterior materials is much more important than their colors. Appearance is important, of course, but the primary function of the walls and roof of a building is to keep water, snow, hot air, and cold air out of the building. Performance should be a primary factor in the choice of exterior materials. But sometimes the exterior components of a building get selected based nearly solely on color, too. Once in a while, by mistake, early in a project, exterior material design decisions are made without even an understanding of the way these materials will be attached to, or constructed as part of, the building. Thenthey get presented to the owner or authorities having jurisdiction, and it’s not until later that the team realizes the selected exterior materials won’t work.
I know this happens, because as a specifier, I’ve had some interesting experiences writing specifications based on the information I’ve been given by the architect for different exterior construction products, including fiber cement cladding, aluminum composite material panels, and aluminum windows. Sometimes, for these and other building envelope products, I’ve just been given the manufacturer’s name and the color – but not a product name. I’ve worked backwards from the color finish, and have narrowed my options down to the only product by that manufacturer that comes in that finish, and, viola, I have the product. Usually this is fine, but several times, I’ve ended up specifying a product that is nothing like what the architect thought it was. What happened was the architect selected the finish from the manufacturer’s available finishes, but didn’t check to make sure that the selected finish was available on a product that would work for the application. Then the team figured out later, after more detailed drawings had been developed, that that was not at all what was envisioned.
Few people pick a car to buy based solely on the colors available from a particular dealer or maker. Most people pick the general type of car model they want, maybe compare some different makes and models for performance, safety, and price, and then look at available colors last. Most buildings are meant to last longer than most cars – they certainly shouldn’t be designed with color foremost in mind. Performance and function of exterior materials need to be foremost in the mind of the designer of a building. Color selection should come after that.
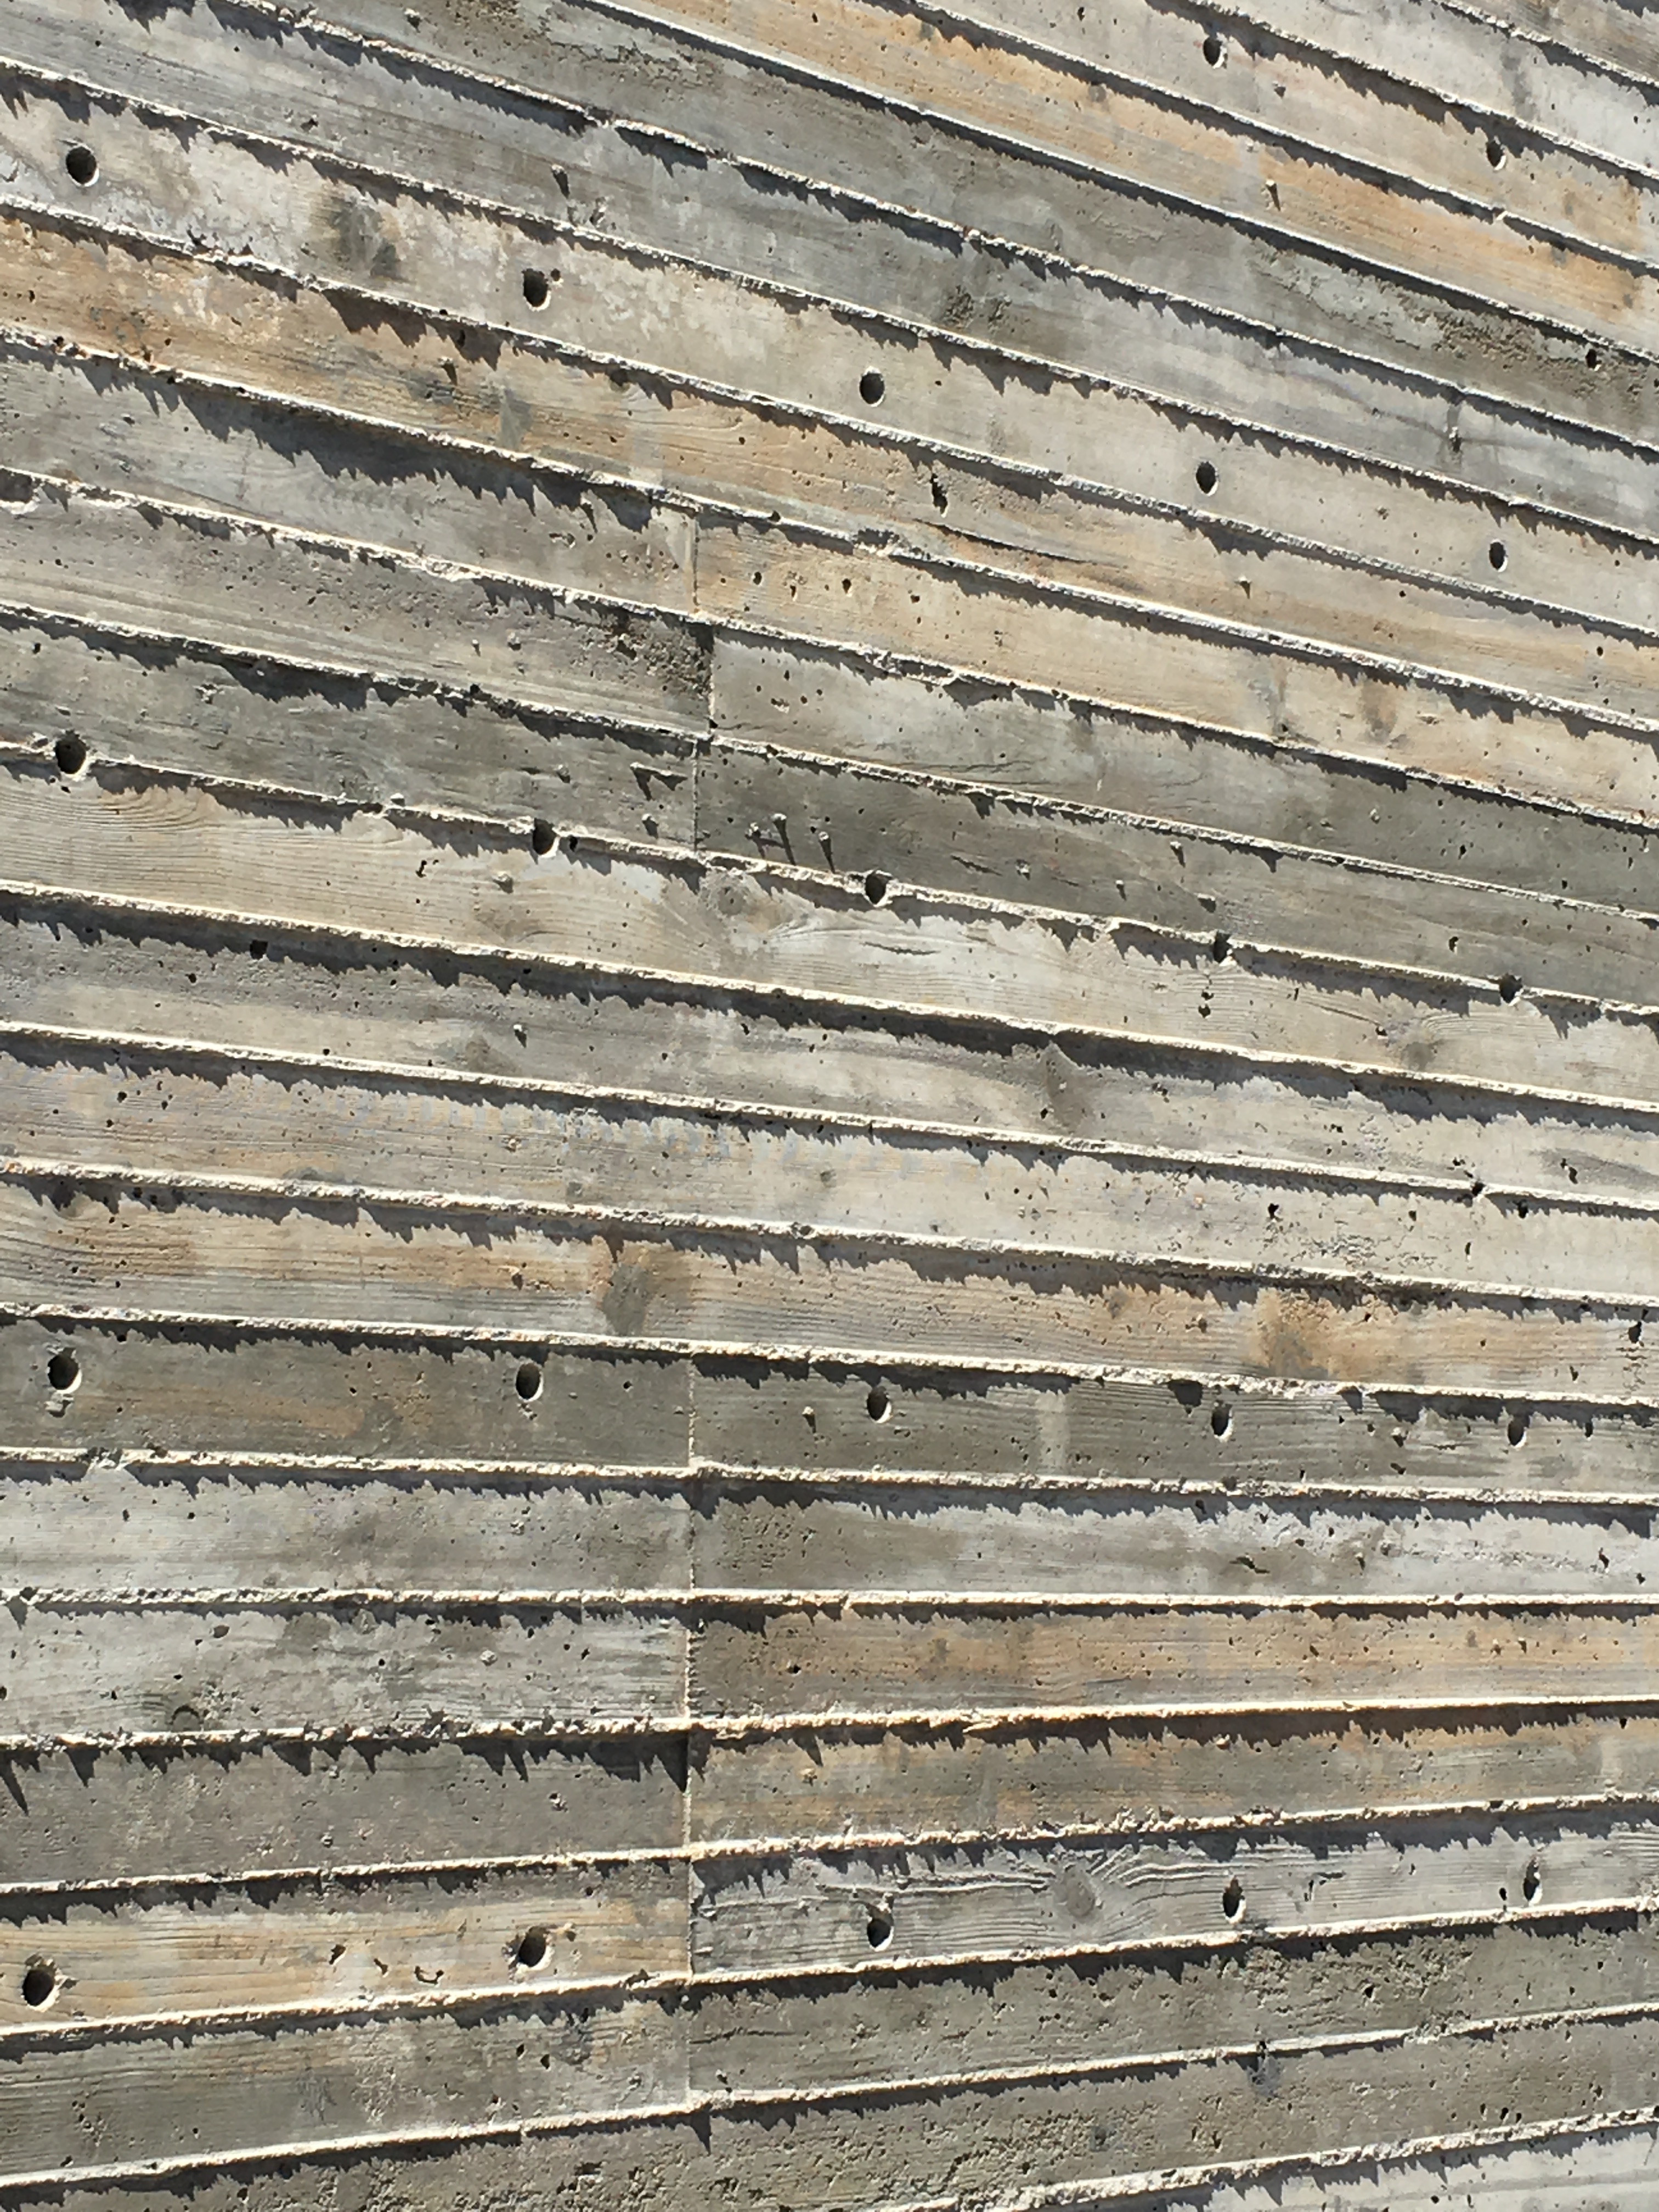
There was probably little room for design-team-confusion during the design and specification of the board-formed concrete wall in the photo above. However, most of our exterior construction products do not include their own structure, air/vapor/water barrier, and finish, all in one material, the way this concrete wall does. All of these functions need to be considered when selecting exterior materials. If the exterior finish can’t stand up without backup structure or substrate, but you’re just thinking about finish, you’re just decorating.
If you, the architect, are not designing for the function and performance of the building’s exterior materials, who do you think will do that, and when? This design work should be done by someone on the architect’s team, and should be done in conjunction with, if not before, exterior finish material selection.
I should mention that I did not coin the phrase “exterior decorating” myself. It’s a good one that I like to borrow.
The best way to learn how buildings get put together may be to build them, or to watch them be built. But another pretty good way to learn how things go together is to see them falling apart.
You may not ever notice the piece of clay tile that plugs up the bottom of a curved tile at the edge of the roof – but here, in the center of the photo below, it’s sliding out, so you see it, and this may make you curious.
Some people call these eave closure pieces “birdstops.” Some manufacturers provide such accessory pieces in metal. These, on an old house in Denver, are clay to match the roof tiles. Their purpose is to keep out weather, birds, and little four-legged critters.
Falling apart has an upside – we can learn how things are supposed to be put together.


 Learning isn’t always comfortable.

 Are you designing for the function and performance of the building, or just doing some exterior decorating?
